How To Mount Object Storage Container as File System on Windows VM on Creodias
This article covers configuring automatic mounting of object storage containers on Windows virtual machines running on Creodias cloud. Your object storage containers will be automatically mounted to your Windows VM and you will be able to access them from This PC window of the Administrator user on that VM.
What We Are Going To Cover
Entering the connection data
Performing a test mount
Finding the appropriate time to cache directory entries for
Setting automatic mounting for a container
Disabling the automatic mounting of a container
Prerequisites
No. 1 Account
You need a Creodias hosting account with access to the Horizon interface: https://horizon.cloudferro.com/auth/login/?next=/.
No. 2. Object storage container
You need at least one object storage container on the Creodias cloud. If you do not have one yet, please follow this article: How to use Object Storage on Creodias
No. 3. Generated EC2 Credentials
You need to generate EC2 credentials for your account. If you haven’t done that yet, please follow this article: How to generate and manage EC2 credentials on Creodias.
You will need to use the OpenStack CLI client to do that. The article linked above covers its installation on Linux. If you are a Windows user, please follow one of the articles linked below to install the OpenStack CLI client on Windows:
Then, adjust the instructions from the article How to generate and manage EC2 credentials on Creodias accordingly.
No. 4 Virtual machine with Windows
You need a Windows VM on Creodias cloud with Rclone, WinFSP and NSSM configured.
There are three methods of fulfilling this prerequisite:
- Method 1: Create a new Windows virtual machine
Currently available Windows images have appropriate software (Rclone, WinFSP, NSSM) already preinstalled.
Use article How to create new Linux VM in OpenStack Dashboard Horizon on Creodias as the basic blueprint for creation of an instance.
Apply the following changes to the procedure in that article:
For Source, use a Windows image.
For Networks, be sure to add two networks, one starting with cloud_ and the other starting with eodata_.
If you do not want to access your instance outside of the Horizon dashboard, you may omit the following from the workflow described in that article:
creation of a floating IP,
using the allow_ping_ssh_icmp_rdp security group as well as
the instructions regarding the SSH connection.
The instructions regarding SSH connection from that article do not apply to Windows VMs. Virtual machines with Windows are typically controlled using RDP. If you choose this method, you might want to consider using bastion host forwarding to secure your connection: Connecting to a Windows VM via RDP through a Linux Bastion Host port forwarding on Creodias
- Method 2: Use a virtual machine created using an image published on or after 20th of December 2022
If you already have a virtual machine created using an image published on or after 20th of December 2022, you should have appropriate software installed (unless a user later removed it). Therefore, you should be able to use one such machine for this article.
- Method 3: Use a machine created using an older image and install required software manually
If you have a virtual machine created using an image published before 20th of December 2022, you will need to install and configure appropriate software manually. Information on how to do it can be found in Method 1 of this article: Mount EODATA on a Windows virtual machine on Creodias hosting. If you do not want to have access to the EODATA repository on your virtual machine, you can finish following that article after having created Rclone configuration file in the Mounting EODATA section of that text (you do not need to add any content to it).
Software tools used in this article: Rclone, WinFSP, and NSSM
All the software used in this article comes preinstalled on Creodias virtual machines created using default Windows images.
Rclone has multiple functions such as managing files in cloud storage and syncing between file systems. In this article, you will use its rclone mount command to mount object storage on your Windows VM.
WinFSP enables accessing custom file systems on Microsoft Windows. In this workflow, it will allow Rclone to mount the S3 storage.
NSSM is a service manager. Here, it will be used for configuring automatic mounting of object storage. You will enter its GUI it from the command line.
How the Rclone configuration file will be used in this article
Virtual machines created using default Windows running on Creodias cloud have automatic mounting of the EODATA repository configured. This process is done using a script which creates the appropriate configuration file if it doesn’t exist and mounts the repository.
In this article, you will add the appropriate login credentials for your object storage containers to that configuration file. After that, using provided program called NSSM, you will create services which will automatically mount those object storage containers.
In the end, less than a minute after each login you should see the EODATA repository and your configured object storage containers ready to use in your This PC window.
Step 1: Enter the connection data
Login to the Administrator account on your virtual machine.
Navigate to the C:\Users\Administrator\.config\rclone folder using the Windows file manager. Open the file rclone.conf in that folder using Notepad or other plain text editor like Notepad++. If you do not see that file there, wait up to a couple of minutes and try again.
The file should already contain section used for accessing the EODATA repository:
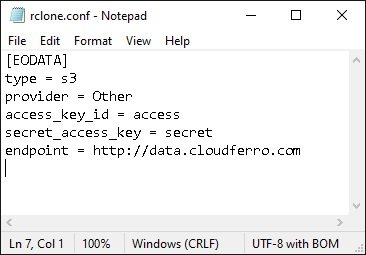
If you did not configure anything there yet, it will be empty.
Each section containing the object storage connection data starts with a line containing its name written in square brackets. In this case, such section will be used for connecting to all object storage containers stored in the same place using the same pair of EC2 credentials. If you intend to use object storage containers which have different credentials, each key pair will, however, need its own section similar to the one below.
Add the following section to the end of this file:
[remote-config]
type = s3
provider = Other
access_key_id = 1234
secret_access_key = 4321
endpoint = s3.waw4-1.cloudferro.com
[remote-config]
type = s3
provider = Other
access_key_id = 1234
secret_access_key = 4321
endpoint = s3.waw3-1.cloudferro.com
[remote-config]
type = s3
provider = Other
access_key_id = 1234
secret_access_key = 4321
endpoint = s3.waw3-2.cloudferro.com
[remote-config]
type = s3
provider = Other
access_key_id = 1234
secret_access_key = 4321
endpoint = s3.fra1-2.cloudferro.com
In the above block, replace 1234 and 4321 with the access and secret key you obtained while following Prerequisite No. 3, respectively.
If you want to use a different name for your connection than remote-config, replace it in the code above. This name does not have to be the same as the name of one of your containers.
If you want to use object storage containers from more than one key pair, create a separate section for each of them. Each section has to have a different name written in square brackets.
As stated previously, you do not need multiple sections for different object storage containers using the same key pair.
Save the file and close Notepad.
Step 2: Perform a test mount
You can now test the connection to your object storage container. Open PowerShell and navigate to the folder containing Rclone by executing the following command:
cd C:\rclone
In order to test the connection you configured, execute the command below. Replace remote-config with the name of the connection you just configured.
.\rclone.exe lsd remote-config:
You should see the list of object storage containers associated with your credentials, for example:
-1 2023-01-18 12:53:14        -1 second-test-container
-1 2023-01-16 13:23:03        -1 test-container
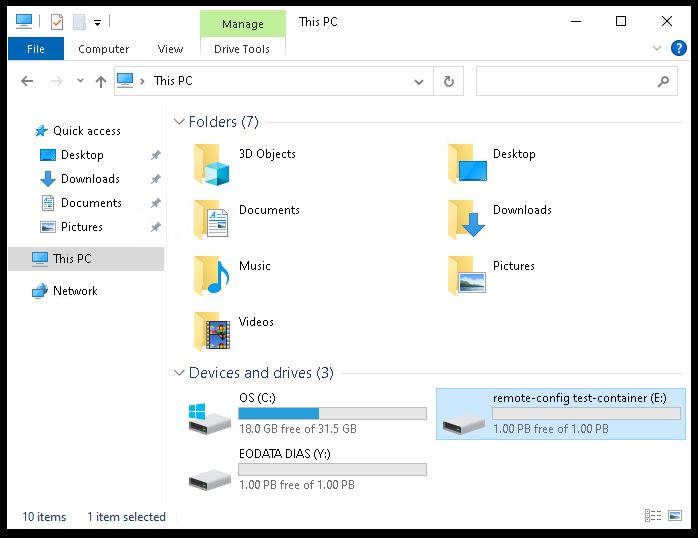
To test the mounting of one of your containers, execute the command below without leaving the PowerShell. Replace remote-config with the name of your connection, test-container with the name of your container and E: with the drive letter under which you wish to mount it.
.\rclone.exe mount remote-config:test-container E: --vfs-cache-mode full --dir-cache-time 1m0s
Warning
By default, EODATA repository is mounted on disk Y: so be sure to use some other letter for your drive.
The option in this command –vfs-cache-mode full should make the mount support standard file system operations.
The option –dir-cache-time 1m0s will be explained in the next step.
You should now get the following output:
The service rclone has been started.
Go to This PC window. You should see the mounted container there:
Enter it and you should see its content there:

To stop the test mount, press CTRL+C in the PowerShell. You should get the following output:
The service rclone has been stopped.
The container should no longer be visible in This PC window.
If pressing CTRL+C does not stop the test mount, make sure that the PowerShell window is focused by left-clicking it. Press a letter on your keyboard, for example A, and try pressing CTRL+C again.
You can perform test mounts for all object storage containers you wish to access on your virtual machine.
Do not close PowerShell yet.
Step 3: Tweak the –dir-cache-time option
In Step 2, you performed a test mount of your object storage container using the following command:
.\rclone.exe mount remote-config:test-container E: --vfs-cache-mode full --dir-cache-time 1m0s
Tweaking the option –dir-cache-time is important especially if you intend to use your container on multiple physical and/or virtual machines. This includes using the container on your virtual machine and the Horizon dashboard. You might discover that the changes made to the bucket on another computer do not appear on your Windows VM. Using the Refresh option of the Windows File Explorer might not synchronize that change either.
That is because the Refresh option in this case does not pull the changes directly from the container, but from the cache. If the option –dir-cache-time is not specified during mounting, the cache is automatically synchronized every 5 minutes. Therefore, if you for example change a name of the folder on your other device, you will be able to pull that change after up to about 5 minutes.
Specifying this option overwrites this default value of 5 minutes. In this example, the automatic refresh of cache was set to 1 minute (1m0s). It is also possible to set this value to for example 1 second (0m1s). You can replace 1m0s in the command above with the value of your choice.
You can now perform a few test mounts as explained in Step 2 and find the –dir-cache-time value that suits you.
Step 4: Configuring automatic mounting of your container
To configure automatic mounting of your drive after logging in to Windows, return to PowerShell.
While still in C:\rclone folder, execute the command below.
.\nssm.exe install
You should get the following window:
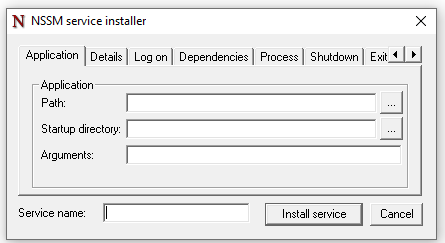
Click the … button next to the Path: text field.
Choose the location of Rclone. If you followed this tutorial, this location is as follows:
C:\rclone\rclone.exe
In the Arguments text field enter the following code. Replace remote-config with the name of your connection, test-container with the name of your container, E: with the drive letter under which you wish to mount it and 1m0s with the value you chose in Step 3.
mount remote-config:test-container E: --vfs-cache-mode full --dir-cache-time 1m0s
Warning
By default, EODATA repository is mounted on disk Y: so be sure to use some other letter for your drive.
In the text field Service name: enter the name for your mounting service. It can be different than the name of your connection you set in Step 1 and the name of your S3 container. In this example, the name mounting-service will be used.
Navigate to the Log on. Select the option This account:. In the text field next to that option enter Administrator. Enter the password for your Administrator account in the Password: and Confirm: text fields.
Click Install service.
Repeat the process for each object storage container you wish to have automatically mounted.
Restart your VM and check whether the drives gets automatically mounted in the This PC window. If it is, the service works as intended.
You should now be able to work with your files.
If you find yourself unable to delete files or folders on the object storage, you can remove them from the Object Store -> Containers option in the Horizon dashboard:

Disabling automatic mounting of a container
If you no longer wish to access a private object storage container on a particular virtual machine, you need to disable its mounting. Open PowerShell and execute the following command there to navigate to the C:\rclone directory:
cd C:\rclone
To check the status of your automatic mounting service, execute the command below. Replace mounting-service with the name of your automatic mounting service you set in Step 4.
.\nssm.exe status mounting-service
You should get the following output:
SERVICE_RUNNING
To stop the automatic mounting of your container, execute the command below. Replace mounting-service as previously.
.\nssm.exe stop mounting-service
Delete the service by executing the command below. Replace mounting-service as previously.
.\nssm.exe remove mounting-service confirm
You should now get the output similar to this:
Service "mounting-service" removed successfully!
Repeat the process for each container you no longer wish to be mounted.
Open the C:\Users\Administrator\.config\rclone.conf file using Notepad or other plain text editor and remove the lines responsible for mounting of object storage you no longer wish to be mounted.
Important
The instructions for stopping of automatic mounting of the EODATA repository can be found here: Mount EODATA on a Windows virtual machine on Creodias hosting.
What To Do Next
Object storage containers on the Creodias cloud can be mounted both on physical and virtual machines running Windows and Linux. To mount the object storage container on a different platform, please follow one of the articles below:
How to mount object storage container from Creodias as file system on local Windows computer
How to Mount Object Storage Container as a File System in Linux Using s3fs on Creodias
How to access private object storage using S3cmd or boto3 on Creodias