How to Mount Object Storage Container as a File System in Linux Using s3fs on Creodias
The following article covers mounting of object storage containers using s3fs on Linux. One of possible use cases is having easy access to content of such containers on different computers and virtual machines. For access, you can use your local Linux computer or virtual machines running on Creodias cloud. All users of the operating system should have read, write and execute privileges on contents of these containers.
What We Are Going To Cover
Installing s3fs
Creating a file containing login credentials
Creating a mounting point
Mounting the container using s3fs
Testing whether mounting was successful
Dismount a container
Configuring automatic mounting
Stopping automatic mounting of a container
Potential problems with the way s3fs handles objects
Prerequisites
No. 1 Account
You need a Creodias hosting account with access to the Horizon interface: https://horizon.cloudferro.com/auth/login/?next=/.
No. 2 Machine running Linux
You need a machine running Linux. It can be a virtual machine running on Creodias cloud or your local Linux computer.
This article was written for Ubuntu 22.04. If you are running a different distribution, adjust the commands from this article accordingly.
No. 3 Object storage container
You need at least one object storage container on Creodias cloud. The following article shows how to create one: How to use Object Storage on Creodias.
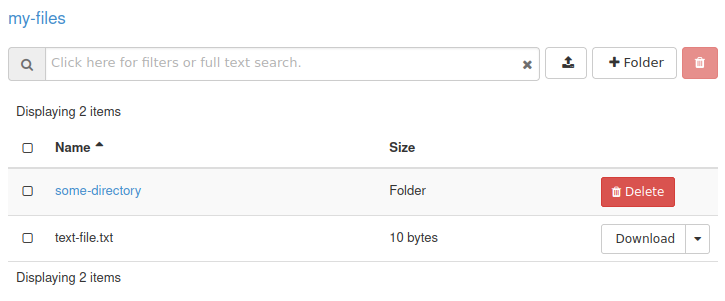
As a concrete example, let’s say that the container is named my-files and that it contains two items. This is what it could look like in the Horizon dashboard:
With the proper s3fs command from this article, you will be able to access that container remotely but through a local file system.
No. 4 Generated EC2 credentials
You need to have EC2 credentials for your object storage containers generated. The following article will tell you how to do it: How to generate and manage EC2 credentials on Creodias.
No. 5 Knowledge of the Linux command line
Basic knowledge of the Linux command line is required.
Step 1: Sign in to your Linux machine
Sign in to an Ubuntu account which has sudo privileges. If you are using SSH to connect to a virtual machine running on Creodias cloud, the username will likely be eouser.
Step 2: Install s3fs
First, check if s3fs is installed on your machine. Enter the following command in the terminal:
which s3fs
If s3fs is already installed, the output should contain its location, which could look like this:
/usr/local/bin/s3fs
If the output is empty, it probably means that s3fs is not installed. Update your packages and install s3fs using this command:
sudo apt update && sudo apt upgrade && sudo apt install s3fs
Step 3: Create file or files containing login credentials
In this article, we are going to use plain text files for storing S3 credentials - access and secret keys. (If you don’t have the credentials yet, follow Prerequisite No. 4.) Each file can store one such pair and can be used to mount all object storage containers to which that key pair provides access.
For each key pair you intend to use, create file name and a corresponding text file. The content of the file will be just one line,
starting with access key,
followed by a colon,
followed by a secret key
from that key pair. If the access key is 1234abcd and the secret key is 4321dcba, the corresponding text file should have the following content:
1234abcd:4321dcba
Change permissions of each file containing a key pair to 600. If such a file is called .passwd-s3fs and is stored in your home directory, the command for changing its permissions would be:
chmod 600 ~/.passwd-s3fs
Step 4: Create mount points
The files inside your object storage container should appear inside a folder of your choice. Such a folder will be called mount point in this article. You can use an empty folder from your file system for that purpose. You can also create new folder(s) to use as mount points.
To keep things tidy, let us use in this example a standard Linux folder called /mnt, which is what system administrators use to mount other file systems. For each container, use the usual mkdir command to create a subfolder of /mnt. For instance:
sudo mkdir /mnt/mount-point
Step 5: Mount a container
Here is a typical command to mount a container:
sudo s3fs my-files /mnt/mount-point -o passwd_file=~/.passwd-s3fs -o url=https://s3.waw4-1.cloudferro.com -o endpoint="default" -o use_path_request_style -o umask=0000 -o allow_other
sudo s3fs my-files /mnt/mount-point -o passwd_file=~/.passwd-s3fs -o url=https://s3.waw3-1.cloudferro.com -o endpoint="waw3-1" -o use_path_request_style -o umask=0000 -o allow_other
sudo s3fs my-files /mnt/mount-point -o passwd_file=~/.passwd-s3fs -o url=https://s3.waw3-2.cloudferro.com -o endpoint="default" -o use_path_request_style -o umask=0000 -o allow_other
sudo s3fs my-files /mnt/mount-point -o passwd_file=~/.passwd-s3fs -o url=https://s3.fra1-2.cloudferro.com -o endpoint="default" -o use_path_request_style -o umask=0000 -o allow_other
It goes without saying that you will need to change some of the parameters involved – but not all of them. Here is what to change and what to use as prescribed:
Edit container name and mount point
my-files is the name of the container
/mnt/mount-point is a directory in Linux file system which will be the mount point for that container
Edit key pair location (note it starts with -o)
-o passwd_file - location of the file with the key pair used for mounting that container
Do not edit the following parameters – just copy and paste verbatim
-o url - the endpoint URL address
-o endpoint - the S3 region
-o use_path_request_style - parameter that fixes issues with certain characters (such as dots)
-o umask - umask which describes permissions for accessing a container - in this case it is read, write and execute
-o allow_other - allows access to the container to all users on the system
Once you have executed the command, navigate to the directory in which you mounted the object storage container. If still using folder /mnt/mount-point, the command is:
cd /mnt/mount-point
List contents of the container and be ready to wait a couple of seconds for the operation to be completed:
ls
You should see files from your object storage container.
Suppose you mounted object storage container under /mnt/mount-point, which contains
a directory called some-directory and
a file named text-file.txt.
This is what executing the ls command from the mount point could produce:

To mount multiple containers, repeat the s3fs command with relevant parameters, as many times as needed.
Unmounting a container
To unmount a container, first make sure that the content of your object storage is not in use by any application on your system, including terminals and file managers. After that, execute the following command, replacing /mnt/mount-point with the mount point of your object storage container:
sudo umount -lf /mnt/mount-point
Configuring automatic mounting of your object storage
Here is how to configure automatic mounting of your object storage containers after system startup.
Check the location under which s3fs is installed on your system:
which s3fs
The output should contain the full location of the s3fs binary on your system. On Ubuntu virtual machines created using default images on Creodias cloud, it will likely be:
/usr/local/bin/s3fs
Memorize or write it somewhere down, you will need it later.
Open the file /etc/fstab for editing. You will need sudo permissions for that. For example, if you wish to use nano for this purpose, execute the following command:
sudo nano /etc/fstab
Append the following line to it:
/usr/local/bin/s3fs#my-files /mnt/mount-point fuse passwd_file=/home/eouser/.passwd-s3fs,_netdev,allow_other,use_path_request_style,uid=0,umask=0000,mp_umask=0000,gid=0,url=https://s3.waw4-1.cloudferro.com,endpoint=default 0 0
/usr/local/bin/s3fs#my-files /mnt/mount-point fuse passwd_file=/home/eouser/.passwd-s3fs,_netdev,allow_other,use_path_request_style,uid=0,umask=0000,mp_umask=0000,gid=0,url=https://s3.waw3-1.cloudferro.com,endpoint=waw3-1 0 0
/usr/local/bin/s3fs#my-files /mnt/mount-point fuse passwd_file=/home/eouser/.passwd-s3fs,_netdev,allow_other,use_path_request_style,uid=0,umask=0000,mp_umask=0000,gid=0,url=https://s3.waw3-2.cloudferro.com,endpoint=default 0 0
/usr/local/bin/s3fs#my-files /mnt/mount-point fuse passwd_file=/home/eouser/.passwd-s3fs,_netdev,allow_other,use_path_request_style,uid=0,umask=0000,mp_umask=0000,gid=0,url=https://s3.fra1-2.cloudferro.com,endpoint=default 0 0
Replace the parameters from that line as follows:
/usr/local/bin/s3fs with the full location of s3fs binary you obtained previously
my-files with the name of your object storage container
/mnt/mount-point with the full location of the directory which you chose as a mount point
/home/eouser/.passwd-s3fs with the full location of the file containing the key pair used to access your object storage container created in Step 3
Append such a line for every container you wish to have automatically mounted.
Reboot your VM and check whether the mounting was successful by navigating to each mount point and making sure that the files from those object storage containers are there.
Stopping automatic mounting of a container
If you no longer want your containers to be automatically mounted, first make sure that each of them is not in use by any application on your system, including terminals and file managers.
After that, unmount each container you wish to stop from automatic mounting. Execute the following command - replace /mnt/mount-point with the mount point of your first container - and repeat it for every other such container, if applicable.
sudo umount /mnt/mount-point
Finally, modify the /etc/fstab file.
To do that, open that file in your favorite text editor with sudo. If your favorite text editor is nano, use this command:
sudo nano /etc/fstab
Remove the lines responsible for automatic mounting of containers you no longer want to be automatically mounted. If you followed this article, these lines were added while following its Step 6.
Save the file and exit the text editor.
You can now reboot your virtual machine to check if the containers are indeed no longer being mounted.
Potential problems with the way s3fs handles objects
s3fs attempts to translate object storage to a file system and most of the time is successful. However, sometimes it might not be possible. One of potential problems with s3fs comes from the fact that object storage allows a folder and file to share the same name in the same location, which is outright impossible in normal operating systems.
Here is a situation from the Horizon dashboard:
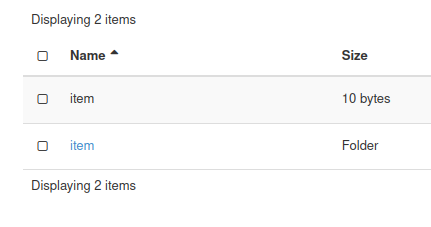
The first row contains an object named item, with size of 10 bytes. The second row has the object called item labeled in blue color, described as a folder. Both the “file” and the “folder” are represented in Horizon to look like regular file and regular folder from Linux or Windows – except that they are not. In S3 terminology, the former is an object with the name ending in item, while the latter is an object with the name ending in item/ (note it is ending with a slash). Since their names are different, they can coexist in object store based on S3 standard.
When above mentioned location is accessed by s3fs, the ls command will return only the folder:

To prevent this issue, invent and use consistent file system conventions while utilizing object storage.
Another potential problem is that some changes to the object storage might not be immediately visible in file system created by s3fs. Wait a bit and double check to see whether that is the case.
What To Do Next
You can also access object storage from Creodias without mounting it as a file system.
Check the following articles for more information: