Backup of Kubernetes Cluster using Velero
What is Velero
Velero is the official open source project from VMware. It can back up all Kubernetes API objects and persistent volumes from the cluster on which it is installed. Backed up objects can be restored on the same cluster, or on a new one. Using a package like Velero is essential for any serious development in the Kubernetes cluster.
In essence, you create object store under OpenStack, either using Horizon or Swift module of openstack command and then save cluster state into it. Restoring is the same in reverse – read from that object store and save it to a Kubernetes cluster.
Velero has its own CLI command system so it is possible to automate creation of backups using cron jobs.
What We Are Going To Cover
Getting EC2 Client Credentials
Adjusting “values.yaml”, the configuration file
Creating namespace called velero for precise access to the Kubernetes cluster
Installing Velero with a Helm chart
Installing and deleting backups using Velero
Example 1 Basics of Restoring an Application
Example 2 Snapshot of Restoring an Application
Prerequisites
No. 1 Hosting
You need a Creodias hosting account with Horizon interface https://horizon.cloudferro.com/auth/login/?next=/.
The resources that you require and use will reflect on the state of your account wallet. Check your account statistics at https://new.cloudferro.com/.
No. 2 How to Access Kubernetes cluster post-deployment
We shall also assume that you have one or more Kubernetes clusters ready and accessible via a kubectl command:
How To Access Kubernetes Cluster Post Deployment Using Kubectl On Creodias OpenStack Magnum
The result of that article will be setting up of system variable KUBECONFIG, which points to the configuration file for access to the Kubernetes cloud. A typical command will be:
export KUBECONFIG=/home/username/Desktop/kubernetes/k8sdir/config
In case this is the first time you are using that particular config file, make it more secure by executing the following command as well:
chmod 600 /home/username/Desktop/kubernetes/k8sdir/config
No. 3 Handling Helm
To install Velero, we shall use Helm:
Deploying Helm Charts on Magnum Kubernetes Clusters on Creodias .
No. 4 An object storage S3 bucket available
To create one, you can access object storage with Horizon interface or CLI.
- Horizon commands
- CLI
You can also use command such as
openstack container
to work with object storage. For more information see How to access object storage using OpenStack CLI on Creodias
Either way, we shall assume that there is a container called “bucketnew”:
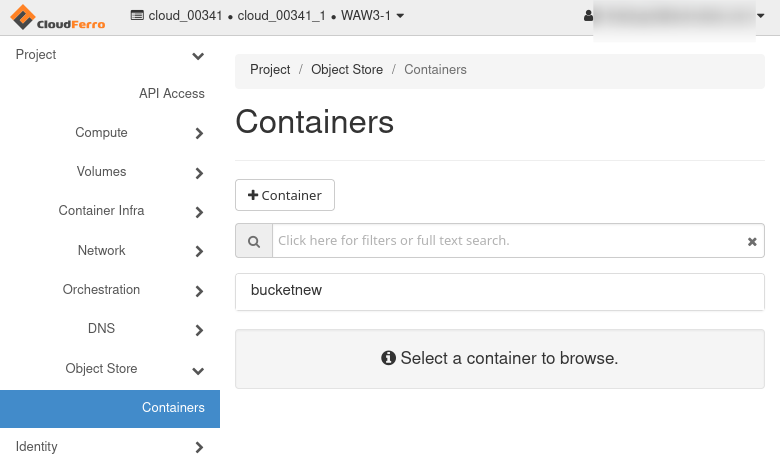
Supply your own unique name while working through this article.
Before Installing Velero
We shall install Velero on Ubuntu 22.04; using other Linux distributions would be similar.
Update and upgrade your Ubuntu environment:
sudo apt update && sudo apt upgrade
It will be necessary to have access to a Kubernetes cluster, v1.16 or later, with DNS and container networking enabled. For more information on supported Kubernetes versions, see Velero compatibility matrix.
Installation step 1 Getting EC2 client credentials
First fetch EC2 credentials from OpenStack. They are necessary to access private bucket (container). Generate them on your own by executing the following commands:
openstack ec2 credentials create
openstack ec2 credentials list
Save somewhere the Access Key and the Secret Key. They will be needed in the next step, in which you set up a Velero configuration file.
Installation step 2 Adjust the configuration file - “values.yaml”
Now create or adjust a configuration file for Velero. Use text editor of your choice to create that file. On MacOS or Linux, for example, you can use nano, like this:
sudo nano values.yaml
Use configuration file provided below. Fill in the required fields, which are marked with ##:
values.yaml
initContainers:
- name: velero-plugin-for-aws
  image: velero/velero-plugin-for-aws:v1.4.0
  imagePullPolicy: IfNotPresent
  volumeMounts:
    - mountPath: /target
      name: plugins

configuration:
  provider: aws
  backupStorageLocation:
    provider: aws
    name: ## enter name of backup storage location (could be anything)
    bucket: ## enter name of bucket created in openstack
    default: true
    config:
      region: default
      s3ForcePathStyle: true
      s3Url: ## enter URL of object storage (for example "https://s3.waw4-1.cloudferro.com")
credentials:
  secretContents: ## enter access and secret key to ec2 bucket. This configuration will create kubernetes secret.
    cloud: |
      [default]
      aws_access_key_id=
      aws_secret_access_key=
  ##existingSecret: ## If you want to use existing secret, created from sealed secret, then use this variable and omit credentials.secretContents.
snapshotsEnabled: false
deployRestic: true
restic:
  podVolumePath: /var/lib/kubelet/pods
  privileged: true
schedules:
  mybackup:
    disabled: false
    schedule: "0 6,18 * * *" ## choose time, when scheduled backups will be make.
    template:
      ttl: "240h" ## choose ttl, after which the backups will be removed.
      snapshotVolumes: false
initContainers:
- name: velero-plugin-for-aws
  image: velero/velero-plugin-for-aws:v1.4.0
  imagePullPolicy: IfNotPresent
  volumeMounts:
    - mountPath: /target
      name: plugins

configuration:
  provider: aws
  backupStorageLocation:
    provider: aws
    name: ## enter name of backup storage location (could be anything)
    bucket: ## enter name of bucket created in openstack
    default: true
    config:
      region: waw3-1
      s3ForcePathStyle: true
      s3Url: ## enter URL of object storage (for example "https://s3.waw3-1.cloudferro.com")
credentials:
  secretContents: ## enter access and secret key to ec2 bucket. This configuration will create kubernetes secret.
    cloud: |
      [default]
      aws_access_key_id=
      aws_secret_access_key=
  ##existingSecret: ## If you want to use existing secret, created from sealed secret, then use this variable and omit credentials.secretContents.
snapshotsEnabled: false
deployRestic: true
restic:
  podVolumePath: /var/lib/kubelet/pods
  privileged: true
schedules:
  mybackup:
    disabled: false
    schedule: "0 6,18 * * *" ## choose time, when scheduled backups will be make.
    template:
      ttl: "240h" ## choose ttl, after which the backups will be removed.
      snapshotVolumes: false
initContainers:
- name: velero-plugin-for-aws
  image: velero/velero-plugin-for-aws:v1.4.0
  imagePullPolicy: IfNotPresent
  volumeMounts:
    - mountPath: /target
      name: plugins

configuration:
  provider: aws
  backupStorageLocation:
    provider: aws
    name: ## enter name of backup storage location (could be anything)
    bucket: ## enter name of bucket created in openstack
    default: true
    config:
      region: default
      s3ForcePathStyle: true
      s3Url: ## enter URL of object storage (for example "https://s3.waw3-2.cloudferro.com")
credentials:
  secretContents: ## enter access and secret key to ec2 bucket. This configuration will create kubernetes secret.
    cloud: |
      [default]
      aws_access_key_id=
      aws_secret_access_key=
  ##existingSecret: ## If you want to use existing secret, created from sealed secret, then use this variable and omit credentials.secretContents.
snapshotsEnabled: false
deployRestic: true
restic:
  podVolumePath: /var/lib/kubelet/pods
  privileged: true
schedules:
  mybackup:
    disabled: false
    schedule: "0 6,18 * * *" ## choose time, when scheduled backups will be make.
    template:
      ttl: "240h" ## choose ttl, after which the backups will be removed.
      snapshotVolumes: false
initContainers:
- name: velero-plugin-for-aws
  image: velero/velero-plugin-for-aws:v1.4.0
  imagePullPolicy: IfNotPresent
  volumeMounts:
    - mountPath: /target
      name: plugins

configuration:
  provider: aws
  backupStorageLocation:
    provider: aws
    name: ## enter name of backup storage location (could be anything)
    bucket: ## enter name of bucket created in openstack
    default: true
    config:
      region: default
      s3ForcePathStyle: true
      s3Url: ## enter URL of object storage (for example "https://s3.fra1-2.cloudferro.com")
credentials:
  secretContents: ## enter access and secret key to ec2 bucket. This configuration will create kubernetes secret.
    cloud: |
      [default]
      aws_access_key_id=
      aws_secret_access_key=
  ##existingSecret: ## If you want to use existing secret, created from sealed secret, then use this variable and omit credentials.secretContents.
snapshotsEnabled: false
deployRestic: true
restic:
  podVolumePath: /var/lib/kubelet/pods
  privileged: true
schedules:
  mybackup:
    disabled: false
    schedule: "0 6,18 * * *" ## choose time, when scheduled backups will be make.
    template:
      ttl: "240h" ## choose ttl, after which the backups will be removed.
      snapshotVolumes: false
Paste the content to the configuration file values.yaml and save.
Example of an already configured file:
initContainers:
- name: velero-plugin-for-aws
  image: velero/velero-plugin-for-aws:v1.4.0
  imagePullPolicy: IfNotPresent
  volumeMounts:
    - mountPath: /target
      name: plugins

configuration:
  provider: aws
  backupStorageLocation:
    provider: aws
    name: velerobackupnew
    bucket: bucketnew
    default: true
    config:
      region: default
      s3ForcePathStyle: true
      s3Url: https://s3.waw4-1.cloudferro.com
credentials:
  secretContents: ## enter access and secret key to ec2 bucket. This configuration will create kubernetes secret.
    cloud: |
      [default]
      aws_access_key_id= c4b4ee62a18f4e0ba23f71629d2038e1x
      aws_secret_access_key= dee1581dac214d3dsa34037e826f9148
  ##existingSecret: ## If you want to use existing secret, created from sealed secret, then use this variable and omit credentials.secretContents.
snapshotsEnabled: false
deployRestic: true
restic:
  podVolumePath: /var/lib/kubelet/pods
  privileged: true
schedules:
  mybackup:
    disabled: false
    schedule: "0 * * *"
    template:
      ttl: "168h"
      snapshotVolumes: false
initContainers:
- name: velero-plugin-for-aws
  image: velero/velero-plugin-for-aws:v1.4.0
  imagePullPolicy: IfNotPresent
  volumeMounts:
    - mountPath: /target
      name: plugins

configuration:
  provider: aws
  backupStorageLocation:
    provider: aws
    name: velerobackupnew
    bucket: bucketnew
    default: true
    config:
      region: waw3-1
      s3ForcePathStyle: true
      s3Url: https://s3.waw3-1.cloudferro.com
credentials:
  secretContents: ## enter access and secret key to ec2 bucket. This configuration will create kubernetes secret.
    cloud: |
      [default]
      aws_access_key_id= c4b4ee62a18f4e0ba23f71629d2038e1x
      aws_secret_access_key= dee1581dac214d3dsa34037e826f9148
  ##existingSecret: ## If you want to use existing secret, created from sealed secret, then use this variable and omit credentials.secretContents.
snapshotsEnabled: false
deployRestic: true
restic:
  podVolumePath: /var/lib/kubelet/pods
  privileged: true
schedules:
  mybackup:
    disabled: false
    schedule: "0 * * *"
    template:
      ttl: "168h"
      snapshotVolumes: false
initContainers:
- name: velero-plugin-for-aws
  image: velero/velero-plugin-for-aws:v1.4.0
  imagePullPolicy: IfNotPresent
  volumeMounts:
    - mountPath: /target
      name: plugins

configuration:
  provider: aws
  backupStorageLocation:
    provider: aws
    name: velerobackupnew
    bucket: bucketnew
    default: true
    config:
      region: default
      s3ForcePathStyle: true
      s3Url: https://s3.waw3-2.cloudferro.com
credentials:
  secretContents: ## enter access and secret key to ec2 bucket. This configuration will create kubernetes secret.
    cloud: |
      [default]
      aws_access_key_id= c4b4ee62a18f4e0ba23f71629d2038e1x
      aws_secret_access_key= dee1581dac214d3dsa34037e826f9148
  ##existingSecret: ## If you want to use existing secret, created from sealed secret, then use this variable and omit credentials.secretContents.
snapshotsEnabled: false
deployRestic: true
restic:
  podVolumePath: /var/lib/kubelet/pods
  privileged: true
schedules:
  mybackup:
    disabled: false
    schedule: "0 * * *"
    template:
      ttl: "168h"
      snapshotVolumes: false
initContainers:
- name: velero-plugin-for-aws
  image: velero/velero-plugin-for-aws:v1.4.0
  imagePullPolicy: IfNotPresent
  volumeMounts:
    - mountPath: /target
      name: plugins

configuration:
  provider: aws
  backupStorageLocation:
    provider: aws
    name: velerobackupnew
    bucket: bucketnew
    default: true
    config:
      region: default
      s3ForcePathStyle: true
      s3Url: https://s3.fra1-2.cloudferro.com
credentials:
  secretContents: ## enter access and secret key to ec2 bucket. This configuration will create kubernetes secret.
    cloud: |
      [default]
      aws_access_key_id= c4b4ee62a18f4e0ba23f71629d2038e1x
      aws_secret_access_key= dee1581dac214d3dsa34037e826f9148
  ##existingSecret: ## If you want to use existing secret, created from sealed secret, then use this variable and omit credentials.secretContents.
snapshotsEnabled: false
deployRestic: true
restic:
  podVolumePath: /var/lib/kubelet/pods
  privileged: true
schedules:
  mybackup:
    disabled: false
    schedule: "0 * * *"
    template:
      ttl: "168h"
      snapshotVolumes: false
Installation step 3 Creating namespace
Velero must be installed in an eponymous namespace, velero. This is the command to create it:
kubectl create namespace velero
namespace/velero created
Installation step 4 Installing Velero with a Helm chart
Here are the commands to install Velero by means of a Helm chart:
helm repo add vmware-tanzu https://vmware-tanzu.github.io/helm-charts
The output is:
"vmware-tanzu" has been added to your repositories
The following command will install velero onto the cluster:
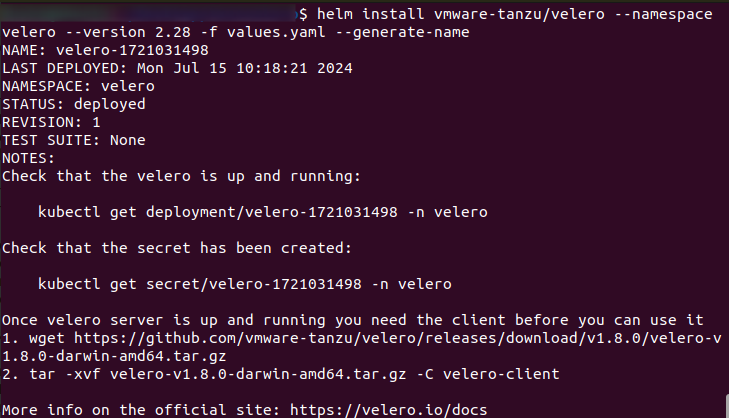
helm install vmware-tanzu/velero --namespace velero --version 2.28 -f values.yaml --generate-name
The output will look like this:
To see the version of Velero that is actually installed, use:
helm list --namespace velero
Note the name used, velero-1721031498, and we are going to use it in the rest of the article. In your case, note the correct velero name and swap value of 1721031498 with it.
Here is how to check that Velero is up and running:
kubectl get deployment/velero-1721031498 -n velero
The output will be similar to this:
NAME                READY   UP-TO-DATE   AVAILABLE   AGE
velero-1721031498   1/1     1            1           5m30s
Check that the secret has been created:
kubectl get secret/velero-1721031498 -n velero
The result is:
NAME                TYPE     DATA   AGE
velero-1721031498   Opaque   1      3d1h
Installation step 5 Installing Velero CLI
The final step is to install Velero CLI – Command Line Interface suitable for working from the terminal window on your operating system.
Download the client specified for your operating system from: https://github.com/vmware-tanzu/velero/releases, using wget. Here we are downloading version
velero-v1.9.1-linux-amd64.tar.gz
but it is recommended to download the latest version. In that case, change the name of the tar.gz file accordingly.
wget https://github.com/vmware-tanzu/velero/releases/download/v1.9.1/velero-v1.9.1-linux-amd64.tar.gz
Extract the tarball:
tar -xvf velero-v1.9.1-linux-amd64.tar.gz
This is the expected result:
velero-v1.9.1-linux-amd64/LICENSE
velero-v1.9.1-linux-amd64/examples/README.md
velero-v1.9.1-linux-amd64/examples/minio
velero-v1.9.1-linux-amd64/examples/minio/00-minio-deployment.yaml
velero-v1.9.1-linux-amd64/examples/nginx-app
velero-v1.9.1-linux-amd64/examples/nginx-app/README.md
velero-v1.9.1-linux-amd64/examples/nginx-app/base.yaml
velero-v1.9.1-linux-amd64/examples/nginx-app/with-pv.yaml
velero-v1.9.1-linux-amd64/velero
Move the extracted velero binary to somewhere in your $PATH (/usr/local/bin for most users):
cd velero-v1.9.1-linux-amd64
# System might force using sudo
sudo mv velero /usr/local/bin
# check if velero is working
velero version

After these operations, you should be allowed to use velero commands. For help how to use them, execute:
velero help
Working with Velero
So far, we have
created an object store named “bucketnew” and
told velero to use it through the bucket: parameter in values.yaml file.
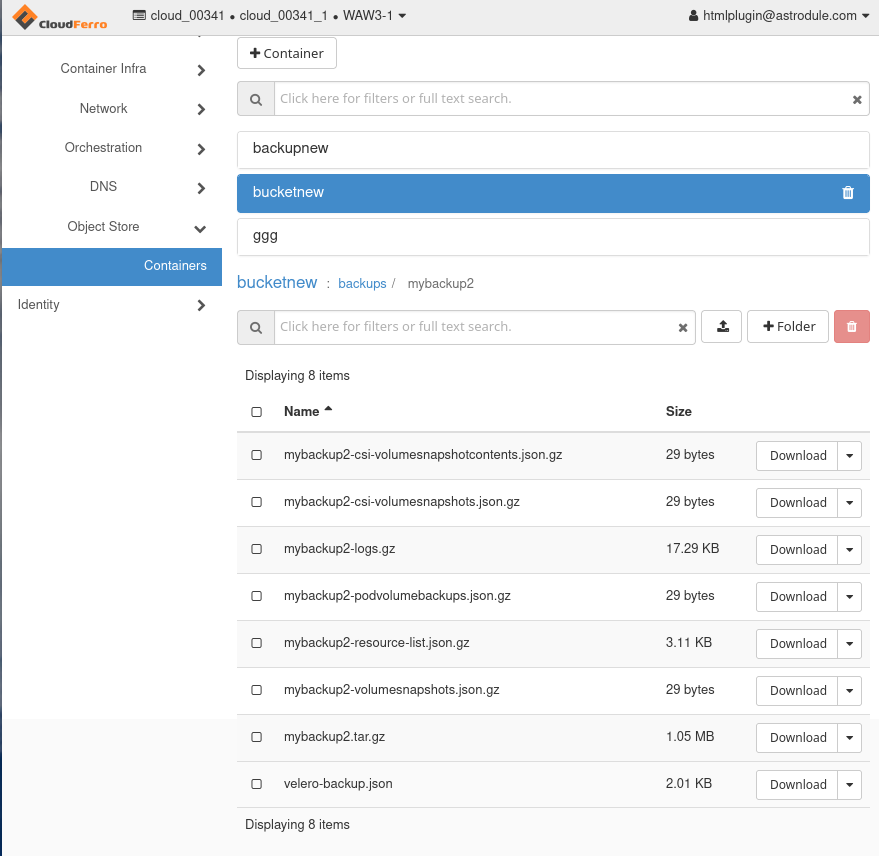
Velero will create another object store called backups under “bucketnew” and then continue creating object stores for particular backups. For example, the following command will add object store called mybackup2:
velero backup create mybackup2
Backup request "mybackup2" submitted successfully.
Here is what it will look like in Horizon:
Let us add two other backups. The first should backup all api objects in namespace velero:
velero backup create mybackup3 --include-namespaces velero
The second will backup all api objects in default namespace
velero backup create mybackup5 --include-namespaces default
Backup request "mybackup4" submitted successfully.
This the object store structure after these three backups:

You can also use velero CLI command to list the existing backups:
velero backup get
This is the result in terminal window:
Example 1 Basics of Restoring an Application
Let us now demonstrate how to restore a Kubernetes application. Let us first clone one example app from GitHub. Execute this:
git clone https://github.com/vmware-tanzu/velero.git
Cloning into 'velero'...
Resolving deltas: 100% (27049/27049), done.
cd velero
Start the sample nginx app:
kubectl apply -f examples/nginx-app/base.yaml
kubectl apply -f base.yaml
namespace/nginx-example unchanged
deployment.apps/nginx-deployment unchanged
service/my-nginx unchanged
Create a backup:
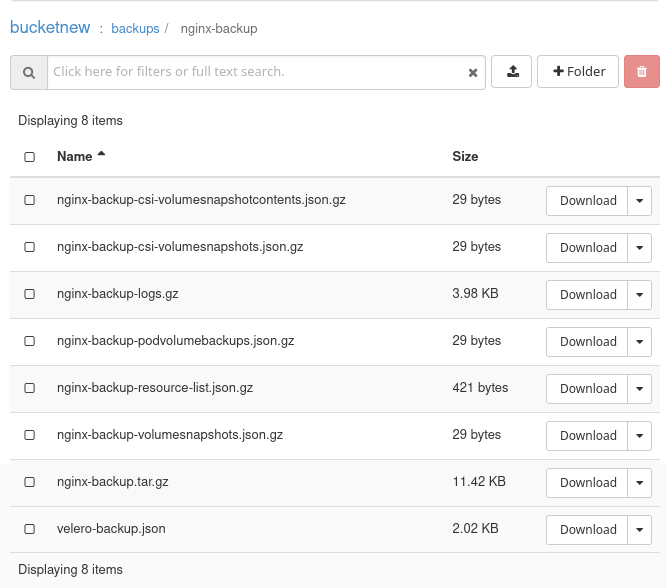
velero backup create nginx-backup --include-namespaces nginx-example
Backup request "nginx-backup" submitted successfully.
This is what the backup of nginx-backup looks like in Horizon:
Simulate a disaster:
kubectl delete namespaces nginx-example
# Wait for the namespace to be deleted
namespace "nginx-example" deleted
Restore your lost resources:
velero restore create --from-backup nginx-backup
Restore request "nginx-backup-20220728013338" submitted successfully.
Run `velero restore describe nginx-backup-20220728013338` or `velero restore logs nginx-backup-20220728013338` for more details.

velero backup get
NAME         STATUS ERRORS WARNINGS CREATED EXPIRES STORAGE LOCATION SELECTOR
backup     New     0       0     <nil>   n/a                      <none>
nginx-backup   New     0       0     <nil>   n/a                      <none>
Example 2 Snapshot of restoring an application
Start the sample nginx app:
kubectl apply -f examples/nginx-app/with-pv.yaml
namespace/nginx-example created
persistentvolumeclaim/nginx-logs created
deployment.apps/nginx-deployment created
service/my-nginx created
Create a backup with PV snapshotting:
velero backup create nginx-backup-vp --include-namespaces nginx-example
Backup request "nginx-backup" submitted successfully.
Run `velero backup describe nginx-backup` or `velero backup logs nginx-backup` for more details.
Simulate a disaster:
kubectl delete namespaces nginx-example
namespace "nginx-example" deleted
Important
Because the default reclaim policy for dynamically-provisioned PVs is “Delete”, these commands should trigger your cloud provider to delete the disk that backs up the PV. Deletion is asynchronous, so this may take some time.
Restore your lost resources:
velero restore create --from-backup nginx-backup-vp
Restore request "nginx-backup-20220728015234" submitted successfully.
Run `velero restore describe nginx-backup-20220728015234` or `velero restore logs nginx-backup-20220728015234` for more details.
Delete a Velero backup
There are two ways to delete a backup made by Velero.
- Delete backup custom resource only
kubectl delete backup <backupName> -n <veleroNamespace>
will delete the backup custom resource only and will not delete any associated data from object/block storage
- Delete all data in object/block storage
velero backup delete <backupName>
will delete the backup resource including all data in object/block storage
Removing Velero from the cluster
Uninstall Velero
To uninstall Velero release:
helm uninstall velero-1721031498 --namespace velero
To delete Velero namespace
kubectl delete namespace velero
What To Do Next
Now that Velero is up and running, you can integrate it into your routine. It will be useful in all classical backups scenarios – for disaster recovery, cluster and namespace migration, testing and development, application rollbacks, compliance and auditing and so on. Apart from these broad use cases, Velero will help with specific Kubernetes cluster tasks for backing up, such as:
backing up and restoring deployments, service, config maps and secrets,
selective backups, say, only for specific namespaces or label selectors,
volume shapshots using cloud provider APIs (AWS, Azure, GCP etc.)
snapshots of persistent volumes for point-in-time recovery
saving backup data to AWS S3, Google Cloud Storage, Azure Blob Storage etc.
integration with kubectl command so that Custom Resource Definitions (CRDs) are used to define backup and restore configuration.