Deploying vGPU workloads on Creodias Kubernetes
Utilizing GPU (Graphical Processing Units) presents a highly efficient alternative for fast, highly parallel processing of demanding computational tasks such as image processing, machine learning and many others.
In cloud environment, virtual GPU units (vGPU) are available with certain Virtual Machine flavors. This guide provides instructions how to attach such VMs with GPU as Kubernetes cluster nodes and utilize vGPU from Kubernetes pods.
There are two ways for adding vGPU capability to your Kubernetes cluster. For each, you should be able to verify the vGPU installation and test it by running vGPU workload.
What Are We Going To Cover
Scenario No. 1 - Add vGPU nodes as a nodegroup on a non-GPU Kubernetes clusters created after June 21st 2023
Scenario No. 2 - Add vGPU nodes as nodegroups on non-GPU Kubernetes clusters created before June 21st 2023
Verify the vGPU installation
Test vGPU workload
Add non-GPU nodegroup to a GPU-first cluster
Prerequisites
No. 1 Hosting
You need a Creodias hosting account with Horizon interface https://horizon.cloudferro.com/auth/login/?next=/.
No. 2 Knowledge of RC files and CLI commands for Magnum
You should be familiar with utilizing OpenStack CLI and Magnum CLI. Your RC file should be sourced and pointing to your project in OpenStack. See article
How To Install OpenStack and Magnum Clients for Command Line Interface to Creodias Horizon.
If you are
using CLI when creating vGPU nodegroups and
are being authenticated with application credentials,
use parameter --unrestricted. See How to generate or use Application Credentials via CLI on Creodias.
No. 3 Cluster and kubectl should be operational
To connect to the cluster via kubectl tool, see this article How To Access Kubernetes Cluster Post Deployment Using Kubectl On Creodias OpenStack Magnum.
No. 4 Familiarity with the notion of nodegroups
Creating Additional Nodegroups in Kubernetes Cluster on Creodias OpenStack Magnum.
Scenario 1 - Add vGPU nodes as a nodegroup on a non-GPU Kubernetes clusters created after June 21st 2023
In order to create a new nodegroup, called gpu, with one node vGPU flavor, say, vm.a6000.2, we can use the following commands:
Verify which images have NVIDIA active
openstack image list | grep NVIDIA
Long strings on the left side denote NVIDIA images and we can use them for the next command:
openstack coe nodegroup create $CLUSTER_ID gpu \
--labels "worker_type=gpu" \
--merge-labels \
--role worker \
--flavor vm.a6000.2 \
--image <NVIDIA_IMAGE_ID> \
--node-count 1
Adjust the node-count and flavor to your preference, adjust the $CLUSTER_ID to the one of your clusters (this can be taken from Clusters view in Horizon UI), and ensure the role is set as worker.
The key setting is adding a label worker_type=gpu:
Your request will be accepted:

Now list the available nodegroups:
openstack coe nodegroup list $CLUSTER_ID_RECENT \
--max-width 120
We get:

The result is that a new nodegroup called gpu is created in the cluster and that it is using the GPU flavor.
Scenario 2 - Add vGPU nodes as nodegroups on non-GPU Kubernetes clusters created before June 21st 2023
The instructions are the same as in the previous scenario, with the exception of adding an additional label:
existing_helm_handler_master_id=$MASTER_0_SERVER_ID
where $MASTER_0_SERVER_ID is the ID of the master0 VM from your cluster. The uuid value can be obtained
in Horizon, through the Instances view
or using a CLI command to isolate the uuid for the master node:
openstack coe nodegroup list $CLUSTER_ID_OLDER \
-c uuid \
-c name \
-c status \
-c role

In this example, uuid is 413c7486-caa9-4e12-be3b-3d9410f2d32f. Set up the value for master handler label:
export MASTER_0_SERVER_ID="413c7486-caa9-4e12-be3b-3d9410f2d32f"
and execute the following command to create an additional nodegroup in this scenario:
openstack coe nodegroup create $CLUSTER_ID_OLDER gpu \
--labels "worker_type=gpu,existing_helm_handler_master_id=$MASTER_0_SERVER_ID" \
--merge-labels \
--role worker \
--flavor vm.a6000.2 \
--node-count 1 \
--image <NVIDIA_IMAGE_ID> \
There may not be any space between the labels.
The request will be accepted and after a while, a new nodegroup will be available and based on a GPU flavor. List the nodegroups with the command:
openstack coe nodegroup list $CLUSTER_ID_OLDER --max-width 120
Verify the vGPU installation
You can verify that vGPU-enabled nodes were properly added to your cluster, by checking the nvidia-device-plugin deployed in the cluster, to the nvidia-device-plugin namespace. The command to list the contents of the nvidia namespace is:
kubectl get daemonset nvidia-device-plugin \
-n nvidia-device-plugin

See which nodes are now present:
kubectl get node

Each GPU node, should have several nvidia labels added. To verify, you can run one of the below commands, the second of which will show the labels formatted:
kubectl get node k8s-gpu-cluster-XXXX --show-labels
kubectl get node k8s-gpu-cluster-XXXX \
-o go-template='{{range $key, $value := .metadata.labels}}{{$key}}: {{$value}}{{"\n"}}{{end}}'
Concretely, in our case, the second command is:
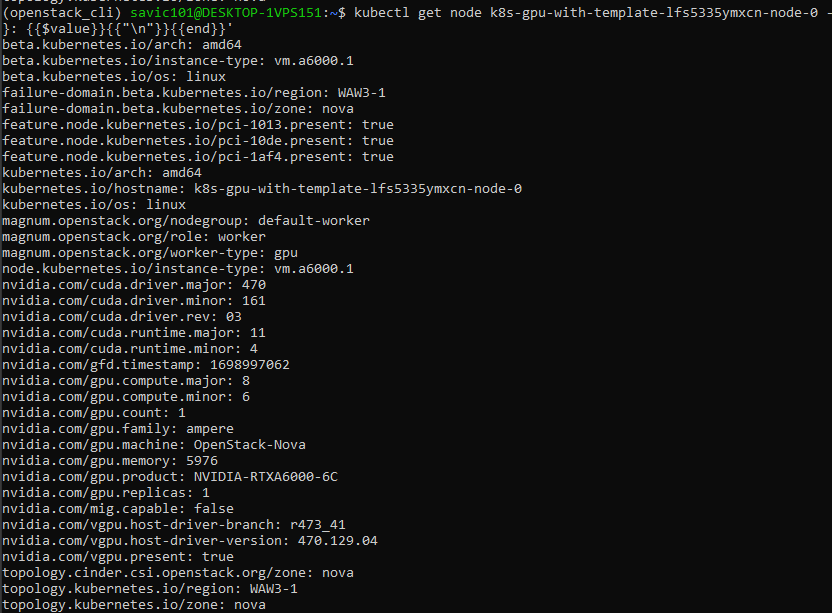
kubectl get node k8s-gpu-with-template-lfs5335ymxcn-node-0 \
-o go-template='{{range $key, $value := .metadata.labels}}{{$key}}: {{$value}}{{"\n"}}{{end}}'
and the result will look like this:
Also, GPU workers are tainted by default with the taint:
node.cloudferro.com/type=gpu:NoSchedule
This can be verified by running the following command, in which we are using the name of the existing node:
kubectl describe node k8s-gpu-with-template-lfs5335ymxcn-node-0 | grep 'Taints'
Run test vGPU workload
We can run a sample workload on vGPU. To do so, create a YAML manifest file vgpu-pod.yaml, with the following contents:
vgpu-pod.yaml
apiVersion: v1
kind: Pod
metadata:
  name: gpu-pod
spec:
  restartPolicy: Never
  containers:
    - name: cuda-container
      image: nvcr.io/nvidia/k8s/cuda-sample:vectoradd-cuda10.2
      resources:
        limits:
          nvidia.com/gpu: 1 # requesting 1 vGPU
  tolerations:
  - key: nvidia.com/gpu
    operator: Exists
    effect: NoSchedule
  - effect: NoSchedule
    key: node.cloudferro.com/type
    operator: Equal
    value: gpu
Apply with:
kubectl apply -f vgpu-pod.yaml

This pod will request one vGPU, so effectively it will utilize the vGPU allocated to a single node. For example, if you had a cluster with 2 vGPU-enabled nodes, you could run 2 pods requesting 1 vGPU each.
Also, for scheduling the pods on GPU, you will need to apply the two tolerations as per the example above, That, effectively, means that the pod will only be scheduled on GPU nodes.
Looking at the logs, we see that the workload was indeed performed:
kubectl logs gpu-pod


[Vector addition of 50000 elements]
Copy input data from the host memory to the CUDA device
CUDA kernel launch with 196 blocks of 256 threads
Copy output data from the CUDA device to the host memory
Test PASSED
Done