Autoscaling Kubernetes Cluster Resources on Creodias OpenStack Magnum
When autoscaling of Kubernetes clusters is turned on, the system can
Add resources when the demand is high, or
Remove unneeded resources when the demand is low and thus keep the costs down.
The whole process can be automatic, helping the administrator concentrate on more important tasks at hand.
This article explains various commands to resize or scale the cluster and will lead to a command to automatically create an autoscalable Kubernetes cluster for OpenStack Magnum.
What We Are Going To Cover
Definitions of horizontal, vertical and nodes scaling
Define autoscaling when creating the cluster in Horizon interface
Define autoscaling when creating the cluster using the CLI
Get cluster template labels from Horizon interface
Get cluster template labels from the CLI
Prerequisites
No. 1 Hosting
You need a Creodias hosting account with Horizon interface https://horizon.cloudferro.com/auth/login/?next=/.
No. 2 Creating clusters with CLI
The article How To Use Command Line Interface for Kubernetes Clusters On Creodias OpenStack Magnum will introduce you to creation of clusters using a command line interface.
No. 3 Connect openstack client to the cloud
Prepare openstack and magnum clients by executing Step 2 Connect OpenStack and Magnum Clients to Horizon Cloud from article How To Install OpenStack and Magnum Clients for Command Line Interface to Creodias Horizon
No. 4. Resizing Nodegroups
Step 7 of article Creating Additional Nodegroups in Kubernetes Cluster on Creodias OpenStack Magnum shows example of resizing the nodegroups for autoscaling.
No. 5 Creating Clusters
Step 2 of article How to Create a Kubernetes Cluster Using Creodias OpenStack Magnum shows how to define master and worker nodes for autoscaling.
There are three different autoscaling features that a Kubernetes cloud can offer:
Horizontal Pod Autoscaler
Scaling Kubernetes cluster horizontally means increasing or decreasing the number of running pods, depending on the actual demands at run time. Parameters to take into account are the usage of CPU and memory, as well as the desired minimum and maximum numbers of pod replicas.
Horizontal scaling is also known as “scaling out” and is shorthened as HPA.
Vertical Pod Autoscaler
Vertical scaling (or “scaling up”, VPA) is adding or subtracting resources to and from an existing machine. If more CPUs are needed, add them. When they are not needed, shut some of them down.
Cluster Autoscaler
HPA and VPA reorganize the usage of resources and the number of pods, however, there may come a time when the size of the system itself prevents from satisfying the demand. The solution is to autoscale the cluster itself, to increase or decrease the number of nodes on which the pods will run on.
Once the number of nodes is adjusted, the pods and other resources need to rebalance themselves across the cluster, also automatically. The number of nodes acts as a physical barrier to the autoscaling of pods.
All three models of autoscaling can be combined together.
Define Autoscaling When Creating a Cluster
You can define autoscaling parameters while defining a new cluster, using window called Size in the cluster creation wizard:
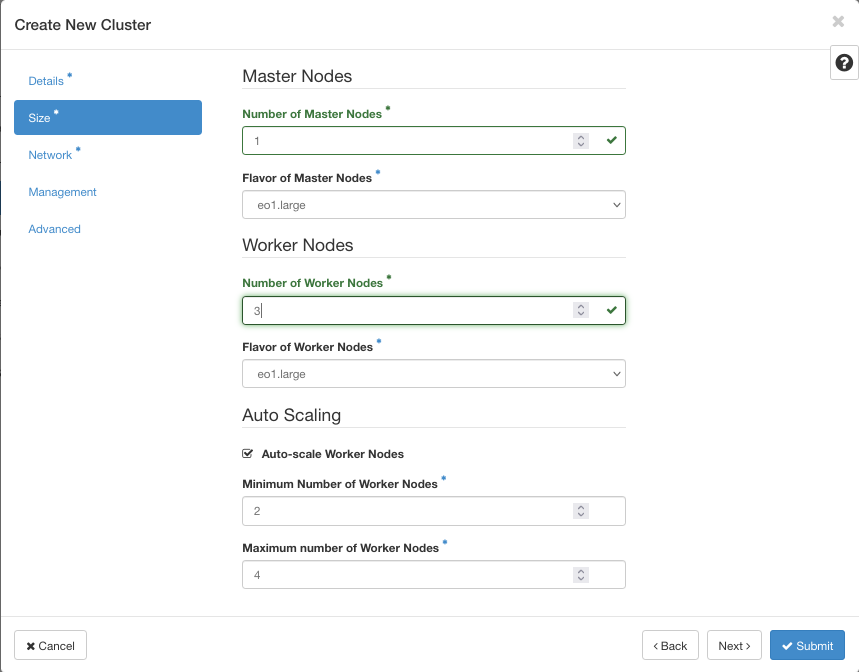
Specify a minimum and maximum number of worker nodes. If these values are 2 and 4 respectively, the cluster will have not less that 2 nodes and not more than 4 nodes at any time. If there is no traffic to the cluster, it will be automatically scaled to 2 nodes. In this example, the cluster can have 2, 3, or 4 nodes depending on the traffic.
For the entire process of creating a Kubernetes cluster in Horizon, see Prerequisites No. 5.
Warning
If you decide to use NGINX Ingress option while defining a cluster, NGINX ingress will run as 3 replicas on 3 separate nodes. This will override the minimum number of nodes in Magnum autoscaler.
Autoscaling Node Groups at Run Time
The autoscaler in Magnum uses Node Groups. Node groups can be used to create workers with different flavors. The default-worker node group is automatically created when the cluster is provisioned. Node groups have lower and upper limits of node count. This is the command to print them out for a given cluster:
openstack coe nodegroup show NoLoadBalancer default-worker -f json -c max_node_count -c node_count -c min_node_count
The result would be:
{
 "node_count": 1,
 "max_node_count": 2,
 "min_node_count": 1
}
This works fine until you try to resize the cluster beyond the limit set in the node group. If you try to resize the above cluster to 12 nodes, like this:
openstack coe cluster resize NoLoadBalancer --nodegroup default-worker 12
you will get the following error:
Resizing default-worker outside the allowed range: min_node_count = 1, max_node_count = 2 (HTTP 400) (Request-ID: req-bbb09fc3-7df4-45c3-8b9b-fbf78d202ffd)
To resolve this error, change node_group max_node_count manually:
openstack coe nodegroup update NoLoadBalancer default-worker replace max_node_count=15
and then resize the cluster to the desired value which was less than 15 in this example:
openstack coe cluster resize NoLoadBalancer --nodegroup default-worker 12
If you repeat the first statement:
openstack coe nodegroup show NoLoadBalancer default-worker -f json -c max_node_count -c node_count -c min_node_count
the result will now be with a corrected value:
  {
 "node_count": 12,
 "max_node_count": 15,
 "min_node_count": 1
}
Note
Resizing of an autoscalable cluster (default nodegroup) from Horizon GUI is not supported for autoscalable nodegroups. While Horizon will accept the request, it will have no impact on the cluster.
How Autoscaling Detects Upper Limit
The first version of Autoscaling would take the current upper limit of autoscaling in variable node_count and add 1 to it. If the command to create a cluster were
openstack coe cluster create mycluster --cluster-template mytemplate --node-count 8 --master-count 3
that version of Autoscaler would take the value of 9 (counting as 8 + 1). However, that procedure was limited to the default-worker node group only.
The current Autoscaler can support multiple node groups by detecting the role of the node group:
openstack coe nodegroup show NoLoadBalancer default-worker -f json -c role
and the result is
{
  "role": "worker"
}
As long as the role is worker and max_node_count is greater than 0, the Autoscaler will try to scale the default-worker node group by adding 1 to max_node_count.
Attention
Any additional node group must include concrete max_node_count attribute.
See Prerequisites No. 4 for detailed examples of using the openstack coe nodegroup family of commands.
Autoscaling Labels for Clusters
There are three labels for clusters that influence autoscaling:
auto_scaling_enabled – if true, it is enabled
min_node_count – the minimal number of nodes
max_node_count – the maximal number of nodes, at any time.
When defining cluster through the Horizon interface, you are actually setting up these cluster labels.
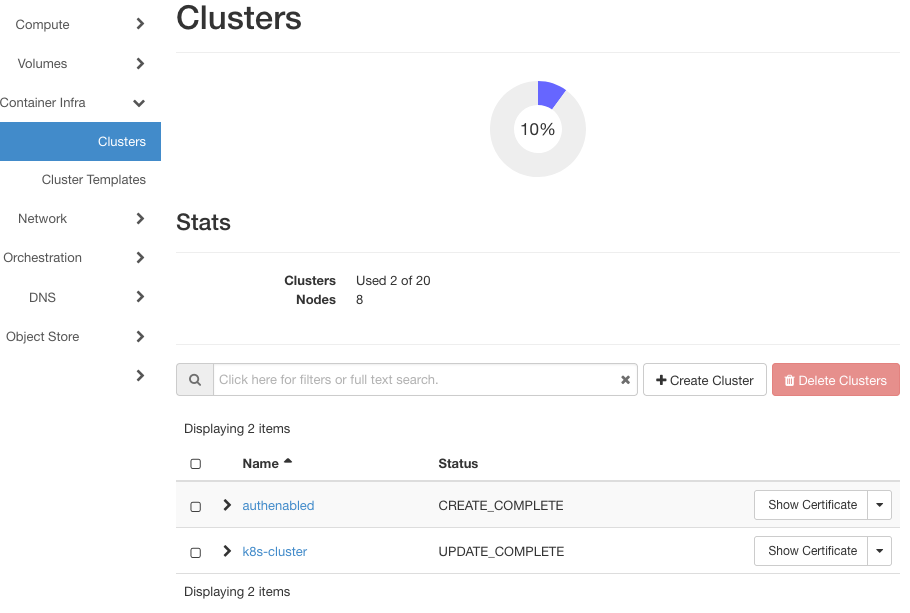
List clusters with Container Infra => Cluster and click on the name of the cluster. Under Labels, you will find the current value for auto_scaling_enabled.
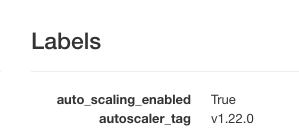
If true, it is enabled, the cluster will autoscale.
Create New Cluster Using CLI With Autoscaling On
The command to create a cluster with CLI must encompass all of the usual parameters as well as all of the labels needed for the cluster to function. The peculiarity of the syntax is that label parameters must be one single string, without any blanks inbetween.
This is what one such command could look like:
openstack coe cluster create mycluster
--cluster-template k8s-stable-1.23.5
--keypair sshkey
--master-count 1
--node-count 3
--labels auto_scaling_enabled=true,autoscaler_tag=v1.22.0,calico_ipv4pool_ipip=Always,cinder_csi_plugin_tag=v1.21.0,cloud_provider_enabled=true,cloud_provider_tag=v1.21.0,container_infra_prefix=registry-public.cloudferro.com/magnum/,eodata_access_enabled=false,etcd_volume_size=8,etcd_volume_type=ssd,hyperkube_prefix=registry-public.cloudferro.com/magnum/,k8s_keystone_auth_tag=v1.21.0,kube_tag=v1.21.5-rancher1,master_lb_floating_ip_enabled=true
If you just tried to copy and paste it into the terminal, you would get syntax errors. The end of the line is not allowed, the entire command must be one long string. To make your life easier, here is a version of the command that you can copy with success.
Warning
The line containing labels will be only partially visible on the screen, but once you paste it into the command line, the terminal software will execute it without problems.
The command is:
openstack coe cluster create mycluster –cluster-template k8s-stable-1.23.5 –keypair sshkey –master-count 1 –node-count 3 –labels auto_scaling_enabled=true,autoscaler_tag=v1.22.0,calico_ipv4pool_ipip=Always,cinder_csi_plugin_tag=v1.21.0/,cloud_provider_enabled=true,cloud_provider_tag=v1.21.0,container_infra_prefix=registry-public.cloudferro.com/magnum/,eodata_access_enabled=false,etcd_volume_size=8,etcd_volume_type=ssd,hyperkube_prefix=registry-public.cloudferro.com/magnum/,k8s_keystone_auth_tag=v1.21.0,kube_tag=v1.21.5-rancher1,master_lb_floating_ip_enabled=true,min_node_count=2,max_node_count=4
The name will be mycluster, one master node and three worker nodes in the beginning.
Note
It is mandatory to set up the maximal number of nodes in autoscaling. If not specified, the max_node_count will default to 0, and there will be no autoscaling at all for the particular nodegroup.
This is the result after the creation:
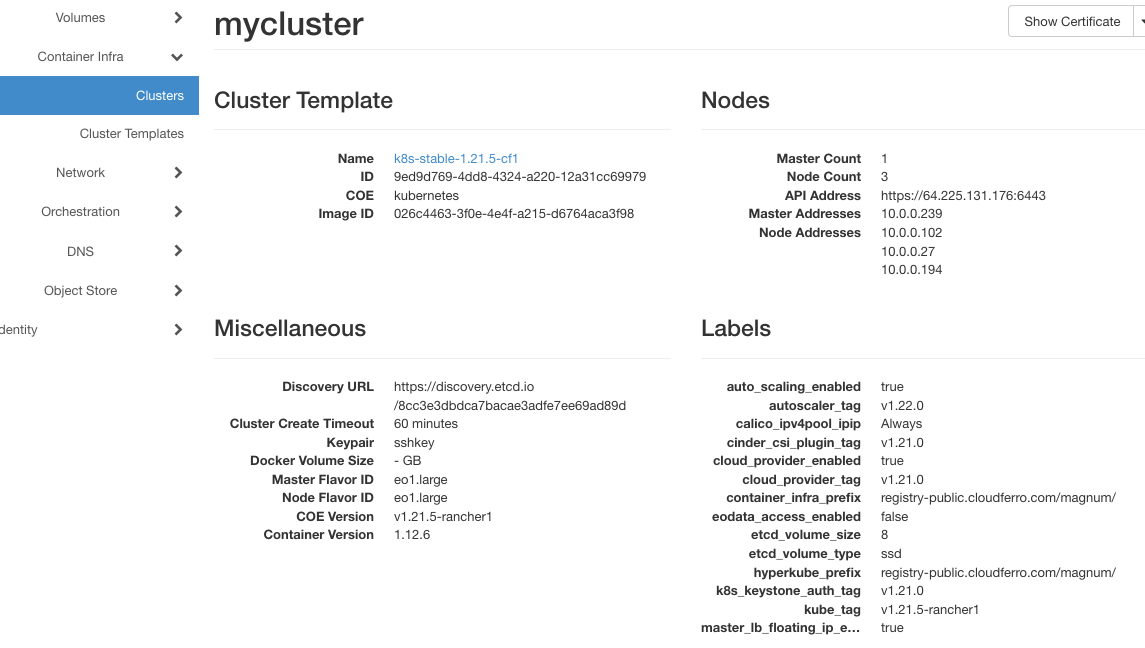
Three worker node addresses are active: 10.0.0.102, 10.0.0.27, and 10.0.0.194.
There is no traffic to the cluster so the autoscaling immediately kicked in. A minute or two after the creation was finished, the number of worker nodes fell down by one, to addresses 10.0.0.27 and 10.0.0.194 – that is autoscaling at work.
Nodegroups With Worker Role Will Be Automatically Autoscalled
Autoscaler automaticaly detects all new nodegroups with “worker” role assigned. The “worker” role is assigned by default if not specified. The maximum number of nodes must be specified as well.
First see which nodegroups are present for cluster k8s-cluster. The command is
openstack coe nodegroup list k8s-cluster -c name -c node_count -c status -c role
Switch -c denotes which column to show, disregarding all other columns that are not listed in the command. You will see a table with columns name, node_count, status and role, which means that columns such as uuid, flavor_id and image_id will not take valueable space onscreen. The result is table with only the four columns that are relevant to adding nodegroupes with roles:

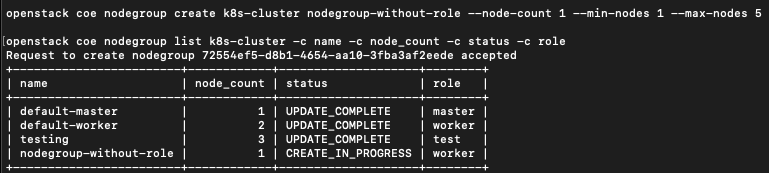
Now add and print a nodegroup without role:
openstack coe nodegroup create k8s-cluster nodegroup-without-role --node-count 1 --min-nodes 1 --max-nodes 5

openstack coe nodegroup list k8s-cluster -c name -c node_count -c status -c role
Since the role was not specified, a default value of “worker” was assigned to node group nodegroup-without-role. Since the system is set up to automatically autoscale nodegroups with worker role, if you add nodegroup without a role, it will autoscale.
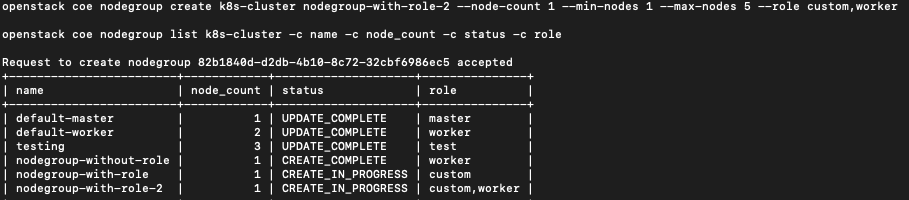
Now add a node group called nodegroup-with-role and the name of the role will be custom:
openstack coe nodegroup create k8s-cluster nodegroup-with-role --node-count 1 --min-nodes 1 --max-nodes 5 --role custom

openstack coe nodegroup list k8s-cluster -c name -c node_count -c status -c role

That will add a nodegroup but will not autoscale it on its own, as there is no worker role specified for the nodegroup.
Finally, add a nodegroup called nodegroup-with-role-2 which will have two roles defined in one statement, that is, both custom and worker. Since at least one of the roles is worker, it will autoscale automatically.
openstack coe nodegroup create k8s-cluster nodegroup-with-role-2 --node-count 1 --min-nodes 1 --max-nodes 5 --role custom,worker

openstack coe nodegroup list k8s-cluster -c name -c node_count -c status -c role
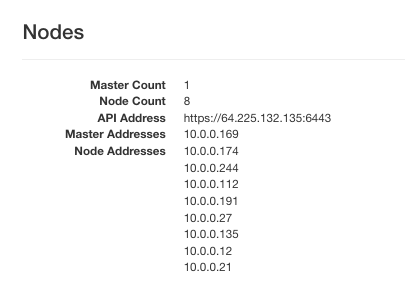
Cluster k8s-cluster now has 8 nodes:
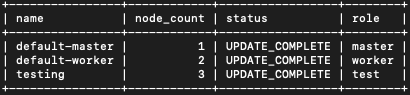
You can delete these three clusters with the following set of commands:
openstack coe nodegroup delete k8s-cluster nodegroup-with-role

openstack coe nodegroup delete k8s-cluster nodegroup-with-role-2

openstack coe nodegroup delete k8s-cluster nodegroup-without-role
Once again, see the result:
openstack coe nodegroup list k8s-cluster -c name -c node_count -c status -c role
How to Obtain All Labels From Horizon Interface
Use Container Infra => Clusters and click on the cluster name. You will get plain text in browser, just copy the rows under Labels and paste them to the text editor of your choice.
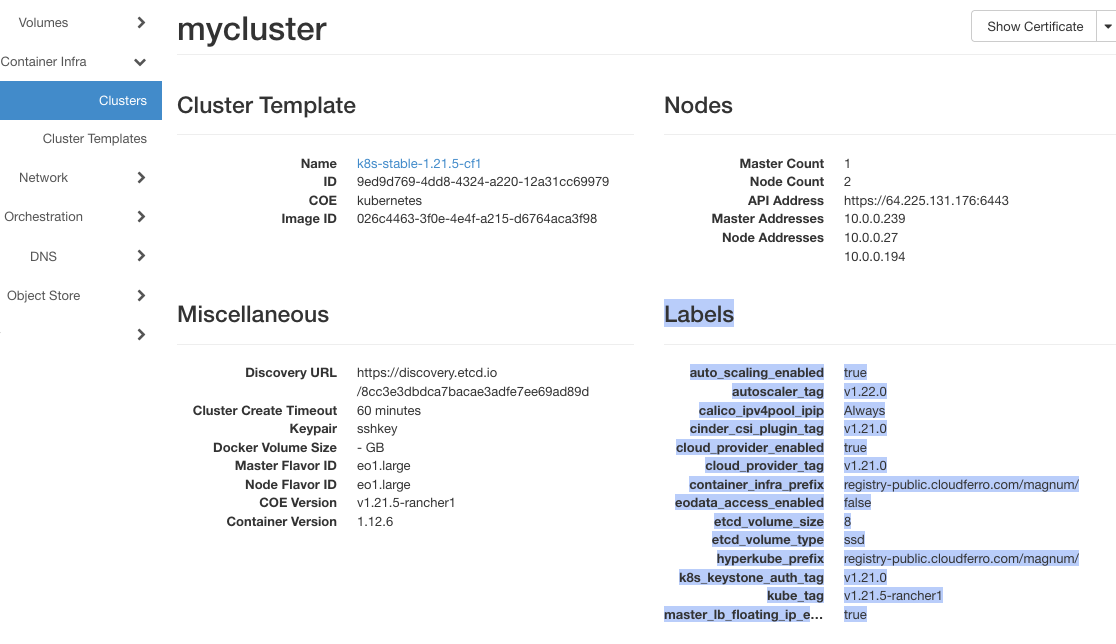
In text editor, manually remove line ends and make one string without breaks and carriage returns, then paste it back to the command.
How To Obtain All Labels From the CLI
There is a special command which will produce labels from a cluster:
openstack coe cluster template show k8s-stable-1.23.5 -c labels -f yaml
This is the result:
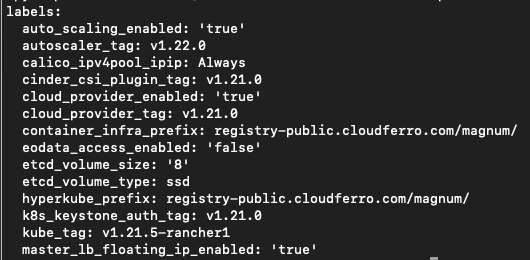
That is yaml format, as specified by the -f parameter. The rows represent label values and your next action is to create one long string without line breaks as in the previous example, then form the CLI command.
Use Labels String When Creating Cluster in Horizon
The long labels string can also be used when creating the cluster manually, i.e. from the Horizon interface. The place to insert those labels is described in Step 4 Define Labels in Prerequisites No. 2.
What To Do Next
Autoscaling is similar to autohealing of Kubernetes clusters and both bring automation to the table. They also guarantee that the system will autocorrect as long as it is within its basic parameters. Use autoscaling of cluster resources as much as you can!