How To Use Command Line Interface for Kubernetes Clusters On Creodias OpenStack Magnum
In this article you shall use Command Line Interface (CLI) to speed up testing and creation of Kubernetes clusters on OpenStack Magnum servers.
What We Are Going To Cover
The advantages of using CLI over the Horizon graphical interface
Debugging OpenStack and Magnum commands
How to create a new Kubernetes cluster template using CLI
How to create a new Kubernetes cluster using CLI
Reasons why the cluster may fail to create
CLI commands to delete a cluster
Prerequisites
No. 1 Hosting
You need a Creodias hosting account with Horizon interface https://horizon.cloudferro.com/auth/login/?next=/.
No. 2 Private and public keys
An SSH key-pair created in OpenStack dashboard. To create it, follow this article How to create key pair in OpenStack Dashboard on Creodias. You will have created keypair called sshkey and you will be able to use it for this tutorial as well.
No. 3 Command Structure of OpenStack Client Commands
Here is the manual for OpenStackClient commands: Command Structure Xena version.
No. 4 Command List of OpenStack Client Commands
These are all the commands supported by Xena release of OpenStackClient: Xena Command List.
No. 5 Documentation for Magnum client
These are all the commands supported by Xena release of MagnumClient: Magnum User Guide.
No. 6 How to install OpenStack and Magnum Clients
The step that directly precedes this article is: How To Install OpenStack and Magnum Clients for Command Line Interface to Creodias Horizon.
In that guide, you have installed the CLI and in this tutorial, you are going to use it to work with Kubernetes on OpenStack Magnum.
No. 7 Autohealing of Kubernetes Clusters
To learn more about autohealing of Kubernetes clusters, follow this official article What is Magnum Autohealer?.
The Advantages of Using the CLI
You can use the CLI and Horizon interface interchangeably, but there are at least three advantages in using CLI.
Reproduce Commands Through Cut & Paste
Here is a command to list flavors in the system
openstack flavor list
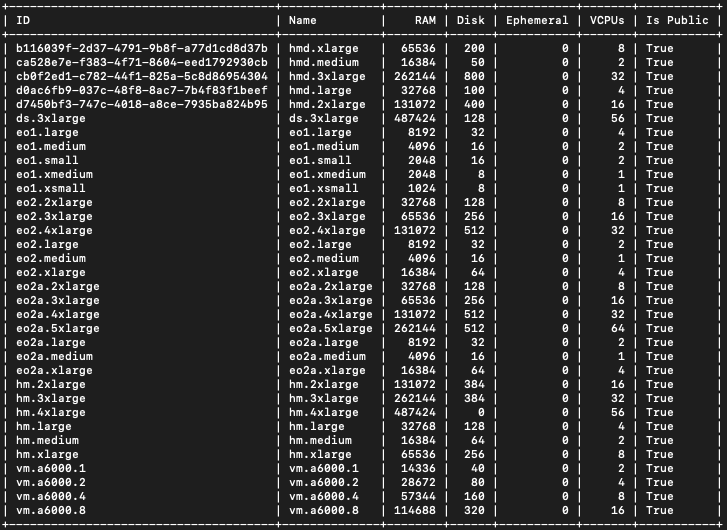
If you have this line stored in text editor app, you can reproduce it at will. In contrast, to get the list of flavors using Horizon, you would have to click on a series of screen buttons
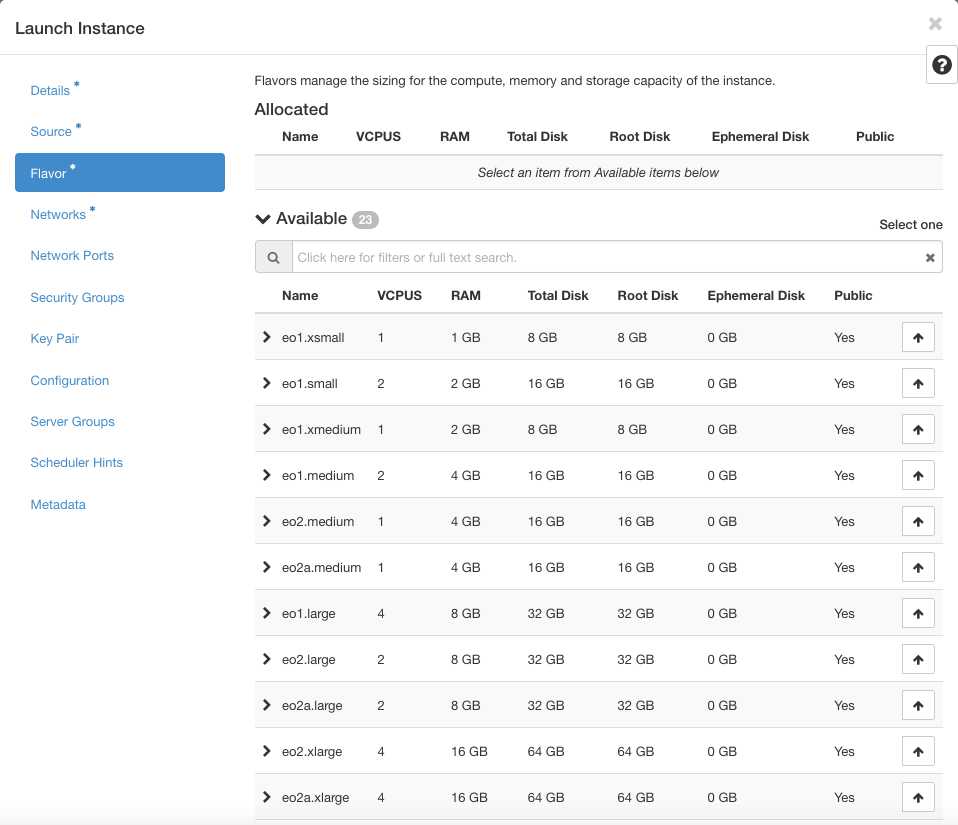
Compute => Instances => Launch instance => Flavor
and only then get the list of flavors to choose from:
A bonus is that keeping commands in a text editor automatically creates documentation for the server and cluster.
CLI Commands Can Be Automated
You can use available automation. The result of the following Ubuntu pipeline is the url for communication from kubectl to the Kubernetes cluster:

There are two commands pipelined into one:
KUBERNETES_URL=$(openstack coe cluster show k8s-cluster
   | awk '/ api_address /{print $4}')
The result of the first command
openstack coe cluster show k8s-cluster
is a series of lines starting with the name of the parameter and followed by the actual value.
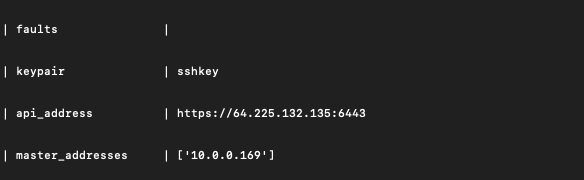
The second statement, to the right of the pipelining symbol |
awk '/ api_address /{print $4}')
is searching for the line starting with api_address and extracting its value https://64.225.132.135:6443. The final result is exported to the system variable KUBERNETES_URL, thus automatically setting it up for use by Kubernetes cluster command kubectl when accessing the cloud.
CLI Yields Access to All of the Existing OpenStack and Magnum Parameters
CLI commands offer access to a larger set of parameters than is available through Horizon. For instance, in Horizon, the default length of time allowed for creation of a cluster is 60 minutes while in CLI, you can set it to other values of choice.
Debugging OpenStack and Magnum Commands
To see what is actually happening behind the scenes, when executing client commands, add parameter –debug:
openstack coe cluster list --debug
The output will be several screens long, consisting of GET and POST web calls, with dozens of parameters shown on screen. (The output is too voluminous to reproduce here.)
How to Enter OpenStack Commands
Note
In the forthcoming example, a version fedora-coreos-34.20210904.3.0 of fedora images is used. As the system is updated in time, the actual values may become different, for instance, any of values fedora-coreos-35 or fedora-coreos-33.20210426.3.0. Use Horizon command Compute -> Images to see what images of fedora are currently available, then edit and replace as needed.
There are several ways to write down and enter Openstack commands into the terminal command line interface.
One way is to enter command openstack and press Enter on the keyboard. You enter the line mode of the openstack command and can enter rows of various openstack parameters line after line. This is stricly for manual data entry and is difficult to automate.
Type quit and press Enter on keyboard to leave that mode.
The usual way of entering openstack parameters is in one long line. Leave spaces between parameters but enter label values without any spaces inbetween. An example may be:
The line breaks and blanks have to be eradicated manually in this case.
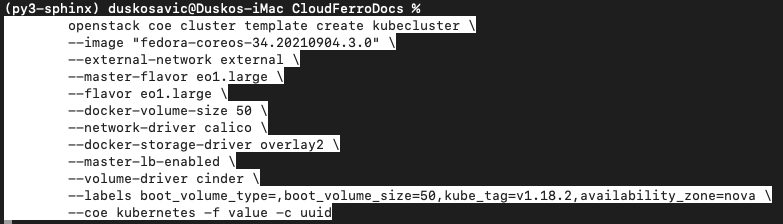
A more elegant way is to use backslash character, \, in line text. The character after backslash will not be taken into account so if you enter it at the very end of the line, the EOL character will be avoided and the first and the second line will be treated as one continuous line. That is exactly what you want, so here is what an entry line could look like with this approach:
openstack coe cluster template create kubecluster \
--image "fedora-coreos-34.20210904.3.0" \
--external-network external \
--master-flavor eo1.large \
--flavor eo1.large \
--docker-volume-size 50 \
--network-driver calico \
--docker-storage-driver overlay2 \
--master-lb-enabled \
--volume-driver cinder \
--labels boot_volume_type=,boot_volume_size=50,kube_tag=v1.18.2,availability_zone=nova \
--coe kubernetes -f value -c uuid
The end of each line is precented by a backslash and so all these lines appear as one (long) line to terminal command line scanner. However, when copying and pasting this to the terminal line, beware of the following situation:
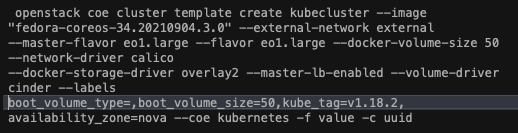
If the blanks are present at the beginning of each line, that will be a problem. Eliminate them by going into any text editor and then removing them either manually or through replace function. What you need to have in text editor is this:
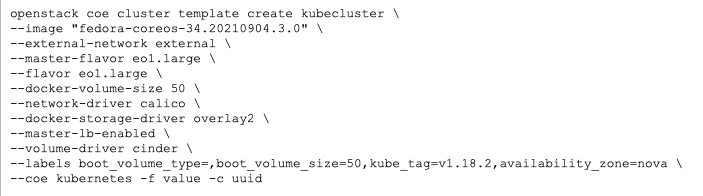
Now you can copy it and paste into the terminal command line:
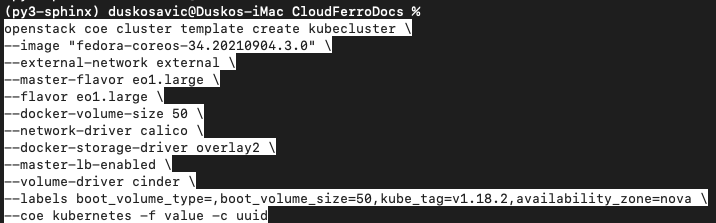
You notice that the line with labels can become long and its right part may not be visible on screen. Use \ and new line to break the long –labels line into several shorter ones:
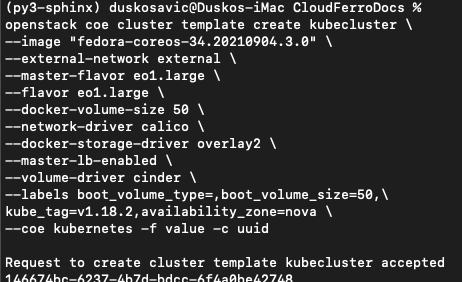
Pressing Enter on the keyboard activates this entire command and it is accepted by the system as you can see in the line below the command.
Warning
If you are new to Kubernetes please, at first, create clusters only directly using the default cluster template. Once you get more experience, you can start creating your own cluster templates and here is how to do it using CLI.
OpenStack Command for Creation of Cluster
In this step you can create a new cluster using either the default cluster template or any of the templates that you have already created.
Enter
openstack coe cluster create -h
to see the parameters. Provide all or almost all of the required parameters.
usage: openstack coe cluster create
[-h]
--cluster-template <cluster-template>
[--discovery-url <discovery-url>]
[--docker-volume-size <docker-volume-size>]
[--labels <KEY1=VALUE1,KEY2=VALUE2;KEY3=VALUE3...>]
[--keypair <keypair>]
[--master-count <master-count>]
[--node-count <node-count>]
[--timeout <timeout>]
[--master-flavor <master-flavor>]
[--flavor <flavor>]
<name>
Here is what one such command might actually look like:
openstack coe cluster create
   --cluster-template k8s-stable-1.23.5
   --docker-volume-size 50
   --labels eodata_access_enabled=false,floating-ip-enabled=true,
   --merge-labels
   --keypair sshkey
   --master-count 3
   --node-count 2
   --timeout 190
   --master-flavor eo1.large
   --flavor eo1.large
   newcluster
Warning
When using the exemplar default cluster template, k8s-stable-1.23.5, there is no need to specify label master-lb-enabled=true as the master load balancer will always be created with the default cluster template. The only way to not have master load balancer created with the default template is to specify flag –master-lb-disabled. Again, using master-lb-enabled=false with –merge-labels applied afterwards, also will not work, i.e. will not prevent master LB from being created.
Here are some special labels the functionality of which is only available through CLI and not through Horizon as well.
How to properly form a cluster with auto healing turned on
Note
Prerequisite No. 6 will show you how to enable command line interface with your cloud server. Prerequisite No. 7 will give you a formal introduction to the notion of Kubernetes autohealing, as implemented in OpenStack Magnum.
The only way to have auto healing turned on and guarantee at the same time that the cluster will be formed normally, is to set up the following label:
auto_healing_enabled=True
Warning
Do not include the above label if you want to create a cluster that does not use auto healing.
Here is a variation of the CLI command to generate a cluster. It will use medium values instead of large for flavors, will have only one master and one worker node, will have auto healing turned on etc.
openstack coe cluster create –cluster-template k8s-stable-1.23.5 –labels floating-ip-enabled=true,master-lb-enabled=true,auto_healing_enabled=true –merge-labels –keypair sshkey –master-count 1 –node-count 1 –master-flavor eo1.medium –flavor eo1.medium newcluster
Execute the command for creation of a cluster
Copy and paste the above command into the terminal where OpenStack and Magnum clients are active:

How To Check Upon the Status of the Cluster
The command to show the status of clusters is
openstack coe cluster list
newcluster is in status of CREATE_IN_PROGRESS i.e. it is being created under the hood. Repeat the command after a minute or two and see the latest status, which now is CREATE_FAILED. To see the reason why the creation of the cluster stopped, go to the Horizon interface, list the clusters and click on the name of newcluster.
Under Stack, there is a message like this:
Resource CREATE failed: OverQuotaClient: resources.secgroup_kube_master: Quota exceeded for resources:
['security_group_rule']. Neutron server returns request_ids: ['req-1aff5045-db64-4075-81df-80611db8cb6c']
The quota for the security group rules was exceeded. To verify, execute this command:
openstack quota show --default
The result may be too cluttered in a normal terminal window, so in this case, more information will be available from the Horizon interface:
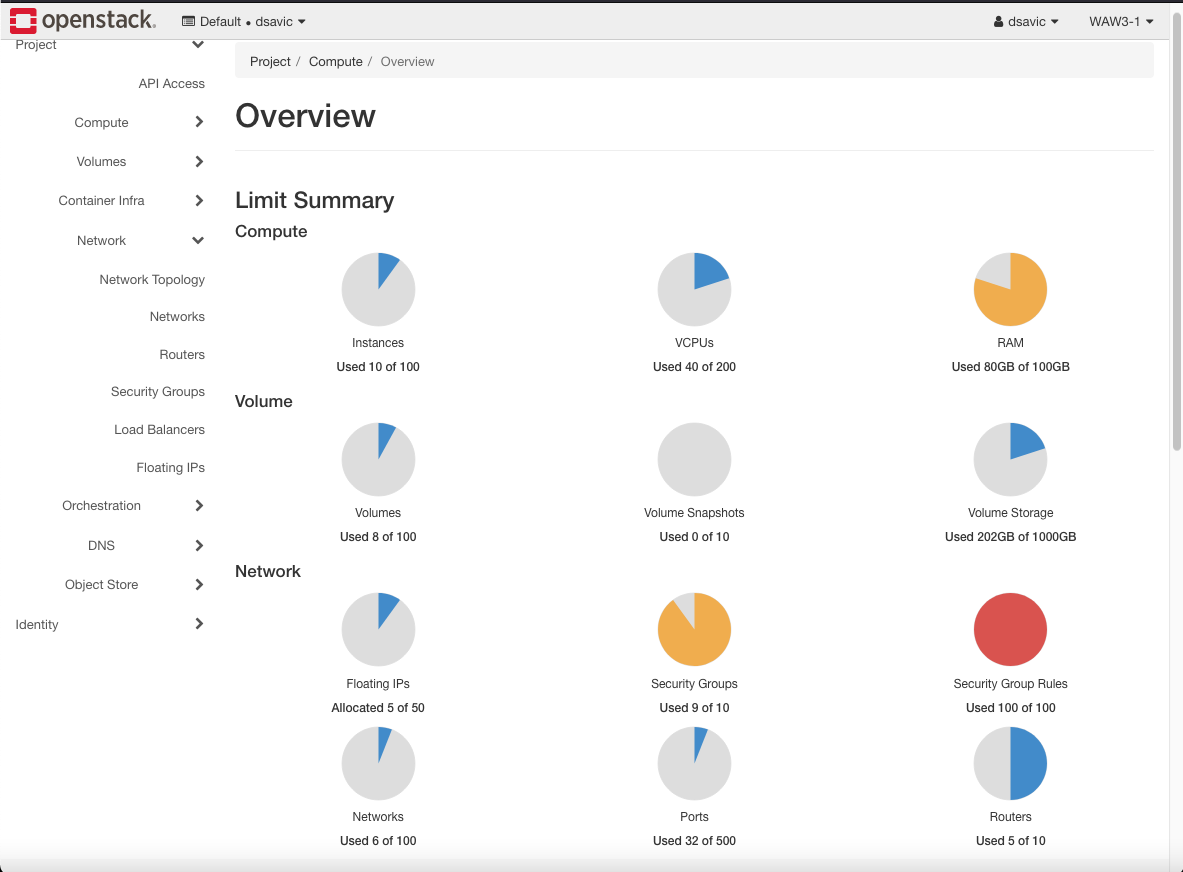
Red and orange colors denote danger and you either have to ask support to double your quotas or delete the instances and clusters that have exceeded them.
Note
It is out of scope of this article to describe how to delete elements through Horizon interface. Make sure that quotas are available before new cluster creation.
Failure to Create a Cluster
There are many reasons why a cluster may fail to create. Maybe the state of system quotas is not optimal, maybe there is a mismatch between the parameters of the cluster and the parameters in the rest of the cloud. For example, if you base the creation of cluster on the default cluster template, it will use Fedora distribution and require 10 GiB of memory. It may clash with –docker-volume-size if that was set up to be larger then 10 GiB.
The flavors for master and minions are eo1.large, and if you want a larger Docker image size, increase the –master-flavor size.
The entire cloud may be overloaded and the creation of cluster may take longer than the default 60 minutes. Set up the –timeout parameter to 120 or 180 minutes in such cases.
If the creation process failed prematurely, then
review system quotas
delete the failed cluster(s)
review system quotas again
change parameters and
run the cluster creation command again.
CLI Commands to Delete a Cluster
If the cluster failed to create, it is still taking up system resources. Delete it with command such as
openstack coe cluster delete
List the clusters and you will first see that the status is DELETE_IN_PROGRESS and, after a while, the newcluster will disappear.
Now try to delete cluster largecluster. There are two of them, so putting up a command such as
openstack coe cluster delete largecluster
will not be accepted. Instead of the name, enter the uuid value:
openstack coe cluster delete e80c5815-d20b-4a2b-8588-49cf7a7e1aad
Again, the request will be accepted and then after a minute or two, the required cluster will disappear.
Now there is only one largecluster so this will work:
openstack coe cluster delete largecluster
Deleting clusters that were not installed properly has freed up a significant amount of system resources. There are no more orange and red quotas:
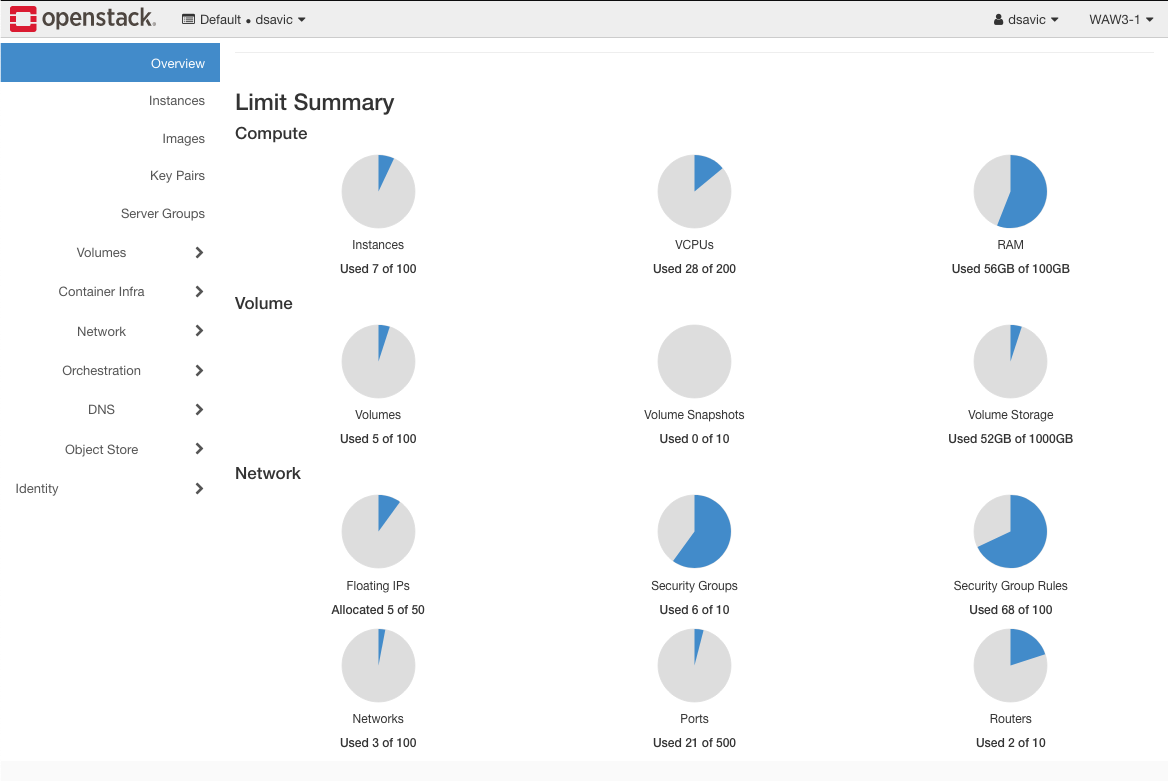
In this step you have successfuly deleted the clusters whose creation has stopped prematurely, thus paving the way to the creation of the next cluster under slightly different circumstances.
What To Do Next
In this tutorial, you have used the CLI commands to generate cluster templates as well as clusters themselves. Also, if the cluster process failed, how to free up the system resources and try again.
OpenStack and Magnum did heavy lifting for you, letting you create full fledged Kubernetes clusters with only a handful of CLI commands. The next step is to start working with the Kubernetes clusters directly. That means installing the kubectl command with article How To Access Kubernetes Cluster Post Deployment Using Kubectl On Creodias OpenStack Magnum and using it to install the apps that you want to run on Kubernetes clusters.