Sealed Secrets on Creodias Kubernetes
Sealed Secrets improve security of our Kubernetes deployments by enabling encrypted Kubernetes secrets. This allows to store such secrets in source control and follow GitOps practices of storing all configuration in code.
In this article we will install tools to work with Sealed Secrets and demonstrate using Sealed Secrets on Creodias cloud.
What We Are Going To Cover
Install the Sealed Secrets controller
Install the kubeseal command line utility
Create a sealed secret
Unseal the secret
Verify
Prerequisites
No. 1 Account
You need a Creodias hosting account with access to the Horizon interface: https://horizon.cloudferro.com/auth/login/?next=/.
No. 2 Understand Helm deployments
To install Sealed Secrets on Kubernetes cluster, we will use the appropriate Helm chart. The following article explains the procedure:
Deploying Helm Charts on Magnum Kubernetes Clusters on Creodias
No. 3 Kubernetes cluster
General explanation of how to create a Kubernetes cluster is here:
How to Create a Kubernetes Cluster Using Creodias OpenStack Magnum
For new cluster, using the latest version of the cluster template is always recommended. This article was tested with Kubernetes 1.25.
No. 4 Access to cluster with kubectl
How To Access Kubernetes Cluster Post Deployment Using Kubectl On Creodias OpenStack Magnum
Step 1 Install the Sealed Secrets controller
In order to use Sealed Secrets we will first install the Sealed Secrets controller to our Kubernetes cluster. We can use Helm for this purpose and the first step is to download the Helm repository. To add the repo locally use the following command:
helm repo add sealed-secrets https://bitnami-labs.github.io/sealed-secrets
The next step is to install the SealedSecrets controller chart. We need to install it to the namespace kube-system. Note we also override the name of the controller, so that it corresponds to the default name used by the CLI utility kubeseal which we will install in the following section.
helm install sealed-secrets -n kube-system --set-string fullnameOverride=sealed-secrets-controller sealed-secrets/sealed-secrets
The chart downloads several resources to our cluster. The key ones are:
SealedSecret Custom Resource Definition (CRD) - defines the template for sealed secrets that will be created on the cluster
The SealedSecrets controller pod running in the kube-system namespace.
Step 2 Install the kubeseal command line utility
Kubeseal CLI tool is used for encrypting secrets using the public certificate of the controller. To proceed, install kubeseal with the following set of commands:
KUBESEAL_VERSION='0.23.0'
wget "https://github.com/bitnami-labs/sealed-secrets/releases/download/v${KUBESEAL_VERSION:?}/kubeseal-${KUBESEAL_VERSION:?}-linux-amd64.tar.gz"
tar -xvzf kubeseal-${KUBESEAL_VERSION:?}-linux-amd64.tar.gz kubeseal
sudo install -m 755 kubeseal /usr/local/bin/kubeseal
You can verify that kubeseal was properly installed by running:
kubeseal --version
which will return result similar to the following:

Step 3 Create a sealed secret
We can use Sealed Secrets to encrypt the secrets, which can be decrypted only by the controller running on the cluster.
A sealed secret needs to be created based off a regular, unencrypted Kubernetes secret. However, we don’t want to commit this base secret to our Kubernetes cluster. We also do not want to create a permanent file with the unencrypted secret contents, to avoid accidentally committing it to source control.
Therefore we will use kubectl to create a regular secret only temporarily, using –dry-run=client parameter. The secret has a key foo and value bar. kubectl outputs this temporary secret, we then pipe this output to kubeseal utility. kubeseal seals (encrypts) the secret and saves it to a file called sealed-secret.yaml.
kubectl create secret generic mysecret \
--dry-run=client \
--from-literal=foo=bar -o yaml | kubeseal \
--format yaml > mysecret.yaml
When we view the file we can see the contents are encrypted and safe to store in source control.
Step 4 Unseal the secret
To unseal the secret and make it available and usable in the cluster, we perform the following command:
kubectl create -f mysecret.yaml
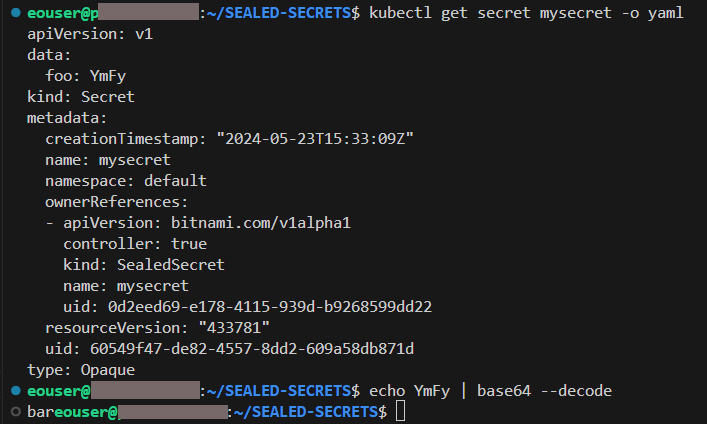
This, after few seconds, generates a regular Kubernetes secret which is readable to our cluster. We can verify this with these two commands:
kubectl get secret mysecret -o yaml
echo YmFy | base64 --decode
The former command extracts output the yaml of the secret, while the latter decodes the value of the data stored under key foo which outputs the expected result: bar.
The results can also be seen on the below screen:
Step 5 Verify
The generated secret can be used as a regular Kubernetes secret. To test, create a file test-pod.yaml with the following contents:
test-pod.yaml
apiVersion: v1
kind: Pod
metadata:
  name: nginx
spec:
  containers:
  - name: nginx
    image: nginx:latest
    env:
    - name: TEST_VAR
      valueFrom:
        secretKeyRef:
          name: mysecret
          key: foo
This launches a minimal pod called nginx which is based on nginx server container image. In the container inside the pod, we create an environment variable called TEST_VAR. The value of the variable is assigned from our secret mysecret by the available key foo. Apply the example with the following command:
kubectl apply -f test-pod.yaml
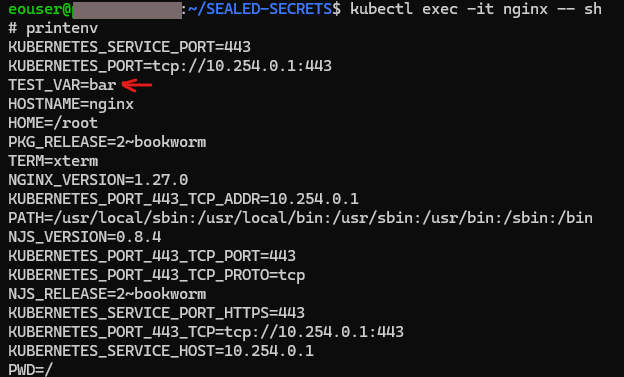
Then enter the container inside the nginx pod:
kubectl exec -it nginx -- sh
The command prompt will change to #, meaning the command you enter is executed inside the container. Execute the printenv command to see environment variables. We can see our variable TEST_VAR with the value bar, as expected:
What To Do Next
Sealed Secrets present a viable alternative to secret management using additional tools such as HashiCorp-Vault. For additional information, see Installing HashiCorp Vault on Creodias Magnum.