Deploying Helm Charts on Magnum Kubernetes Clusters on Creodias
Kubernetes is a robust and battle-tested environment for running apps and services, yet it could be time consuming to manually provision all resources required to run a production-ready deployment. This article introduces Helm as a package manager for Kubernetes. With it, you will be able to quickly deploy complex Kubernetes applications, consisting of code, databases, user interfaces and more.
What We Are Going To Cover
Background - How Helm works
Install Helm
Add a Helm repository
Helm chart repositories
Deploy Helm chart on a cluster
Customize chart deployment
Prerequisites
No. 1 Account
You need a Creodias hosting account with access to the Horizon interface: https://horizon.cloudferro.com/auth/login/?next=/.
No. 2 Basic understanding of Kubernetes
We assume you have basic understanding of Kubernetes, its notions and ways of working. Explaining them is out of scope of this article.
No. 3 A cluster created on cloud
For trying out Helm installation and deployment in an actual environment, create a cluster on using OpenStack Magnum How to Create a Kubernetes Cluster Using Creodias OpenStack Magnum.
No. 4 Active connection to the cloud
For Kubernetes, that means a kubectl command line tool installed and kubeconfig pointing to a cluster. Instructions are provided in this article How To Use Command Line Interface for Kubernetes Clusters On Creodias OpenStack Magnum.
No. 5 Access to Ubuntu to run code on
Code samples in this article assume you are running Ubuntu 20.04 LTS or similar Linux system. You can run them on
Windows with Linux subsystem,
genuine desktop Ubuntu operating system or you can also
create a virtual machine in the Creodias and run the examples from there. These articles will provide technical know-how if you need it:
How to create a Linux VM and access it from Windows desktop on Creodias
How to create a Linux VM and access it from Linux command line on Creodias
Background - How Helm works
A usual sequence of deploying an application on Kubernetes entails:
having one or more containerized application images available in an image registry
deploying one or more Kubernetes resources, in the form of manifest YAML files, onto a Kubernetes cluster
The Kubernetes resources, directly or indirectly, point to the container images. They can also contain additional information required by these images to run. In a very minimal setup, we would have e.g., an NGINX container image deployed with a deployment Kubernetes resource, and exposed on a network via a service resource. A production-grade Kubernetes deployment of a larger application usually requires a set of several, or more, Kubernetes resources to be deployed on the cluster.
For each standard deployment of an application on Kubernetes (e.g. a database, a CMS system, a monitoring application), the boilerplate YAML manifests would mostly be the same and only vary based on the specific values assigned (e.g. ports, endpoints, image registry, version, etc.).
Helm, therefore, automates the process of provisioning a Kubernetes deployment. The person in charge of the deployment does not have to write each resource from the scratch or consider the links between the resources. Instead, they download a Helm chart, which provides predefined resource templates. The values for the templates are read from a central configuration file called values.yaml.
Helm charts are designed to cover a broad set of use cases required for deploying an application. The application can be then simply launched on a cluster with a few commands within seconds. Some specific customizations for an individual deployment can be then easily adjusted by overriding the default values.yaml file.
Install Helm
You can install Helm on your own development machine. To install, download the installer file from the Helm release page, change file permission, and run the installation:
curl -fsSL -o get_helm.sh https://raw.githubusercontent.com/helm/helm/main/scripts/get-helm-3
chmod 700 get_helm.sh
 ./get_helm.sh
You can verify the installation by running:
$ helm version
For other operating systems, use the link to download Helm installation files and proceed analogously.
Add a Helm repository
Helm charts are distributed using repositories. For example, a single repository can host several Helm charts from a certain provider. For the purpose of this article, we will add the Bitnami repository that contains their versions of multiple useful Helm charts e.g. Redis, Grafana, Elasticsearch, or others. You can run it using the following command:
helm repo add bitnami https://charts.bitnami.com/bitnami
Then verify the available charts in this repository by running:
helm search repo
The following image shows just a start of all the available apps from bitnami repository to install with Helm:

Helm chart repositories
In the above example, we knew where to find a repository with Helm charts. There are other repositories and they are usually hosted on GitHub or ArtifactHub. Let us have a look at the apache page in ArtifactHUB:
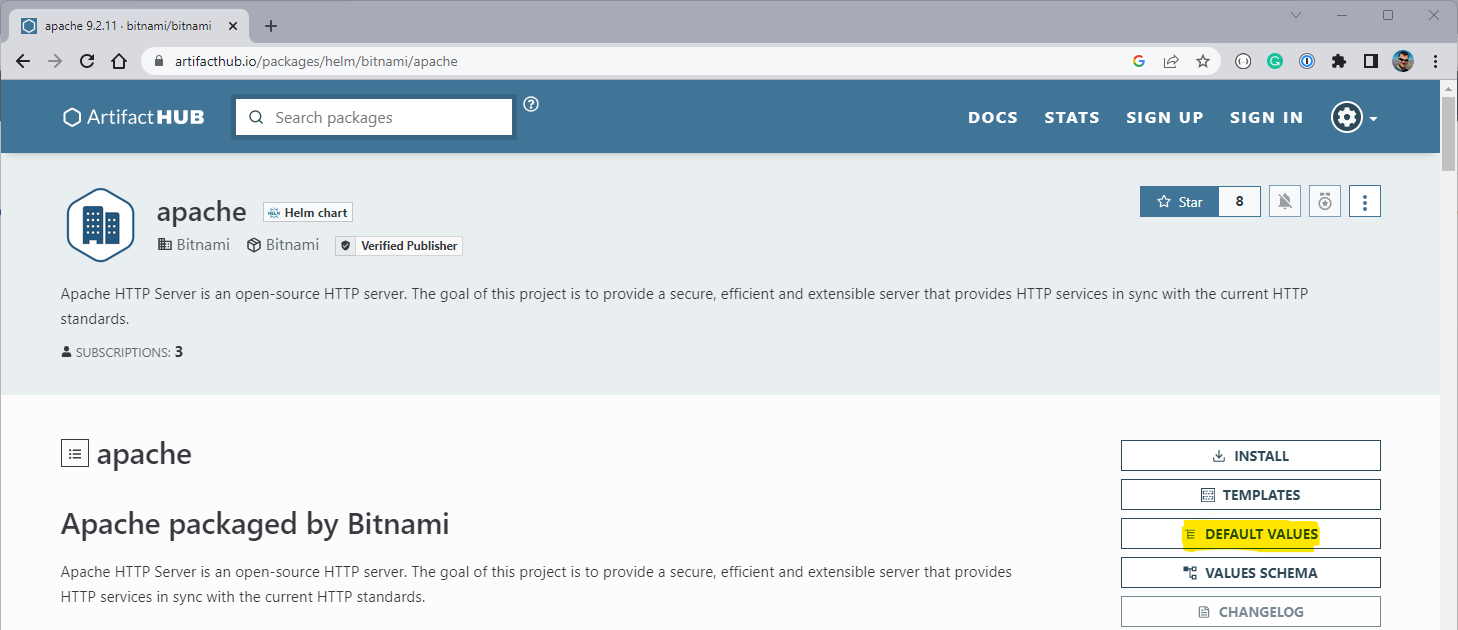
Click on the DEFAULT VALUES option (yellow highlight) and see contents of the default values.yaml file.
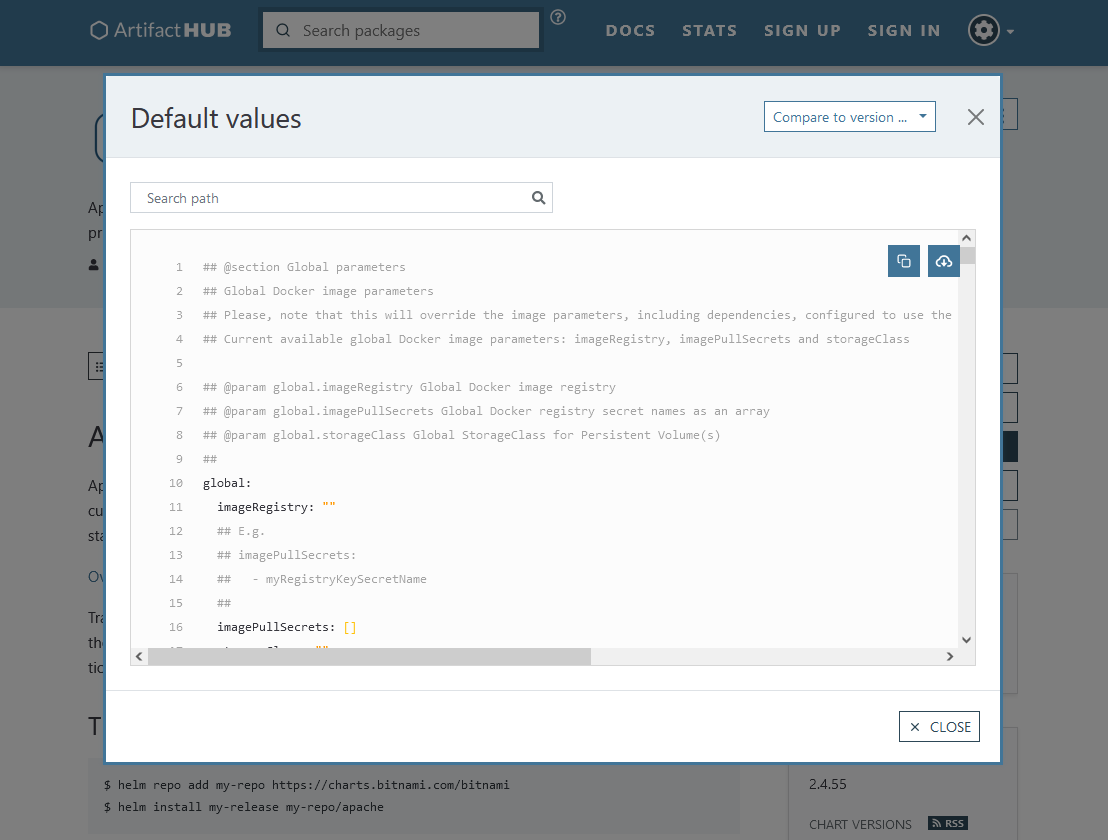
In this file (or in additional tabular information on the chart page), you can check which parameters are enabled for customization, and which are their default values.
Check whether kubectl has access to the cluster
To proceed further, verify that you have your KUBECONFIG environment variable exported and pointing to a running cluster’s kubeconfig file (see Prerequisite No. 4). If there is need, export this environment variable:
export KUBECONFIG = <location-of-your-kubeconfig-file>
If your kubectl is properly installed, you should be then able to list the nodes on your cluster:
kubectl get nodes
That will serve as the confirmation that you have access to the cluster.
Deploy a Helm chart on a cluster
Now that we know where to find repositories with hundreds of charts to choose from, let’s deploy one of them to our cluster.
We will install an Apache web server Helm chart. In order to install it with a default configuration, we need to run a single command:
helm install my-apache bitnami/apache
Note that my-apache refers to the concrete release, that is, the concrete deployment running on our cluster. We can adjust this name to our liking. Upon running the above command, the chart gets deployed and some insight about our release is provided:
NAME: my-apache
LAST DEPLOYED: Tue Jan 31 10:48:07 2023
NAMESPACE: default
STATUS: deployed
REVISION: 1
TEST SUITE: None
NOTES:
CHART NAME: apache
CHART VERSION: 9.2.11
APP VERSION: 2.4.55
....
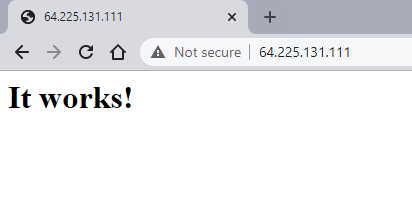
As a result, several Kubernetes resources get deployed on the cluster. One of them is the Kubernetes service, which by default gets deployed as a LoadBalancer type. This way your Apache deployment gets immediately publicly exposed with a floating IP available in the <EXTERNAL-IP> cell on the default port 80:
$ kubectl get services
NAME         TYPE           CLUSTER-IP      EXTERNAL-IP      PORT(S)                      AGE
...
my-apache    LoadBalancer   10.254.147.21   64.225.131.111   80:32654/TCP,443:32725/TCP   5m
Note that the floating IP generation can take a couple of minutes to appear. After this time, once you enter the floating IP into the browser you shall see the service available from the Internet:
Customizing the chart deployment
We just saw how quick it was to deploy a Helm chart with the default settings. Usually, before running the chart in production, you will need to adjust a few settings to meet your requirements.
To customize the deployment, a quick and dirty approach would be to provide flags on the Helm command line to adjust specific parameters. The problem is that each command line option will have 10-20 available flags, so this approach may not be the best in the long run.
A more universal approach, however, is to customize the values.yaml file. There are two main ways of doing it:
- Copy the entire values.yaml file
Here you only adjust the value of a specific parameter.
- Create new values.yaml file from scratch
It would contain only the adjusted parameters, with their overridden values.
In both scenarios, all defaults, apart from the overridden ones, will be preserved.
As an example of customizing the chart, let us expose Apache web server on port 8080 instead of the default 80. We will use the second approach and provide a minimal my-values.yaml file for the overrides. The contents of this file will be the following:
my-values.yaml
service:
  ports:
    http: 8080
With these customizations, make sure to follow the indentation and follow the YAML structure indicating also the respective parent blocks in the tree.
A separate adjustment that we will make is to create a dedicated namespace apache for our Helm release and instruct Helm to use this namespace. Such an adjustment is quite usual, in order to separate the artifacts related to a specific release/application.
Apply the mentioned customizations to the my-custom-apache release, using the following command:
helm install my-custom-apache bitnami/apache --values my-values.yaml --namespace custom-apache --create-namespace
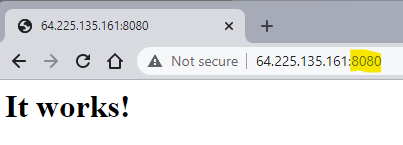
Similarly, as in the earlier example, the service gets exposed. This time, to access the service’s floating IP, refer to the newly created custom-apache namespace:
kubectl get services -n custom-apache
NAME               TYPE           CLUSTER-IP       EXTERNAL-IP     PORT(S)                        AGE
my-custom-apache   LoadBalancer   10.254.230.171   64.225.135.161  8080:31150/TCP,443:30139/TCP   3m51s
We can see that the application is now exposed to a new port 8080, which can be verified in the browser as well:
What To Do Next
Deploy other useful services using Helm charts:
Installing JupyterHub on Magnum Kubernetes Cluster in Creodias
Install and run Argo Workflows on Creodias Magnum Kubernetes
Install and run Dask on a Kubernetes cluster in Creodias cloud
A chart deployed with Helm is, in the end, just a set of Kubernetes resources. Usually, there is a hefty amount of configurable settings in the available Open Source charts. You can edit other parameters on an already deployed cluster and you can even modify the templates to your specific use case.
The following article will show how to use JetStack repo to install CertManager, with which you can deploy HTTPS services on Kubernetes cloud: