Creating Additional Nodegroups in Kubernetes Cluster on Creodias OpenStack Magnum
The Benefits of Using Nodegroups
A nodegroup is a group of nodes from a Kubernetes cluster that have the same configuration and run the user’s containers. One and the same cluster can have various nodegroups within it, so instead of creating several independent clusters, you may create only one and then separate the groups into the nodegroups.
A nodegroup separates the roles within the cluster and can
limit the scope of damage if a given group is compromised,
regulate the number of API requests originating from a certain group, and
create scopes of privileges to specific node types and related workloads.
Other uses of nodegroup roles also include:
for testing purposes,
if your Kubernetes environment is small on resources, you can create a minimal Kubernetes cluster and later on add nodegroups and thus enhance the number of control and worker nodes.
Nodes in a group can be created, upgraded and deleted individually, without affecting the rest of the cluster.
Note
Resizing of an autoscalable cluster (default nodegroup) from Horizon GUI is not supported for autoscalable nodegroups. While Horizon will accept the request, it will have no impact on the cluster.
What We Are Going To Cover
The structure of command openstack coe nodelist
How to produce manageable output from nodelist set of commands
How to list what nodegroups are available in a cluster
How to show the contents of one particular nodegroup in a cluster
How to create a new nodegroup
How to delete an existing nodegroup
How to update nodegroups
How to resize a nodegroup
The benefits of using nodegroups in Kubernetes clusters
Prerequisites
No. 1 Hosting
You need a Creodias hosting account with Horizon interface https://horizon.cloudferro.com/auth/login/?next=/.
No. 2 Creating clusters with CLI
The article How To Use Command Line Interface for Kubernetes Clusters On Creodias OpenStack Magnum will introduce you to creation of clusters using a command line interface.
No. 3 Connect openstack client to the cloud
Prepare openstack and magnum clients by executing Step 2 Connect OpenStack and Magnum Clients to Horizon Cloud from article How To Install OpenStack and Magnum Clients for Command Line Interface to Creodias Horizon
No. 4 Check available quotas
Before creating additional node groups check the state of the resources with Horizon commands Computer => Overview. See Dashboard Overview – Project Quotas And Flavors Limits on Creodias.
Nodegroup Subcommands
Once you create a Kubernetes cluster on OpenStack Magnum, there are five nodegroup commands at your disposal:
openstack coe nodegroup create

openstack coe nodegroup delete

openstack coe nodegroup list

openstack coe nodegroup show

openstack coe nodegroup update
With this, you can repurpose the cluster to include various images, change volume access, set up max and min values for the number of nodes and so on.
Step 1 Access the Current State of Clusters and Their Nodegroups
Here is which clusters are available in the system:
openstack coe cluster list --max-width 120
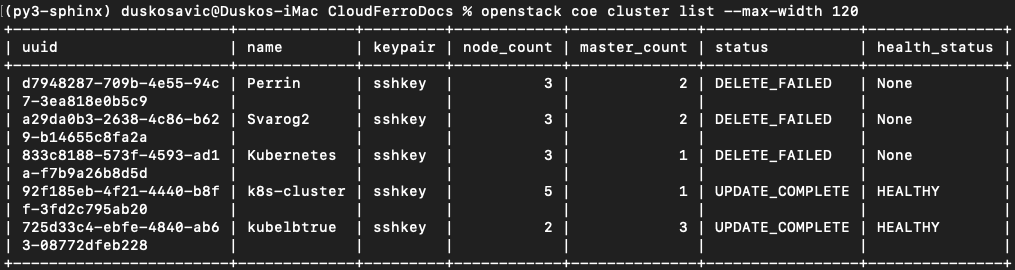
The default process of creating Kubernetes clusters on OpenStack Magnum produces two nodegroups, default-master and default-worker. Use commands
openstack coe nodegroup list kubelbtrue

openstack coe nodegroup list k8s-cluster
to list default nodegroups for those two clusters, kubelbtrue and k8s-cluster.
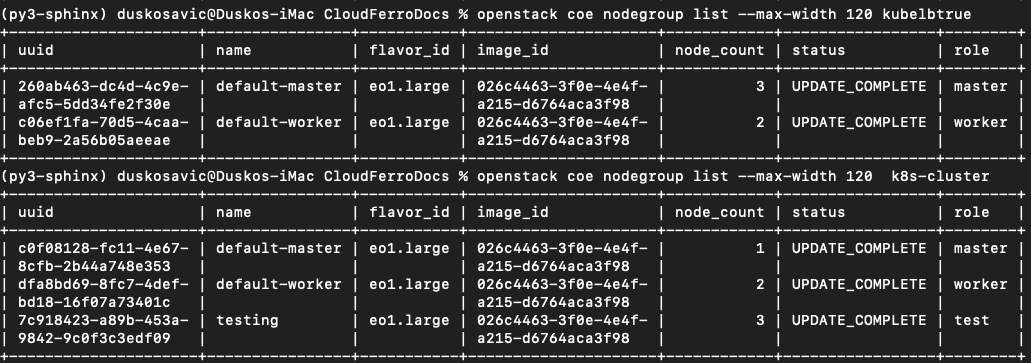
The default-worker node group cannot be removed or reconfigured so plan ahead when creating the base cluster.
Step 2 How to Create a New Nodegroup
In this step you learn about the parameters available for the nodegroup create command. This is the general structure:
openstack coe nodegroup create [-h]
[--docker-volume-size <docker-volume-size>]
[--labels <KEY1=VALUE1,KEY2=VALUE2;KEY3=VALUE3...>]
[--node-count <node-count>]
[--min-nodes <min-nodes>]
[--max-nodes <max-nodes>]
[--role <role>]
[--image <image>]
[--flavor <flavor>]
[--merge-labels]
<cluster> <name>
You will now create a nodegroup of two members, it will be called testing, the role will be called test, and add it to the cluster k8s-cluster:
openstack coe nodegroup create \
--node-count 2 \
--role test \
k8s-cluster testing
Then use the command
openstack coe nodegroup list k8s-cluster
to list the nodegroups twice. The first time, it will be in status of creating, the second time, after a few seconds, it will have been created already.

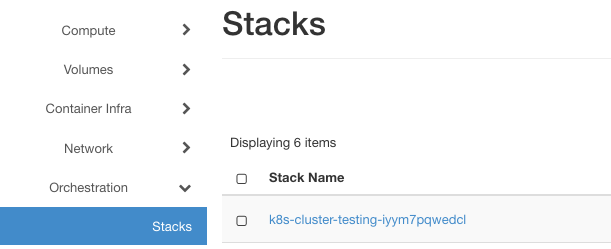
In Horizon, use command Orchestration => Stacks to list the mechanisms that create new instances. In this case, the stack looks like this:
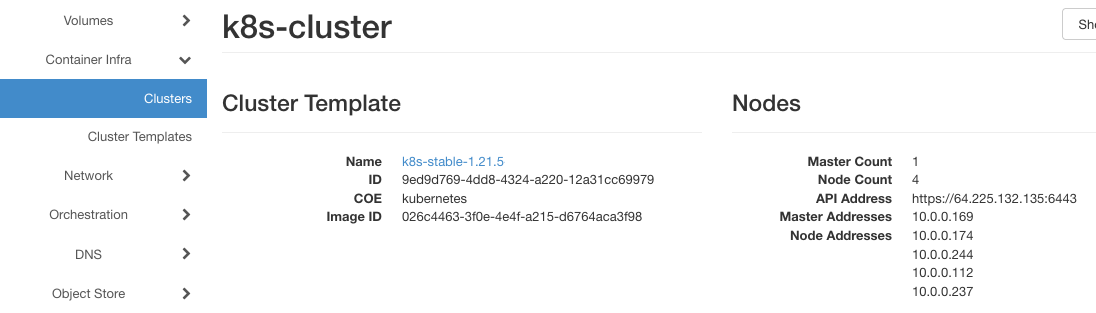
Still in Horizon, click on commands Contaner Infra => Clusters => k8s-clusters and see that there are now five nodes in total:
Step 3 Using role to Filter Nodegroups in the Cluster
It is possible to filter node groups according to the role. Here is the command to show only the test nodegroup:
openstack coe nodegroup list k8s-cluster --role test

Several node groups can share the same role name.
The roles can be used to schedule the nodes when using the kubectl command directly on the cluster.
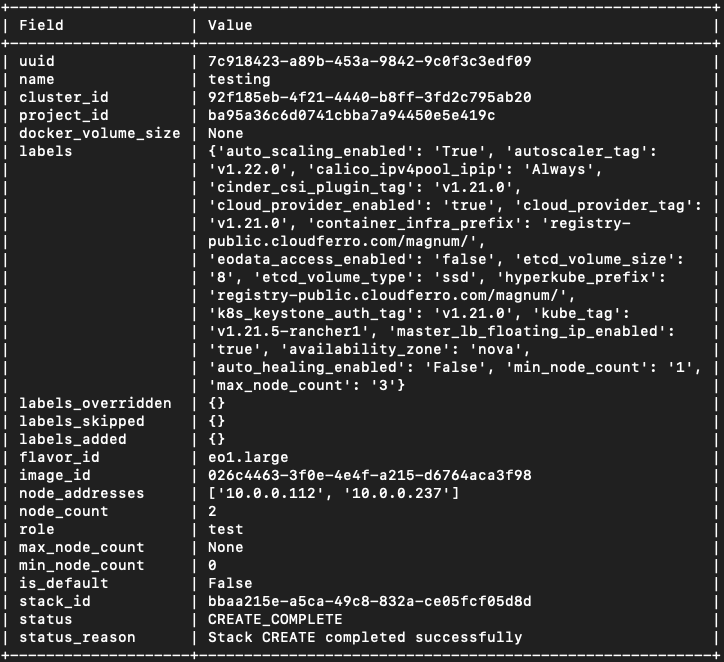
Step 4 Show Details of the Nodegroup Created
Command show presents the details of a nodegroup in various formats – json, table, shell, value or yaml. The default is table but use parameter –max-width to limit the number of columns in it:
openstack coe nodegroup show --max-width 80 k8s-cluster testing
Step 5 Delete the Existing Nodegroup
In this step you shall try to create a nodegroup with small footprint:
openstack coe nodegroup create \
--node-count 2 \
--role test \
--image cirros-0.4.0-x86_64-2 \
--flavor eo1.xsmall \
k8s-cluster cirros
After one hour, the command was cancelled and the creation has failed. The resources will, however, stay frozen in the system so here is how to delete them.
One way is to use the CLI delete subcommand, like this:
openstack coe nodegroup delete k8s-cluster cirros
The status will be changed to DELETE_IN_PROGRESS.
Another way is to find the instances of those created nodes and delete them through the Horizon interface. Find the existing instances with commands Compute => Instance and filter by Instance Name, with text k8s-cluster-cirros-. It may look like this:

and then delete them by clicking on red button Delete Instances.
You will get a confirmation text in cloud in the upper right corner.
Regardless of the way, the instances will not be deleted immediately, but rather scheduled to be deleted in some near future.
The default master and worker node groups cannot be deleted but all the others can.
Step 6 Update the Existing Nodegroup
In this step you will directly update the existing nodegroup, rather than adding and deleting them in a row. The example command is:
openstack coe nodegroup update k8s-cluster testing replace min_node_count=1
Instead of replace, it is also possible to use verbs add and delete.
In the above example, you are setting up the minimum value of nodes to 1. (Previously it was 0 as parameter min_node_count was not specified and its default value is 0.)
Step 7 Resize the Nodegroup
Resizing the nodegroup is similar to resizing the cluster, with the addition of parameter –nodegroup. Currently, the number of nodes in group testing is 2. Make it 1:
openstack coe cluster resize k8s-cluster --nodegroup testing 1
To see the result, apply the command
openstack coe nodegroup list --max-width 120 k8s-cluster
and get:

Cluster cannot be scaled outside of min-nodes/max-nodes set when nodegroup was created.
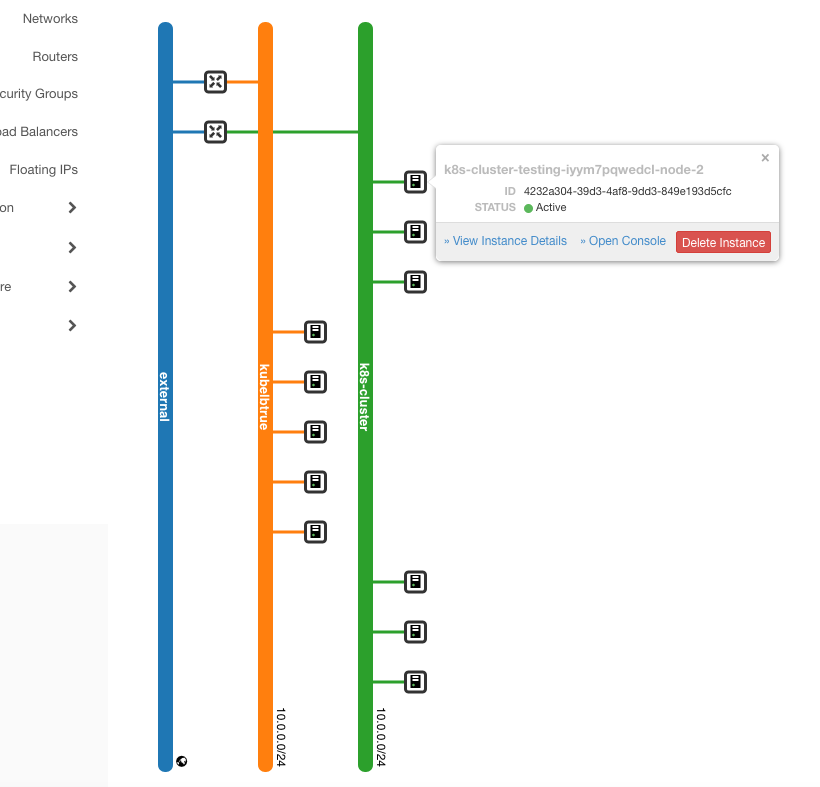
Here is what the state of the networks looks like after all these changes (commands Network => Network Topology => Small in Horizon interface):