Using Kubernetes Ingress on Creodias OpenStack Magnum
The Ingress feature in Kubernetes can be associated with routing the traffic from outside of the cluster to the services within the cluster. With Ingress, multiple Kubernetes services can be exposed using a single Load Balancer.
In this article, we will provide insight into how Ingress is implemented on the . We will also demonstrate a practical example of exposing Kubernetes services using Ingress on the cloud. In the end, you will be able to create one or more sites and services running on a Kubernetes cluster. The services you create in this way will
run on the same IP address without need of creating extra LoadBalancer per service and will also
automatically enjoy all of the Kubernetes cluster benefits – reliability, scalability etc.
What We Are Going To Cover
Create Magnum Kubernetes cluster with NGINX Ingress enabled
Build and expose Nginx and Apache webservers for testing
Create Ingress Resource
Verify that Ingress can access both testing servers
Prerequisites
No. 1 Account
You need a Creodias hosting account with access to the Horizon interface: https://horizon.cloudferro.com/auth/login/?next=/.
No. 2 Basic knowledge of Kubernetes fundamentals
Basic knowledge of Kubernetes fundamentals will come handy: cluster creation, pods, deployments, services and so on.
No. 3 Access to kubectl command
To install necessary software (if you haven’t done so already), see article How To Access Kubernetes Cluster Post Deployment Using Kubectl On Creodias OpenStack Magnum.
The net result of following instructions in that and the related articles will be
a cluster formed, healthy and ready to be used, as well as
enabling access to the cluster from the local machine (i.e. having kubectl command operational).
Step 1 Create a Magnum Kubernetes cluster with NGINX Ingress enabled
When we create a Kubernetes cluster on the , we can deploy it with a preconfigured ingress setup. This requires minimal setting and is described in this help section: How to Create a Kubernetes Cluster Using Creodias OpenStack Magnum.
Such a cluster is deployed with an NGINX ingress controller and the default ingress backend. The role of the controller is to enable the provisioning of the infrastructure e.g. the (virtual) load balancer. The role of the backend is to provide access to this infrastructure in line with the rules defined by the ingress resource (explained later).
We can verify the availability of these artifacts by typing the following command:
kubectl get pods -n kube-system
The output should be similar to the one below. We see that there is an ingress controller created, and also an ingress backend, both running as pods on our cluster.
kubectl get pods -n kube-system
NAME                                                   READY   STATUS    RESTARTS   AGE
...
magnum-nginx-ingress-controller-zxgj8                  1/1     Running   0          65d
magnum-nginx-ingress-default-backend-9dfb4c685-8fjdv   1/1     Running   0          83d
...
There is also an ingress class available in the default namespace:
kubectl get ingressclass
NAME    CONTROLLER             PARAMETERS   AGE
nginx   k8s.io/ingress-nginx   <none>       7m36s
Step 2 Creating services for Nginx and Apache webserver
You are now going to build and expose two minimal applications:
Nginx server
Apache webserver
They will be both exposed from a single public IP address using a single default ingress Load Balancer. The web pages served from each server will be accessible in the browser with a unified routing scheme. In a similar fashion, one could mix and match applications written in a variety of other technologies.
First, let’s create the Nginx server app. For brevity, we use the command line with default settings:
kubectl create deployment nginx-web --image=nginx
kubectl expose deployment nginx-web --type=NodePort --port=80
Similarly, we create the Apache app:
kubectl create deployment apache-web --image=httpd
kubectl expose deployment apache-web --type=NodePort --port=80
The above actions result in creating a service for each app, which can be inspected using the below command. Behind each service, there is a deployment and a running pod.
kubectl get services
You should see an output similar to the following:
kubectl get services
NAME              TYPE           CLUSTER-IP       EXTERNAL-IP      PORT(S)        AGE
apache-web        NodePort       10.254.80.182    <none>           80:32660/TCP   75s
kubernetes        ClusterIP      10.254.0.1       <none>           443/TCP        84d
nginx-web         NodePort       10.254.101.230   <none>           80:32532/TCP   36m
The services were created with the type NodePort, which is a required type to work with ingress. Therefore, they are not yet exposed under a public IP. The servers are, however, already running and serving their default welcome pages.
You could verify that by assigning a floating IP to one of the nodes (see How to Add or Remove Floating IP’s to your VM on Creodias). Then SSH to the node and run the following command:
curl <name-of-node>:<port-number>
E.g. for the scenario above we see:
curl ingress-tqwzjwu2lw7p-node-1:32660
<html><body><h1>It works!</h1></body></html>
Step 3 Create Ingress Resource
To expose application to a public IP address, you will need to define an Ingress Resource. Since both applications will be available from the same IP address, the ingress resource will define the detailed rules of what gets served in which route. In this example, the /apache route will be served from the Apache service, and all other routes will be served by the Nginx service.
Note
There are multiple ways the routes can be configured, we present here just a fraction of the capability.
Create a YAML file called my-ingress-resource.yaml with the following contents:
apiVersion: networking.k8s.io/v1
kind: Ingress
metadata:
  name: example-ingress
  annotations:
    nginx.ingress.kubernetes.io/rewrite-target: /
spec:
  ingressClassName: nginx
  rules:
    - http:
        paths:
        - path: /*
          pathType: Prefix
          backend:
            service:
              name: nginx-web
              port:
                number: 80
        - path: /apache
          pathType: Prefix
          backend:
            service:
              name: apache-web
              port:
                number: 80
And deploy with:
kubectl apply -f my-ingress-resource.yaml
After some time (usually 2 to 5 minutes), verify that the floating IP has been assigned to the ingress:
kubectl get ingress
NAME CLASS HOSTS ADDRESS PORTS AGE
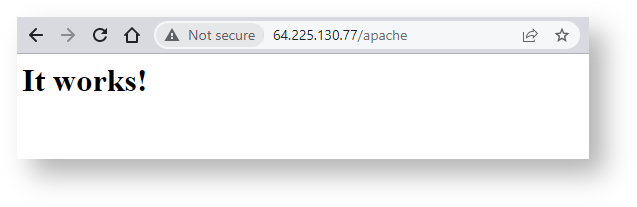
example-ingress nginx * 64.225.130.77 80 3m16s
Note
The address 64.225.130.77 is generated randomly and in your case it will be different. Be sure to copy and use the address shown by kubectl get ingress.
Step 4 Verify that it works
Copy the ingress floating IP in the browser, followed by some example routes. You should see an output similar to the one below. Here is the screenshot for the /apache route:
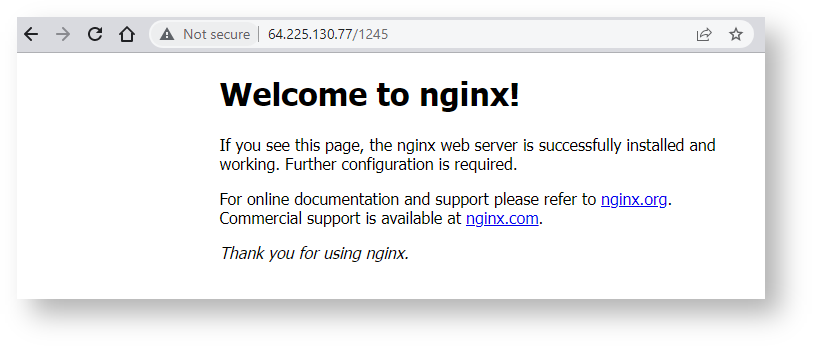
This screenshot shows what happens on any other route – it defaults to Nginx:
What To Do Next
You now have two of the most popular web servers installed as services within a Kubernetes cluster. Here are some ideas how to use this setup:
Create another service on the same server
To create another service under the same IP address, repeat the entire procedure with another endpoint name instead of /apache. Don’t forget to add the apropriate entry into the YAML file.
Add other endpoints for use with Nginx
You can create other endpoints and use Nginx as the basic server instead of Apache.
Use images other than nginx and httpd
There are many sources of containers on the Internet but the most popular catalog is dockerhub.com. It contains operating systems images with preinstalled software you want to use, which will save you the effort of downloading and testing the installation.
Microservices
Instead of putting all of the code and data onto one virtual machine, the Kubernetes way is to deploy multiple custom containers. A typical setup would be like this:
pod No. 1 would contain a database, say, MariaDB, as a backend,
pod No. 2 could contain PHPMyAdmin for a front end to the database,
pod No. 3 could contain installation of WordPress, which is the front end for the site visitor
pod No. 4 could contain your proprietary code for WordPress plugins.
Each of these pods will take code from a specialized image. If you want to edit a part of the code, you just update the relevant Docker image on docker hub and redeploy.
Use DNS to create a domain name for the server
You can use a DNS service to connect a proper domain name to the IP address used in this article. With the addition of a Cert Manager and a free service such as Let’s Encrypt, an ingress will be running HTTPS protocol in a straightforward way.