Sample SLURM Cluster on Creodias Cloud with ElastiCluster
In this guide, your are going to use ElastiCluster for automated setup of an SLURM cluster on an OpenStack environment. Using ElastiCluster
enables quick setup of computing clusters,
requires only a minimum configuration options and
provides built-in support for OpenStack and SLURM.
This setup enables quick provisioning of a SLURM cluster consisting of one master/login node and a required number of compute nodes.
What We Are Going To Cover
How to create a Keystone user
How to create a new key pair called 2468 for SSH access amongst cluster nodes
How to create elasticluster_slurm security group to enable port 22 for that SSH access
Installation ElastiCluster
Provide ElastiCluster configuration
Deploy the cluster
Prerequisites
No. 1 Hosting
You need a Creodias hosting account with access to the Horizon interface: https://horizon.cloudferro.com/auth/login/?next=/.
No. 2 Project quotas and flavors limits
The article Dashboard Overview – Project Quotas And Flavors Limits on Creodias gives basic definitions of quotas and flavors in OpenStack. (Briefly, a quota is how many, say, instances you can have in total, while flavor is how large do you want one instance to be.)
Clusters use fully equipped instance (virtual machines) using, say, 4 CPUs and 32 GB of RAM. If your quota for CPUs is 24 in total, the five virtual machines you are going to build for the SLURM cluster will take 20 out of those 24 CPUs, meaning that there will not much space left in the user account for anything else. So check how much quotas you have at your disposal before creating a cluster in this and similar articles.
No. 3. Connect to the cloud
RC file contains parameters needed to communicate with your cloud. The exact procedure for downloading the RC file from the cloud is explained in article: How to activate OpenStack CLI access to Creodias cloud using one- or two-factor authentication
The exact procedure will depend on whether your account has one- or two-factor authentication enabled:
- One-factor authentication
You enter only the password with which you log into the account.
- Two-factor authentication
You enter both the password and the six-digit code you generate each time you start a new session to connect to the cloud.
Always use the latest value of image id
From time to time, the default images of operating systems in the Creodias cloud are upgraded to the new versions. As a consequence, their image id will change. Let’s say that the image id for Ubuntu 20.04 LTS was 574fe1db-8099-4db4-a543-9e89526d20ae at the time of writing of this article. While working through the article, you would normally take the current value of image id, and would use it to replace 574fe1db-8099-4db4-a543-9e89526d20ae throughout the text.
Now, suppose you wanted to automate processes under OpenStack, perhaps using Heat, Terraform, Ansible or any other tool for OpenStack automation; if you use the value of 574fe1db-8099-4db4-a543-9e89526d20ae for image id, it would remain hardcoded and once this value gets changed during the upgrade, the automated process may stop to execute.
Warning
Make sure that your automation code is using the current value of an OS image id, not the hardcoded one.
Preparation Step 1 Create an OpenStack Keystone User
There are two basic types of users within OpenStack: tenant managers and users.
Tenant managers are the administrators of the account. They authenticate with Keycloak in your Creodias OpenStack system and can create new users.
Users log into their accounts authenticating to Keystone, which is a module within OpenStack system. Also known as Keystone users.
Warning
ElastiCluster will work only on Keystone user accounts.
If you already operate on a separate Keystone user, you can skip this section; if not, log in as the tenant manager using Prerequisite No. 1. Create a new user using Horizon menu command Identity → Users and fill in the template. Remember the username, password, and domain name.

Sign out from the admin user and log in as the user, this time selecting dropdown entry: “Keystone Credentials”.
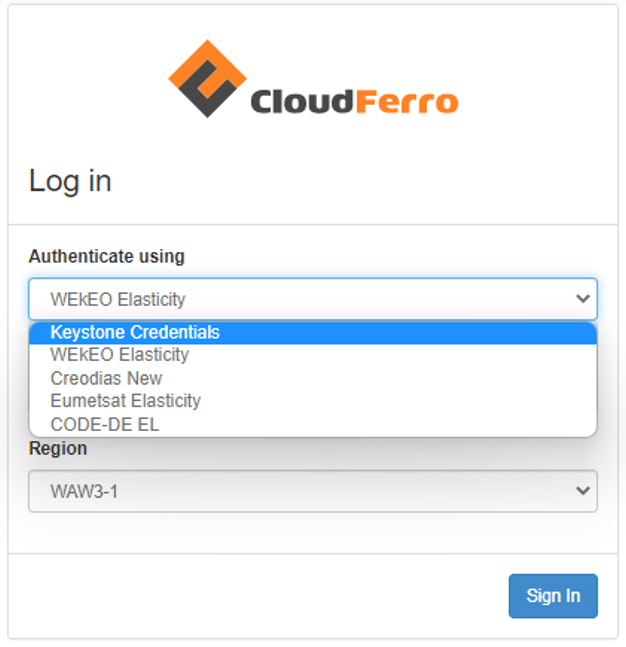
Use the the username, password, and domain name you defined when creating a new user.
Preparation Step 2 Create a New Key Pair
When operating as a new user, you will not have access to any key pair created for your tenant manager. Create a separate key pair arbitrarily called 2468 for the new user and ensure you use it to authenticate for cluster SSH access from your machine. Later on, that key pair will be used in ElastiCluster configuration template.
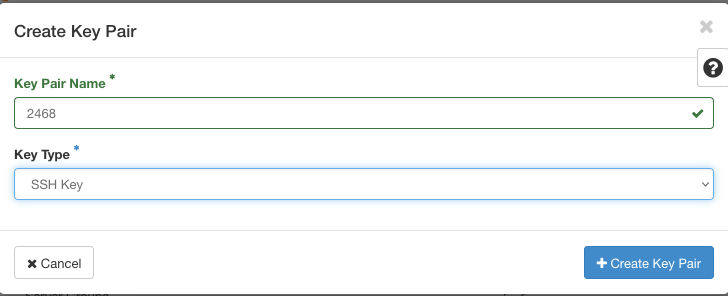
The generated key pair consists of two long and random strings of characters. One is known as the public key and the other is the secret key. To install a SLURM cluster with ElastiCluster, both keys need to be present as readable and protected files on the local computer. For more technical help, see article How to create key pair in OpenStack Dashboard on Creodias.
When generating key pair, the secret key will be automatically downloaded. In our case, that file will be called 2468.pem. To get the public key, you have to copy it as text from option Compute -> Key Pairs and take the value from field Public Key. Save it on your local computer as text file and also make notion of its address.
Let’s say, you have saved the keys as text files in the Downloads folder, with addresses:
/Downloads/2468.txt
/Downloads/2468.pem
The exact location for downloaded files will depend on the operating system you are using, so edit the above commands with the relevant addresses for your case.
You may use these addresses directly but the secret key is sensitive information so you need to make it more secure. One way is to put the files into invisible folders – the usual addresses for this would be:
~/.ssh/id_rsa.pub
~/.ssh/id_rsa
You would then copy the downloaded files to these locations:
cp /Downloads/2468.txt ~/.ssh/id_rsa.pub
cp /Downloads/2468.pem ~/.ssh/id_rsa
and would then delete them from plain sight using the sudo rm command.
The secret key file has to be additionally protected so change its permissions to:
chmod 400 ~/.ssh/id_rsa
Preparation Step 3 Create Security Group
ElastiCluster expects a single entry for a security group. To meet this requirement, we add a custom security group called elasticluster_slurm. It will be later added to our nodes, allowing for communication between them and enabling SSH access from our local machine.
To create a new security group navigate to Network → Security Groups and create a new security group. Add security group rules so that you end up with the rules as shown in the following image:
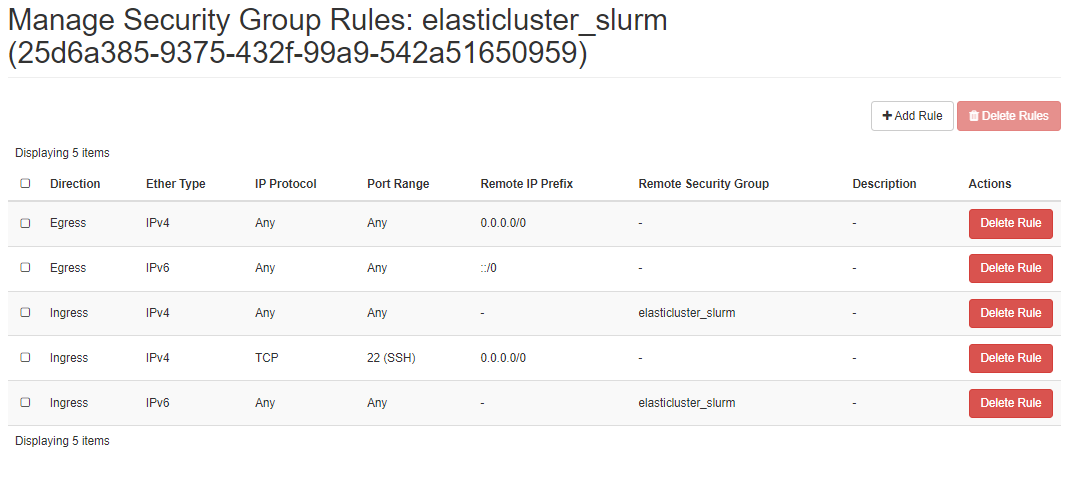
Essentially, you want to use it for SSH traffic so port 22 must be open.
For more help creating security groups see article How to use Security Groups in Horizon on Creodias.
Preparation Step 4 How to set up Python and virtual env
Articles How to install OpenStackClient for Linux on Creodias and How to install OpenStackClient GitBash for Windows on Creodias go into great detail about setting up Python and the appropriate virtual environment. Here we show a minimum set of commands aimed specifically at working with ElastiCluster.
From these articles you can also see how to download the RC file needed for configuration of ElastiCluster.
The following command will install Python3 and virtual environment:
sudo apt install python3-venv
You do not have to repeat this command once Python is installed and operational.
Now create a new Python environment, called elasticluster:
python3 -m venv elasticluster
source elasticluster/bin/activate
The start of the command line should now show (elasticluster), meaning that from now on, everything will happen in that virtual environment.

Preparation Step 5 Source OpenStack RC File
Prerequisite No. 3 Connect to the cloud shows how to
select,
download and
activate
the proper RC file for your account. ElastiCluster will read most of its required parameters from that RC file as well.
Preparation Step 6 Install ElastiCluster
We suggest installing from GitHub as currently advised by ElastiCluster. We add additional utilities as well, including OpenStack client libraries. Running the installation will take several minutes.
git clone https://github.com/elasticluster/elasticluster.git src
cd src
pip install -e .

pip install ndg-httpsclient

pip install python-keystoneclient python-novaclient python-cinderclient \
python-glanceclient python-ceilometerclient python-heatclient \
python-neutronclient python-swiftclient python-openstackclient
Installation Step 1 Create ~/.elasticluster/config
At this point, you have all the elements for creation of a SLURM cluster on Creodias OpenStack hosting. ElastiCluster arranges all the parameters it needs into one config file, called the template. The default location of that file is ~/.elasticluster/config. To create a sample template file in this location, type:
elasticluster list-templates
Warning
If you start getting errors in listing templates, the most probable cause of error would be wrong files for public and secret keys. Check that they are formed correctly, that they have proper permissions etc. and execute the above command again.
Below we provide a sample modified config template that enables setting up a cluster consisting of a single master/login node and four worker nodes.
Note
To run this sample you will need to modify the values to match your project settings.
To edit the file, use your favorite editor, such as nano:
sudo nano ~/.elasticluster/config
This is the model template:
# place in ~/.elasticluster/config

[cloud/openstack]
provider=openstack
use_anti_affinity_groups=no
build_timeout=120

#change to your project name
project_domain_name=cloud_00341

# other values for the provider section will be passed from environment variables populated by the sourced RC_FILE

[login/ubuntu]
image_user=eouser
image_sudo=True

# your keypair (user_key_name) and keys location
user_key_name=2468
user_key_private=~/.ssh/id_rsa
user_key_public=~/.ssh/id_rsa.pub


[setup/slurm]
master_groups=slurm_master
worker_groups=slurm_worker

# install NIS/YP to manage cluster users
global_var_multiuser_cluster=yes


[cluster/slurm]
# cloud/login/setup values aligned with the names of these sections defined above
cloud=openstack
login=ubuntu
setup=slurm

master_nodes=1
worker_nodes=4
ssh_to=master

# custom security group combining 'default' cross-node communication and external SSH access
security_group=elasticluster_slurm

flavor=eo1.large

# image id of Ubuntu 18.04 LTS, available in Horizon interface
image_id=6321c0bf-a7d3-4f2a-a514-d9d3c90b327e

# ID of project's private network e.g. cloud_00332_1, available in Horizon interface
network_ids=e7ec5ad1-df5d-4774-a358-c1d56dd23f28

request_floating_ip=True

# id of floating ip network e.g. "external", available in Horizon interface
floating_network_id=959e9209-cf65-4afe-b17e-c5bfecdb0075
Installation Step 2 How to Enter Correct Values into ElastiCluster Config Template
Let us dissect the template with values that you have to provide for your own OpenStack configuration.
Change project name
#change to your project name
project_domain_name=cloud_00341
You will get the correct cloud name and number from the upper left corner of the Horizon interface:

Choose the Correct Flavor for Available Resources
The line
flavor=eo1.large
is important, because depending on your available quota, your cluster set up might not complete successfully.
We choose EO1.large, because this flavor will enable you to run the sample EO processing workflow in article Sample Workflow: Running EO Processing MPI jobs on a SLURM Cluster on Creodias Cloud.
We suggest the following options:
run the example as is, ensuring you have enough resources (the example setup will consume 20 vCPU from 24 vCPU available in default quota)
run the example on smaller number of workers (e.g. 2 instead of 4) and/or
run the example on smaller flavor such as EO1.medium instead of EO1.large as used here or
request larger quotas (see Helpdesk and Support).
If you change the number of workers or use smaller flavor for this article, be sure to use the same values of workers and flavors in the MPI article mentioned above.
See Prerequisite No. 2 for the actual values of quotas you may have at your disposal.
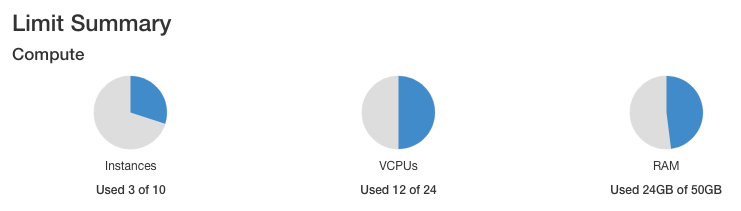
Image id of Ubuntu 18.04 LTS, available in Horizon interface
ElastiCluster works best on Ubuntu 18.04 so that is the image we are going to use here. Its id should be constant across all Creodias OpenStack environments:
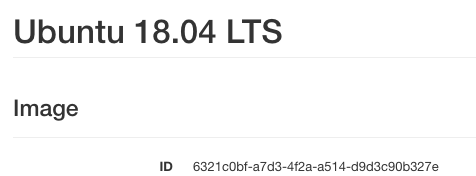
image_id=6321c0bf-a7d3-4f2a-a514-d9d3c90b327e
ID of project’s private network
To get ID values of a network, execute Network -> Networks from main Horizon menu and click on network name.
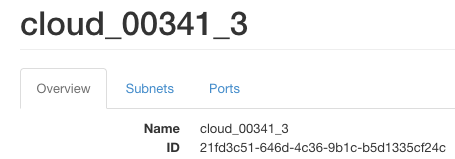
network_ids=21fd3c51-646d-4c36-9b1c-b5d1335cf24c
ID of floating ip network
The id of the “external” network is also available in Horizon interface
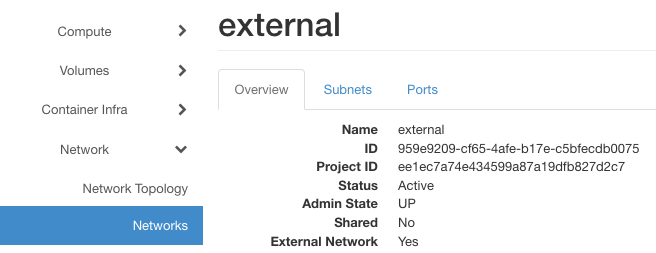
floating_network_id=959e9209-cf65-4afe-b17e-c5bfecdb0075
To see the current state of the template, use either of these two commands:
sudo nano ~/.elasticluster/config

cat ~/.elasticluster/config
Installation Step 3 Run and verify cluster setup
To run the setup for a cluster called myslurmcluster type:
elasticluster start slurm -n myslurmcluster
This will take 10, 15 or even more minutes and the expected result is 5 new virtual machines available in the Horizon interface, configured to run as a SLURM cluster. During the creation of the cluster, hundreds of lines of text will scroll up the terminal window, perhaps like this:
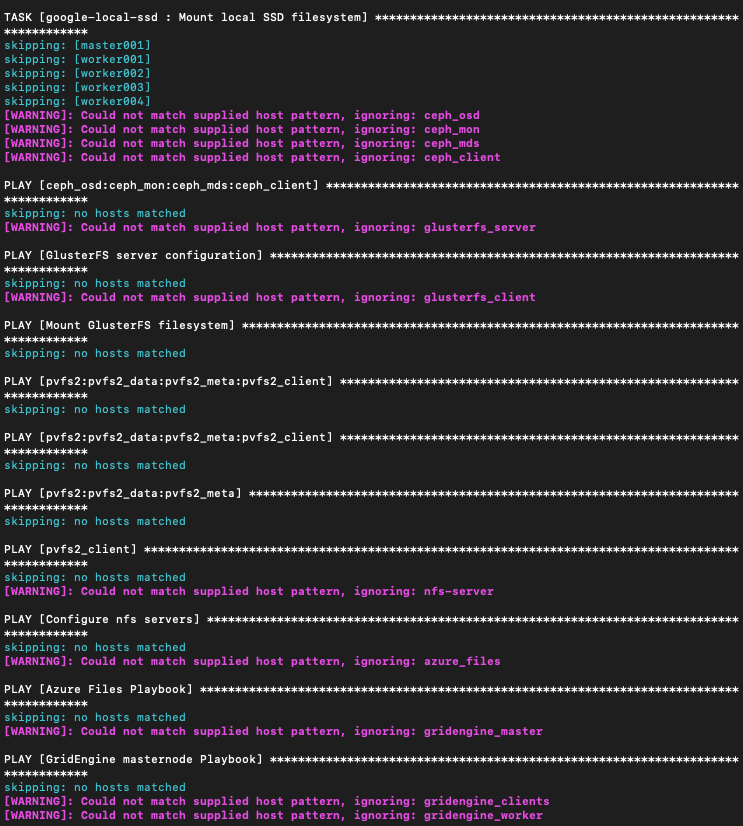
Be patient. ElastiCluster is provisioning no less than five fully functional virtual machines, which will act as one cluster.
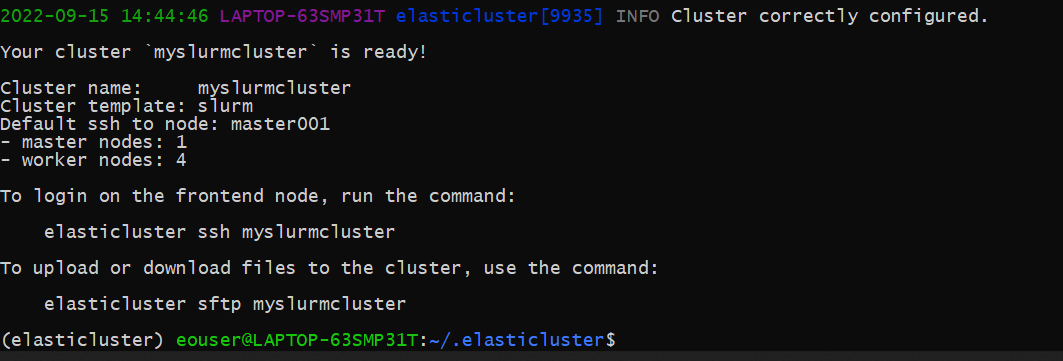
If installation and configuration went well, you will see a screen similar to this:
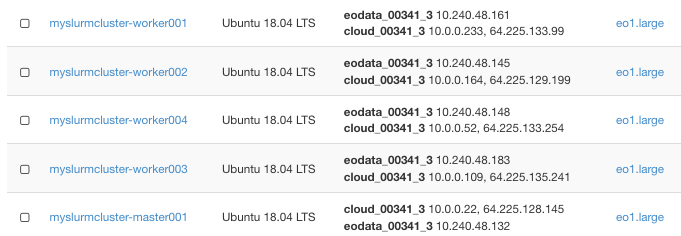
Here are the five new instances, one master and four worker nodes:
We can verify this by running SSH to the master/login node:
elasticluster ssh myslurmcluster
And from this node running a sample SLURM command:
sinfo
which will show information about the cluster:

Step 4 Troubleshooting and Debugging
To troubleshoot, run the cluster setup with the -v flag to identify more detailed insights:
elasticluster -v start slurm -n myslurmcluster
This is how you can start and stop the current ElastiCluster project:
elasticluster stop -y myslurmcluster

elasticluster start myslurmcluster
What To Do Next
The article Sample Workflow: Running EO Processing MPI jobs on a SLURM Cluster on Creodias Cloud demonstrates running MPI jobs on a SLURM cluster that you have just created.