Sample Workflow: Running EO Processing MPI jobs on a SLURM Cluster on Creodias Cloud
The objective of this article is to demonstrate running MPI jobs on a SLURM cluster on the cloud.
MPI - Message Passing Interface - is the standard for communication between computing nodes in a parallel computing architecture. A program written using an MPI implementation enables tasking each node to perform a specific part of the distributed job. The nodes can then inform each other about the status of their specific tasks so that e.g. one node can pick up where another left off. From the developer’s point of view, the MPI code is written in a central script, as if it were written for a single machine.
What We Are Going To Cover
Install mpi4py – implementation of OpenMPI in Python
Install snappy – a Python library for satellite image analysis and processing
Install additional Python modules – s3cmd, boto3 and numpy
Install EO data network to all nodes and thus add EO data capabilities to the cluster
Deploy a distributed MPI job onto the cluster
Run that MPI job for simple preprocessing of satellite images
Download and show one of the images processed within the SLURM cluster
Prerequisites
No. 1 Account
You need a Creodias hosting account with access to the Horizon interface: https://horizon.cloudferro.com/auth/login/?next=/.
No. 2 A running SLURM cluster
We will use the cluster setup from the article:
Sample SLURM Cluster on Creodias Cloud with ElastiCluster.
This cluster has one master and 4 worker nodes, it is called myslurmcluster and has the /home directory shared as NFS share on all of the nodes. Also, on SLURM nodes there will be Ubuntu 18.04 with Python 3.6 running, which is ideal for SNAPPY.
Please adjust the below commands and scripts to your target SLURM installation.
No. 3 Basic familiarity with overall programming
Some experience in using Linux and computer programming through a language such as Python, and using libraries or software such as: OpenMPI, Snappy, mpi4py.
Further reading is available under these links:
No. 4 Install SNAP and s3cmd
Additionally, you will need SNAP and s3cmd and they will be downloaded and installed in continuation of the article.
Step 1 Install mpi4py
OpenMPI is one of the standards for MPI implementation. It already comes preinstalled on the SLURM cluster if you followed the guideline in Prerequisite No. 2.
Let’s access the master node and make sure we are in the /home/eouser directory:
elasticluster ssh myslurmcluster
cd /home/eouser
Note, that /home is an NFS share on the master node, which is also mounted (with subdirectories) also on the worker nodes. Thus, updating the contents of this folder on the master, makes it also available for the workers.
Let us run the following commands (from the master node) to install mpi4py, both on the master and on the workers. The srun command with –nodes flag is used for installation on the workers:
sudo apt install python3-mpi4py
srun --nodes=4 sudo apt install python3-mpi4py
Then let’s create a minimal program to verify the mpi4py installation
touch mpi4py_hello.py
nano mpi4py_hello.py
mpi4py_hello.py
from mpi4py import MPI
comm = MPI.COMM_WORLD
print("Hello, my rank is: " + str(comm.rank))
Run it with the following command:
mpirun -n 4 python3 mpi4py_hello.py
This will be the result:
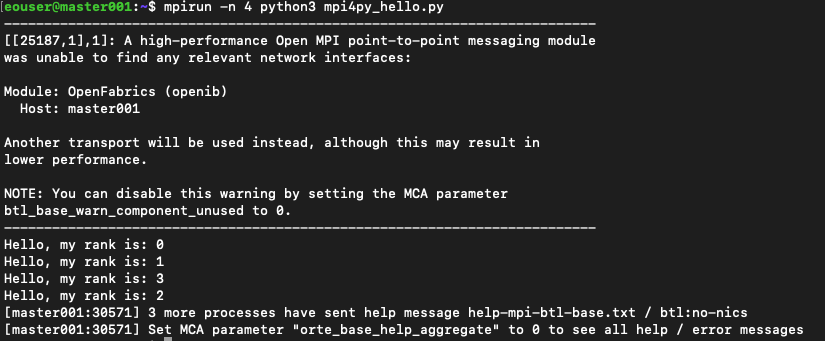
We see a warning about OpenFabrics and MCA parameter. For the examples in this article, we will disregard such warnings. There are also two ways of eliminating them; one is to use parameter
--mca btl_base_warn_component_unused 0
The command would then be
mpirun -n 4 --mca btl_base_warn_component_unused 0 python3 mpi4py_hello.py
and the result is much clearer:

The other way to suppress the warning permanently is by editing file /etc/openmpi/openmpi-mca-params.conf and inserting the line btl_base_warn_component_unused = 0.
Step 2 Install snappy
Snappy is Python extension library for a desktop application - SNAP, available from ESA (European Space Agency) for analyzing and processing satellite images.
We can take the most recent link from the downloading page for SNAP and run the download with wget using the below command. We then need to make this file executable:
wget https://download.esa.int/step/snap/9.0/installers/esa-snap_all_unix_9_0_0.sh
chmod +x esa-snap_all_unix_9_0_0.sh
We will run the installer in unattended mode. This way we can automate the process avoiding the interactive installer’s questions about the configuration of each node.
In order to do so, we will prepare a response file (.varfile) and run the installer with the -q option. You can modify the file to your preference e.g. to enable other extensions.
.varfile should be in the same location as the installer executable file (see below).
touch esa-snap_all_unix_9_0_0.varfile
nano esa-snap_all_unix_9_0_0.varfile
esa-snap_all_unix_9_0_0.varfile
executeLauncherWithPythonAction$Boolean=true
extendPathEnvVar$Boolean=true
forcePython$Boolean=true
pythonExecutable=/usr/bin/python3.6
sys.component.3109$Boolean=true
sys.component.RSTB$Boolean=true
sys.component.S1TBX$Boolean=true
sys.component.S2TBX$Boolean=true
sys.component.S3TBX$Boolean=true
Once the response file is ready, run the installer with this command:
./esa-snap_all_unix_9_0_0.sh -q
The next step is to enable snappy for our Python distribution. Run the following commands from the master:
cd ~/snap/bin
./snappy-conf /usr/bin/python3.6
This is the result:
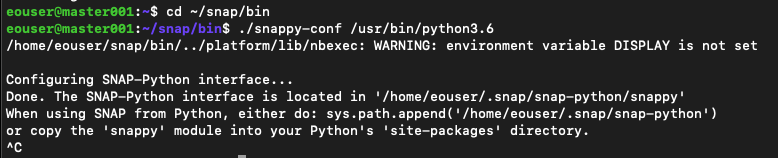
Feel free to interrupt with Ctrl+C after you see the “Done” message.
We will also copy the snappy module to our Python’s site-packages directory, to enable running scripts from any location in our directory tree (both on the master and the worker nodes).
sudo cp ~/.snap/snap-python/snappy /usr/lib/python3/dist-packages -r
srun --nodes=4 sudo cp ~/.snap/snap-python/snappy /usr/lib/python3/dist-packages -r
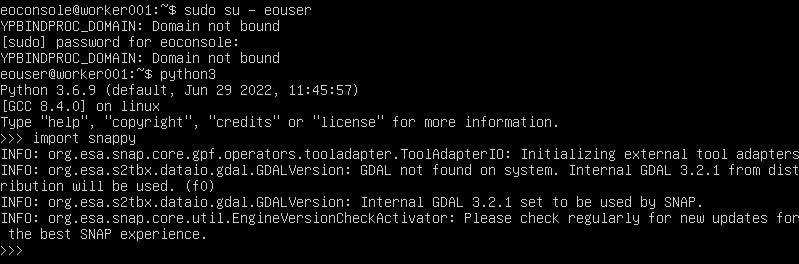
Still on the master node, verify that it works by going to the Python console and trying to import snappy:
python3
>>> import snappy
If all goes well, we should see a screen similar to the one below:

Repeat this action on one of the workers nodes as well. The easiest way is to use the console within Horizon; click on the name of the worker node instance, then on Console, log in as eoconsole user, enter the password and follow the commands as in the following image:
Step 3 Add EO Data Capabilities to the Cluster
Add EO data network to our master and worker nodes
Our snappy script will pull satellite images from the EO data repository. Therefore, we should add EO data network to our master and worker nodes.
Log out from a cluster machine now:
exit
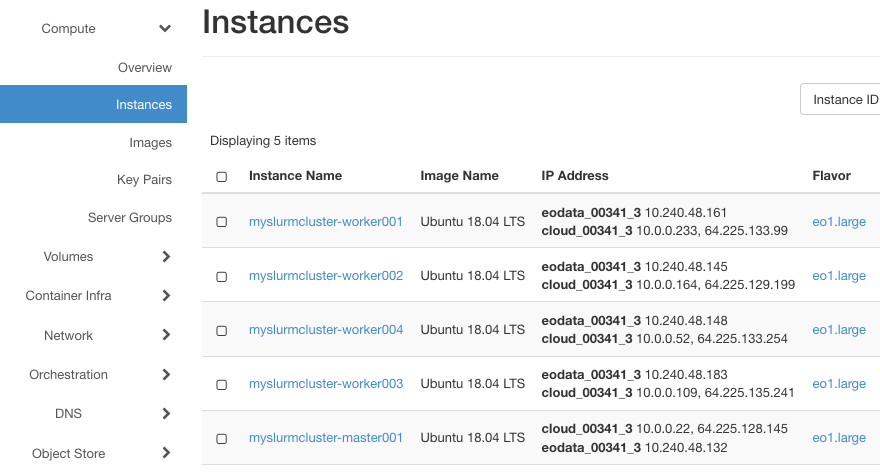
Type the following commands from your workstation, ensuring you replace eodata_00341_3 with the name of your assigned EO data network. To see the exact name of that network use menu commands Network -> Networks:
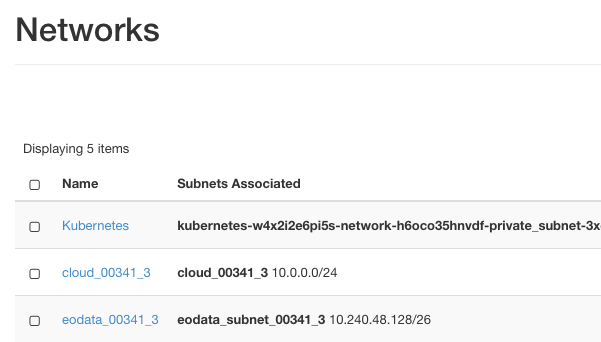
From the image, the name we need is eodata_00341_3 and the commands are:
The commands are:
openstack server add network myslurmcluster-master001 eodata_00341_3
for i in `seq 1 4`; do openstack server add network myslurmcluster-worker00$i eodata_00341_3; done
In Horizon, you should see that EO data was added successfully to the machines:
Then, log back into the master node with:
elasticluster ssh myslurmcluster
Install the s3cmd package
Install the s3cmd package, for downloading SAFE products from the EO data repository:
sudo apt install -f s3cmd
srun --nodes=4 sudo apt install -f s3cmd
We need to configure s3cmd to use the EO data cluster. For this purpose run:
s3cmd --configure
and follow the wizard steps using these values:
access key, secret key: any string
default region: Region1
S3 endpoint: data.cloudferro.com
Https: No
For the other values, just go with the defaults (hit enter), and at the end save the configuration.
Step 4 Install Additional Python Modules
Finally, install additional Python modules for our data processing script: numpy and boto3. Once these packages get installed in user space, they also get populated on worker nodes via an NFS share. To that end, run the following commands from the master:
python3 -m pip install boto3

python3 -m pip install numpy
Step 5 Run an Image Processing MPI Job
Our sample script pulls satellite image products in SAFE format from the EO data repository and performs basic EO processing operations using SNAP/Snappy. The workflow runs the following sequence:
A subset of EO data products is listed only on one of the nodes using boto3
The list gets divided into chunks and MPI’s scatter function distributes chunks between the workers
Each worker downloads their subset of products using s3cmd
Each worker then performs the processing of the image. The choice of processing tools is only for illustration purposes: we use SNAP’s Resample function and then the Subset function.
After the image got processed, the resulting TIFF files are saved to the common NFS folder.
Create and edit the file image_processing.py:
touch image_processing.py

nano image_processing.py
Then enter the following contents:
image_processing.py
import boto3
import os
import numpy as np

from mpi4py import MPI

import snappy
from snappy import ProductIO
from snappy import HashMap
from snappy import GPF

# MPI's retrieved parameters: number of all nodes on the cluster (size), and the current node (rank)
comm = MPI.COMM_WORLD
rank = comm.Get_rank()
size = comm.Get_size()

# boto3 setup: authorization and information about the subset of EO data repository to use (here Sentinel-2 L1C)
s3_resource = boto3.resource('s3', aws_access_key_id='ANYKEY', aws_secret_access_key='ANYKEY', endpoint_url='http://data.cloudferro.com')
s3_client = s3_resource.meta.client
bucket_name = 'eodata'
prefix = 'Sentinel-2/MSI/L1C/2022/10/01/'
max_keys = 8

# using boto3 we generate a list of products, the list is generated only on one of the nodes (MPI's comm.rank==0)
# we split the list into chunks, then the MPI's comm.scatter function distributes the chunks between all nodes
sendbuf = []

if comm.rank == 0:
  collection_dicts = s3_client.list_objects(Delimiter='/', Bucket=bucket_name, Prefix=prefix, MaxKeys=max_keys)['CommonPrefixes']
  collections =  np.array([i['Prefix'] for i in collection_dicts])
  chunked_collections = np.array_split(collections, size)
  sendbuf = chunked_collections

collections_chunk = comm.scatter(sendbuf, root=0)

# download .SAFE product files to local folder using s3cmd
for col in collections_chunk:
  product_ex_prefix = col.replace(prefix, '')
  cmd = 'mkdir ' + product_ex_prefix
  os.system(cmd)
  cmd = 's3cmd get ' + '--recursive s3://eodata/' + col + ' ~/' + product_ex_prefix
  os.system(cmd)

  # Read product to SNAP and apply SNAP's Resampling
  product = ProductIO.readProduct(product_ex_prefix)
  paramsRes = HashMap()
  paramsRes.put('targetResolution',20)
  productRes = GPF.createProduct('Resample', paramsRes, product)

  # Apply SNAP's Subset and save the file back to local folder
  paramsSub = HashMap()
  paramsSub.put('sourceBands', 'B2,B3,B4')
  paramsSub.put('copyMetadata', 'true')
  productSub = GPF.createProduct('Subset', paramsSub, productRes)

  ProductIO.writeProduct(productSub, product_ex_prefix, 'GeoTiff')
Run the script with the following command:
mpirun --n 4 python3 image_processing.py
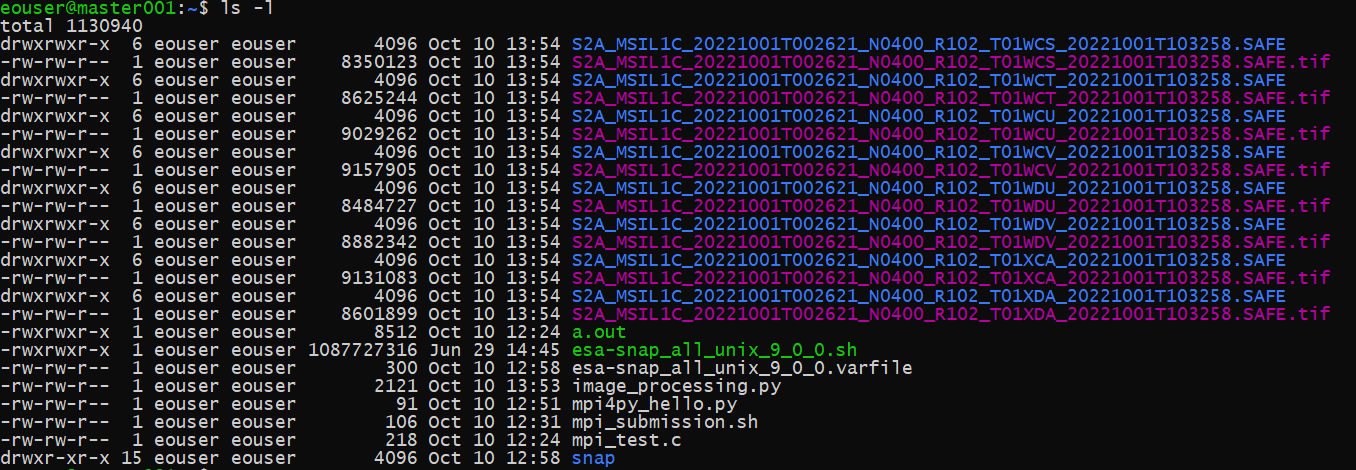
After the completed operation, we can see 8 Sentinel-2 SAFE products downloaded and 8 output tif files generated.
What To Do Next
If you are using SLURM cluster to work with satellite data, you can download the images produced above, using command such as
elasticluster sftp myslurmcluster
To gain full perspective, you should also use dedicated software like SNAP desktop to view the images in human vision range.