Install TensorFlow on Docker Running on Creodias vGPU Virtual Machine
TensorFlow is one of the most popular libraries for Machine Learning. Coupled with vGPU-based VMs, it significantly speeds up the machine learning workflow. In this article, you will use Docker to install TensorFlow on Creodias cloud, with vGPU support enabled.
For the installation method of TensorFlow which does not involve using Docker, follow this article:
Install TensorFlow on vGPU enabled VM on Creodias.
Installation instructions are based on the following sources:
Installation guide from NVIDIA
Installation guide from TensorFlow
Prerequisites
No 1. Account
You need a Creodias hosting account with access to the Horizon interface: https://horizon.cloudferro.com/auth/login/?next=/.
No 2. Virtual machine with NVIDIA GPU
Installing TensorFlow as explained below was tested on an Ubuntu 20.04 virtual machine with NVIDIA GPU, which was created using the default configuration for Creodias hosting. To access that virtual machine through SSH, you will use the eouser account.
This virtual machine must have a
floating IP address and you must have the ability to
connect to it using an SSH key stored on your PC.
The following article describes how to create such a machine: How To Create a New Linux VM With NVIDIA Virtual GPU in the OpenStack Dashboard Horizon on Creodias. If during that process you did not add a floating IP, you can do that as follows: How to Add or Remove Floating IP’s to your VM on Creodias.
What We Are Going To Cover
Update software on your VM and verify that the NVIDIA graphics card is working
Install Docker
Install and verify the NVIDIA Container Toolkit
Install TensorFlow
Step 1: Update software on your VM and verify that the NVIDIA graphics card is working
Connect to your virtual machine using SSH by invoking the following command (replace 64.225.129.70 with the floating IP address of your virtual machine).
ssh eouser@64.225.129.70
Update all the software on your virtual machine:
sudo apt update && sudo apt upgrade
Reboot your VM:
sudo reboot
Connect to your VM using SSH as previously once it reboots.
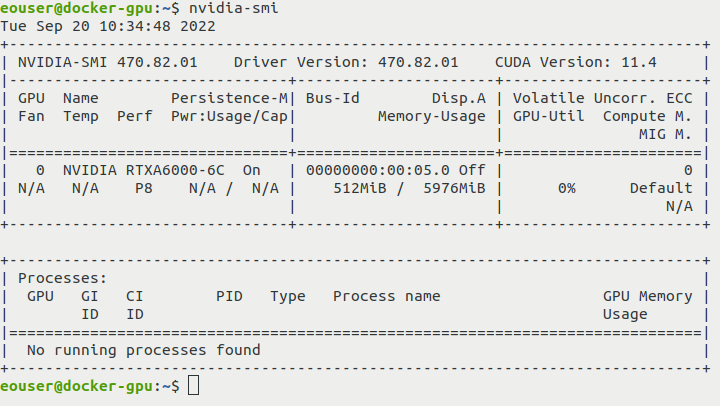
Verify that the NVIDIA graphics card is working:
nvidia-smi
The result of your command should look like this:
Step 2: Install Docker
Install Docker using the official script and enable its service:
curl https://get.docker.com | sh && sudo systemctl --now enable docker
Step 3: Install and verify the NVIDIA Container Toolkit (ndivia-docker2)
The NVIDIA Container Toolkit is a tool for building and running GPU-accelerated Docker containers. Find additional information here: https://catalog.ngc.nvidia.com/orgs/nvidia/teams/k8s/containers/container-toolkit
We need it since we will be running a GPU-accelerated workflow in a container.
Add the appropriate repository and GPG key:
distribution=$(. /etc/os-release;echo $ID$VERSION_ID) \
      && curl -fsSL https://nvidia.github.io/libnvidia-container/gpgkey | sudo gpg --dearmor -o /usr/share/keyrings/nvidia-container-toolkit-keyring.gpg \
      && curl -s -L https://nvidia.github.io/libnvidia-container/$distribution/libnvidia-container.list | \
            sed 's#deb https://#deb [signed-by=/usr/share/keyrings/nvidia-container-toolkit-keyring.gpg] https://#g' | \
            sudo tee /etc/apt/sources.list.d/nvidia-container-toolkit.list
Now install package nvidia-docker2:
sudo apt update && sudo apt install -y nvidia-docker2
Restart Docker:
sudo systemctl restart docker
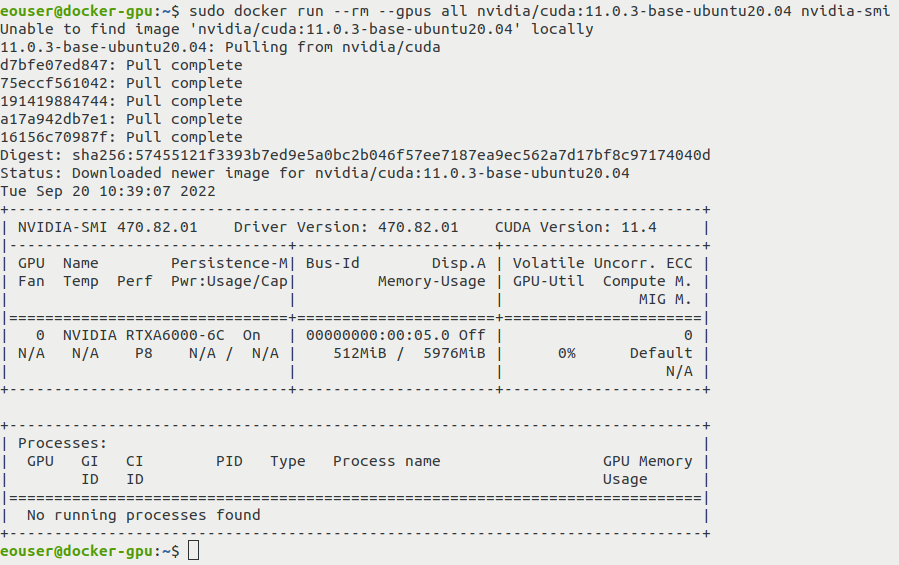
Verify that the NVIDIA Container Toolkit is working:
sudo docker run --rm --runtime=nvidia --gpus all nvidia/cuda:11.4.3-base-ubuntu20.04 nvidia-smi
You should see the output of the nvidia-smi command (this time, however, it is running from the inside of the container):
Step 4 Install TensorFlow with vGPU support
Pull the TensorFlow image:
sudo docker pull tensorflow/tensorflow:2.11.0-gpu
Run a test inside it:
sudo docker run --gpus all -it --rm tensorflow/tensorflow:2.11.0-gpu python -c "import tensorflow as tf; print(tf.reduce_sum(tf.random.normal([1000, 1000])))"
After the previous command, outcome of a random sample TensorFlow operation is shown.
Your output should include information similar to this:

What To Do Next
Now that you have successfully installed TensorFlow on a Creodias virtual machine with an enabled vGPU, you can try to use it for practical purposes. One of the ways to test it is described in the article
Sample Deep Learning Workflow Using TensorFlow Running on Docker on Creodias vGPU Virtual Machine.
There you will see how quick a deep learning operation can be when a vGPU is present.