How to create instance snapshot using OpenStack CLI on Creodias
In this article, you will learn how to create instance snapshot on Creodias cloud, using OpenStack CLI.
Instance snapshots allow you to archive the state of the virtual machine. You can, then, use them for
backup,
migration between clouds
disaster recovery and/or
cloning environments for testing or development.
We cover both types of storage for instances, ephemeral and persistent.
The plan
In reality, you will be using the procedures described in this article with the already existing instances.
However, to get a clear grasp of the process, while following this article you are going to create two new instances, one with ephemeral and the other with persistent type of storage. Let their names be instance-which-uses-ephemeral and instance-which-uses-volume. You will create an instance snapshot for each of them.
If you are only interested in one of these types of instances, you can follow its respective section of this text.
It goes without saying that after following a section about one type of virtual machine you can clean up the resources you created to, say, save costs.
Or you can keep them and use them to create an instance out of it using one of articles mentioned in What To Do Next.
What We Are Going To Cover
Prerequisites
No. 1 Account
You need a Creodias hosting account with access to the Horizon interface: https://horizon.cloudferro.com/auth/login/?next=/.
No. 2 Ephemeral storage vs. persistent storage
Please see article Ephemeral vs Persistent storage option Create New Volume on Creodias to understand the basic difference between ephemeral and persistent types of storage in OpenStack.
No. 3 Instance with ephemeral storage
You need a virtual machine hosted on Creodias cloud.
You can create an instance with ephemeral storage by following this article: How to create a VM using the OpenStack CLI client on Creodias cloud
The actual command used to create an instance from that article was
openstack server create \
--image Debian-custom-upload \
--flavor eo1.small \
--key-name ssh-key \
--network cloud_00734_1 \
--network eodata \
--security-group default \
--security-group allow_ping_ssh_icmp_rdp \
Test-Debian
In the examples in this article, we are using a default image Ubuntu 22.04 LTS.
With ephemeral storage, only one new instance is created.
No. 4 Instance with persistent storage
When creating an instance with persistent storage, you just add one new option to the above command; the option is –boot-from-volume followed by a
space and the
desired size of the new volume in gigabytes.
Make sure to enter the amount of storage sufficient for your needs.
You can also look at storage size available with your chosen virtual machine flavor for guidance (openstack flavor list command, column Disk)
For instance, if you want your boot volume to have 16 GB, add the following:
--boot-from-volume 16
The complete command would, then, look like this:
openstack server create \
--image Debian-custom-upload \
--flavor eo1.small \
--key-name ssh-key \
--network cloud_00734_1 \
--network eodata_00734_1 \
--security-group default \
--security-group allow_ping_ssh_icmp_rdp \
--boot-from-volume 16 \
Test-Debian
In the examples in this article, we are using a default image Ubuntu 22.04 LTS.
With persistent storage, one instance and one volume are created:
a special kind of instance (with no ephemeral storage) and
the volume that is attached to that instance.
The instance will boot from the volume that was attached during the creation of instance.
Otherwise, an instance can have two or more volumes attached to it, however, only one will serve as its boot drive.
No. 5 How to delete resources
If you want to learn how to delete instances, snapshots, volumes and other OpenStack objects, please have a look at the following articles:
How to correctly delete all project resources using OpenStack command line clients on Creodias.
How to create or delete volume snapshot on Creodias.
No. 6 OpenStack CLI client
You need to have OpenStack CLI client installed. One of the following articles should help you:
To use OpenStack CLI client to control Creodias cloud, you need to prove your identity: How to activate OpenStack CLI access to Creodias cloud using one- or two-factor authentication
Creating a snapshot of instance which uses ephemeral storage
Create and list an instance using CLI
Create an instance named instance-which-uses-ephemeral, according to Prerequisite No. 3, for example:
openstack server create \
--image "Ubuntu 22.04 LTS" \
--flavor eo1.small \
--key-name ssh-key \
--network cloud_00734_1 \
--network eodata_00734_1 \
--security-group default \
--security-group allow_ping_ssh_icmp_rdp \
instance-which-uses-ephemeral
Be sure to use your own parameters in this command.
List your instances:
openstack server list

If your instance in column Status still has BUILD, wait up to a couple of minutes until it has status ACTIVE. To refresh the list, execute openstack server list again.
The output above includes ID of an instance which can be used to refer to it in other commands. This ID is a string of characters which are all in one line. The OpenStack CLI client might output that as multiple lines for better legibility. If it happens, make sure to enter it as one line regardless of that.
Shut down the VM
Shut down your instance. It is best to do it using the functions of its operating system. If, like here, the image used was Ubuntu 22.04 LTS, you could use the Horizon console or SSH access to execute a command such as
sudo shutdown now
The exact command will depend on the type of image, so further explanations are out of scope of this article.
Alternatively, you can use OpenStack CLI command for this purpose. This command will first send the shut down signal and if within a certain time period the instance is not shut down, OpenStack will force this operation. This might lead to data loss. The command is:
openstack server stop <instance-id or instance-name>
After stop, you can use either the ID or the instance name.
Using the instance name when referencing it in this command seems to be easier and more natural. However, if there are two or more instances with the same name, the command may return an error. Also, if a name contains special characters like spaces or dollar signs $, they will need to be escaped appropriately or this method might not work at all.
That is why using the instance ID is a better choice. In our case, we read that the value of column ID in the example above is
95622f8c-ab89-4686-97c3-3018202f01d8
and so the command to stop the server becomes
openstack server stop 95622f8c-ab89-4686-97c3-3018202f01d8
You can verify that the instance is shut down by executing openstack server list again - the instance should have in column Status the following value: SHUTOFF

Create a snapshot
To create a snapshot of an instance, use this command:
openstack server image create \
--name <snapshot-name> \
--wait \
<instance-id or instance-name>
Here,
<snaphsot-name> is the name of the snapshot (in this example, we will use instance_ephemeral_snapshot)
<instance-id or instance-name> is ID or name of the instance
A long term approach would be to include into the name of snapshot
the date,
the time and
the version of the snapshot.
Or, it can be anything else that can later remind you which version of the snapshot to use.
Note
Using –name parameter here to provide desired name for your snapshot is optional. If you don’t provide it, the snapshot should have the same name as your instance. This is how this command would look like without this parameter:
openstack server image create \
--wait \
<instance-id or instance-name>
Parameter --wait should cause the OpenStack CLI to return to the command prompt only once your instance snapshot has been created.
If the operation was successful, you should get output similar to this:
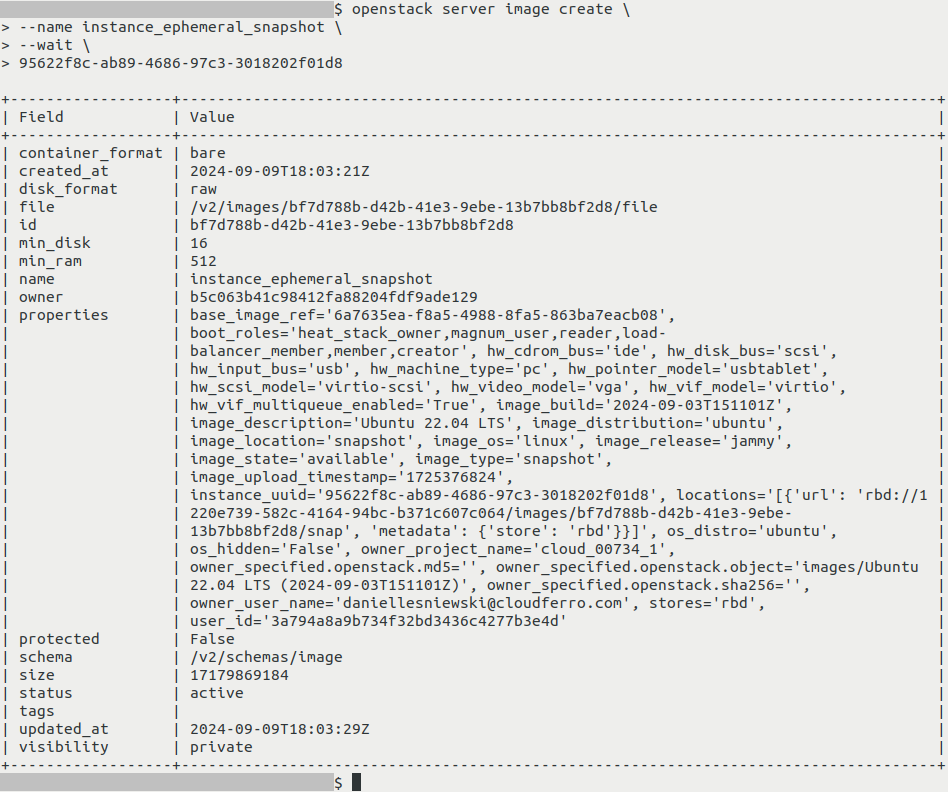
It contains various information about this instance snapshot. Its size is equal to 17179869184, here provided in bytes, and should be the same as the size of boot drive of your virtual machine.
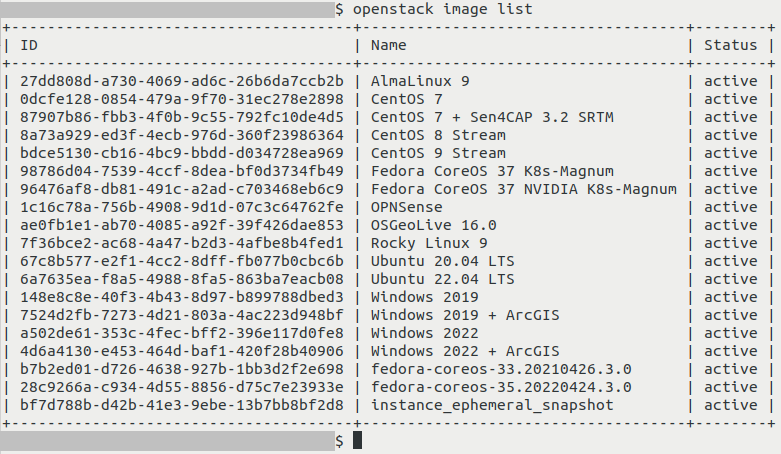
If you now execute
openstack image list
your new instance snapshot should be listed alongside other images, including the ones available on Creodias cloud by default. It should have the same name as your instance:
What will the snapshot contain for ephemeral storage
This instance snapshot should contain the content of boot drive of your virtual machine. It will not, however, include any content of any volumes which might have been connected to that virtual machine.
Rule of thumb: always check whether there are volumes attached to the instance and if you want to preserve their states as well, copy or create snapshot of each of those volumes.
Snapshot of instance which uses persistent storage
What does creating a snapshot of instance with persistent storage do?
When creating a snapshot of instance with persistent storage, the following is created:
Snapshot of volume which serves as boot drive of the instance.
Snapshots of other volumes connected to the virtual machine (if any).
Instance snapshot which appears to have the size of 0 bytes (because it does not contain data stored on your virtual machine). This snapshot contains the list of all these other snapshots in its metadata.
Note that names of volumes which were connected to the VM at the time of creating a snapshot will not be preserved.
If in the future you want to create a virtual machine from this instance snapshot:
If you don’t have the snapshot of volume which the instance used as boot volume, you will not be able to recreate the instance from that snapshot.
If the snapshot of one of the attached volumes does not exist, the virtual machine will be recreated without that volume.
Create and list instances
Create an instance named instance-which-uses-volume, according to Prerequisite No. 4, for example:
openstack server create \
--image "Ubuntu 22.04 LTS" \
--flavor eo1.small \
--key-name ssh-key \
--network cloud_00734_1 \
--network eodata \
--security-group default \
--security-group allow_ping_ssh_icmp_rdp \
--boot-from-volume 16 \
instance-which-uses-volume
Be sure to use your own parameters in this command.
List your instances:
openstack server list

In this example, we have one virtual machine called instance-which-uses-volume which uses a volume as its boot drive.
If your instance in column Status still has BUILD, wait up to a couple of minutes until it has status ACTIVE. To refresh the list, execute openstack server list again.
The output above includes ID of an instance which can be used to refer to it in other commands. This ID is a string of characters which are all in one line. The OpenStack CLI client might output that as multiple lines for better legibility. If it happens, make sure to enter it as one line regardless of that.
We can view a list of volumes attached to that virtual machine by executing:
openstack server show -c volume_attached <instance-id or instance-name>
where <instance-id or instance-name> is the ID or name of your instance.
Using the instance name when referencing it in this command seems to be easier and more natural. However, if there are two or more instances with the same name, the command may return an error. Also, if a name contains special characters like spaces or dollar signs $, they will need to be escaped appropriately or this method might not work at all.
That is why using the instance ID is a better choice. In our case, we read that the value of column ID in the example above is
e69f90da-60d8-4d72-9b57-35f7063bc92d
and so the command to show attached volumes becomes
openstack server show -c volume_attached e69f90da-60d8-4d72-9b57-35f7063bc92d

The command openstack server show is usually used to show detailed information about a virtual machine. In this case, we cut its output so that it only shows contents of section volumes_attached.
For each of the volumes, you can see whether (True) or not (False) OpenStack will remove that volume if the instance is to be removed (delete_on_termination). Apart from that, you will see the ID (value id) of that volume.
Note that in this part of output, the comma is being used between properties of one volumes and not between information about different volumes.
Shut down the VM
Shut down your instance. It is best to do it using the functions of your operating system. If, like here, the image used was Ubuntu 22.04 LTS, you could use the Horizon console or SSH access to execute a command such as
sudo shutdown now
Again, the OpenStack CLI command which you can use alternatively to shut down the instance is
openstack server stop <instance-id or instance-name>
where <instance-id or instance-name> is the ID or name of the instance.
Verify that it is shut down by executing
openstack server list
Value SHUTOFF in column Status denotes that the server has stopped as planned:

In the screenshot above, column ID contains <instance_id> with the value of
<instance_id> is a string of characters which are all in one line. The OpenStack CLI client might output that as multiple lines for better legibility. If it happens, make sure to use it as one line regardless.
Creating the snapshot
To create a snapshot of an instance, use this command:
openstack server image create \
--name <snapshot-name>
--wait \
<instance-id or instance-name>
Here,
<snaphsot-name> is the name of the snapshot (in this example, we will use instance_persistent_snapshot
<instance-id or instance-name> is ID or name of the instance
Parameter --wait should cause the OpenStack CLI to return to the command prompt only once your instance snapshot has been created.
Note
Using –name parameter here to provide desired name for your snapshot is optional. If you don’t provide it, the snapshot should have the same name as your instance. This is how this command would look like without this parameter:
openstack server image create \
--wait \
<instance-id or instance-name>
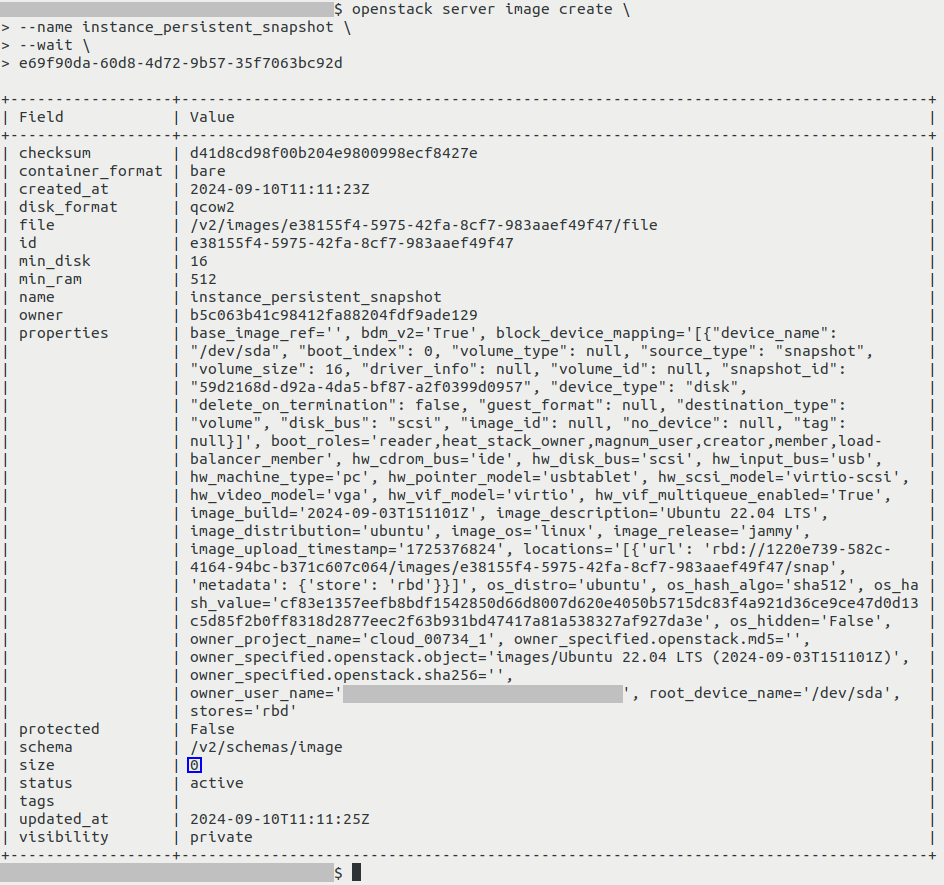
If the operation was successful, you should get output similar to this:
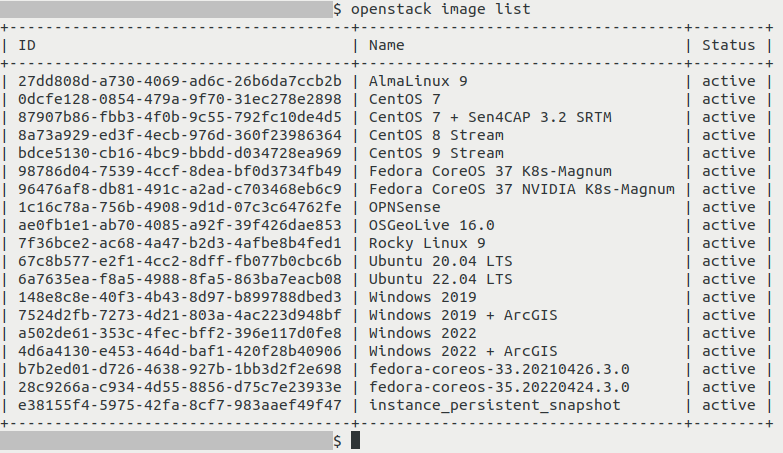
Your instance snapshot should now be visible when listing images:
openstack image list
Exploring instance snapshot and volume snapshots which were created alongside it
The above mentioned output of openstack server image create contains various information about this instance snapshot.
Because this snapshot does not contain the data stored on that virtual machine, its size (on screenshot above marked with a dark blue rectangle) appears to be 0 bytes.
Within section properties (property block_device_mapping), value of key snapshot_id is the ID of the volume snapshot which was created while creating this instance snapshot. In example above, it is 59d2168d-d92a-4da5-bf87-a2f0399d0957
You can check detailed information about that volume snapshot by executing the command below:
openstack volume snapshot show <snapshot-id or snapshot-name>
Replace <snapshot_id> with the ID or name of the snapshot.
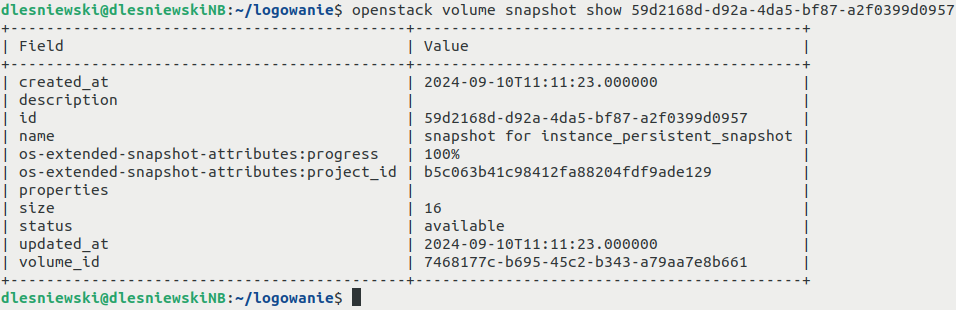
Its size should be the same as the size of original volume from which it was created.
That volume snapshot should be visible normally when listing volume snapshots with
openstack volume snapshot list

What happens if there are multiple volumes?
If multiple volumes were connected to your instance, snapshot of each of them should be created alongside with instance snapshot. All of these volume snapshots should appear in the properties section of instance snapshot, property block_device_mapping. This is how it could look like:
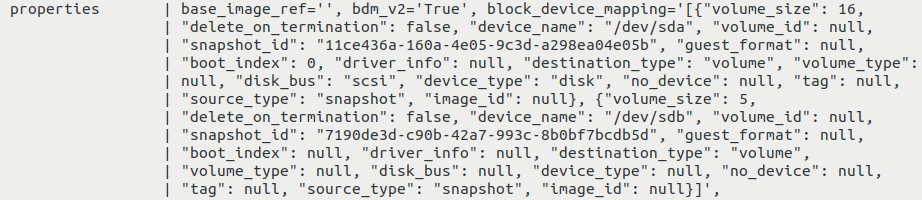
In this example, there are two volume snapshots, each created for one of the volumes of our VM:
one with ID of 11ce436a-160a-4e05-9c3d-a298ea04e05b and size of 16 GB, as well as
another one with ID of 7190de3d-c90b-42a7-993c-8b0bf7bcdb5d and size of 5 GB
What To Do Next
To create a new virtual machine from an instance snapshot, see
How to start a VM from instance snapshot using Horizon dashboard on Creodias
How to start a VM from instance snapshot using OpenStack CLI on Creodias
You can create instance snapshot with Horizon dashboard as well. See How to create instance snapshot using Horizon on Creodias
For discusion regarding bootable vs. non-bootable volumes, see Bootable versus non-bootable volumes on Creodias.
Downloading an instance snapshot
There is something you should be aware of when using command openstack image save explained in OpenStack instance migration using command line on Creodias to download an instance snapshot. There are two cases:
- Ephemeral storage
This command should work correctly for downloading snapshots of an instance which uses ephemeral storage.
- Persistent storage
Executing that command to download a snapshot of instance which uses persistent storage will result in downloading of an empty file.