How to transfer volumes between domains and projects using OpenStack CLI client on Creodias
Volumes in OpenStack can be used to store data. They are visible to virtual machines like drives.
Such a volume is usually available to just the project in which it was created. Transferring data stored on it between projects might take a long time, especially if such a volume contains lots of data, like, say, hundreds or thousands of gigabytes (or even more).
This article covers changing the assignment of a volume to a project. This allows you to move a volume directly from one project (which we will call source project) to another (which we will call destination project) using the OpenStack CLI in a way that does not require you to physically transfer the data.
The source project and destination project must both be on the same cloud (for example WAW3-2). They can (but don’t have to) belong to different users from different domains and organizations.
What We Are Going To Cover
Initializing transfer of volume
Accepting transfer of volume
Cancelling transfer of volume
Prerequisites
No. 1 Account
You need a Creodias hosting account with access to the Horizon interface: https://horizon.cloudferro.com/auth/login/?next=/
No. 2 OpenStack CLI Client
To use the OpenStack CLI client, you need to have it installed. See one of these articles to learn how to do it:
When installed, you will have access to openstack command and will be able to communicate with the OpenStack cloud:
How to activate OpenStack CLI access to Creodias cloud using one- or two-factor authentication
No. 3 Volume
You need to have a volume which you want to migrate.
Such a volume must not be connected to a virtual machine. It must have the following Status: Available.
You can check the status of your volume by executing the following command:
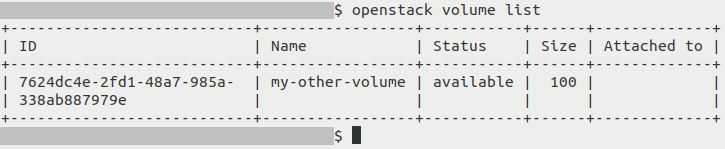
openstack volume list

In this example, the volume which we want to transfer is called my-other-volume. Its status, marked on screenshot above with a blue rectangle, is available.
No. 4 Ability to perfom operations on both the source project and the destination project
For the transfer to be successful, you need to first initiate it from the source project and then accept it from the source project.
If source and/or destination is not managed by you, you might need to get appropriate permission to perform such an operation.
To access each of these projects directly (if possible), source appropriate RC file. If you don’t have direct access to any of these projects, you probably can request their members to execute commands mentioned in this article.
Step 1: Initiating transfer of volume
Perform this step in the source project.
Execute the following command:
openstack volume list

Write somewhere down the ID of the volume you want to transfer. In this example, we want to transfer volume called my-other-volume. Its ID, marked on the screenshot above with a green rectangle, is 7624dc4e-2fd1-48a7-985a-338ab887979e.
Once you have obtained the ID, execute command below, but replace its parts as instructed:
openstack volume transfer request create --name my-transfer 7624dc4e-2fd1-48a7-985a-338ab887979e
In this command, replace:
my-transfer with the name of the transfer of your choice (make sure that it is passed to the shell correctly, watch out for any special characters like double quotes or spaces)
7624dc4e-2fd1-48a7-985a-338ab887979e with the ID of the volume you want to transfer
If the operation was successful, you should get output similar to this:
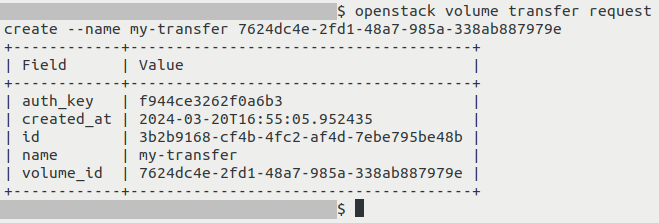
Write somewhere down the ID of the transfer (value for id) and the authorization key (value for auth_key).
In example screenshot above, that ID of the transfer is f944ce3262f0a6b3 and the authorization key is 3b2b9168-cf4b-4fc2-af4d-7ebe795be48b.
Note that after initializing the transfer, the volume cannot be connected to any virtual machine until the transfer is accepted or cancelled. To learn how to cancel the transfer (if you, say, accidentally chose the wrong volume), see section Cancelling transfer of a volume near the end of the article.
Step 2: Accepting transfer of volume
Perform this step in the destination project.
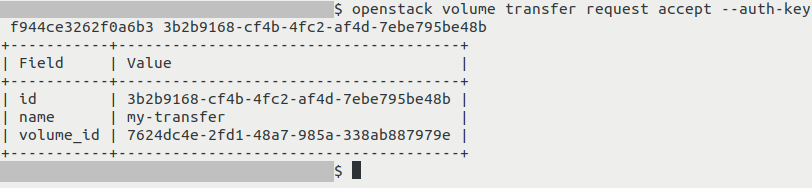
Execute the command below. In it, replace f944ce3262f0a6b3 with the authorization key and 3b2b9168-cf4b-4fc2-af4d-7ebe795be48b with the ID of the transfer. These two values are to be obtained while following Step 1.
openstack volume transfer request accept --auth-key f944ce3262f0a6b3 3b2b9168-cf4b-4fc2-af4d-7ebe795be48b
If the operation was successful, you should get output similar to this:
To verify that the volume has indeed been moved to your new project, execute this command:
openstack volume list
The transferred volume should be on the list:
Cancelling transfer of volume
If you, say, accidentally initiated transfer for a wrong volume and nobody accepts that transfer, it can be cancelled.
In this example, let’s assume that we wanted to transfer volume called my-volume. However, we mistakenly initiated transfer for volume my-other-volume.
Checking the statuses of the volumes using openstack volume list will show that my-volume now has status awaiting-transfer:
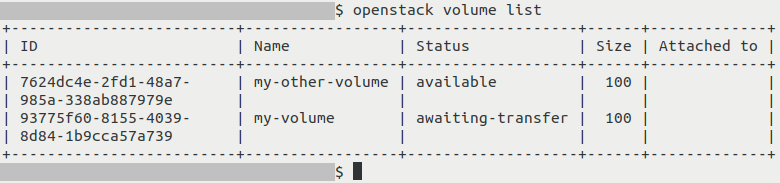
Volume in such a status cannot be connected to a virtual machine.
To do cancel volume transfer, execute command below (replace 3b2b9168-cf4b-4fc2-af4d-7ebe795be48b with ID of the transfer obtained in Step 1):
openstack volume transfer requested delete 3b2b9168-cf4b-4fc2-af4d-7ebe795be48b
If the operation was successful, the output should be empty.
Executing openstack volume list again should inform you that the volume once again has available status:

What To Do Next
Now that the volume has been transferred, you might want to connect it to a virtual machine. This article includes information how to do that: How to move data volume between VMs using OpenStack CLI on Creodias
The workflow described in this article can also be done using the Horizon dashboard. Learn more here: How to transfer volumes between domains and projects using Horizon dashboard on Creodias