How to create a VM from volume snapshot using OpenStack CLI on Creodias
In this article, you will learn how to create a virtual machine from volume snapshot using OpenStack CLI client.
Prerequisites
No. 1 Account
You need a Creodias hosting account with access to the Horizon interface: https://horizon.cloudferro.com/auth/login/?next=/.
No. 2 Familiarity with the process of creating a virtual machine
You need to be familiar with the basics of creating a virtual machine with OpenStack CLI client How to create a VM using the OpenStack CLI client on Creodias cloud.
In this article, we work with above mentioned article but modify some of their steps.
No. 3 Volume snapshot created from a bootable volume which contains an operating system
We assume that you not only already have a volume snapshot but that it was also created from a bootable volume in itself.
See the following articles for more information:
Of course, if you want your new virtual machine to be operational, that bootable volume needs to have a functional operating system, for example Ubuntu 22.04.
In this article, term source volume denotes the volume from which the volume snapshot that we are working with was created.
No. 4 Access to the virtual machine being created
There are different methods of accessing virtual machines. This includes SSH and web console.
For SSH, while creating a virtual machine from a volume snapshot, there is an option of “injecting” an SSH key to the machine being created. Some operating systems are compatible with this feature, while others are not.
If for your particular volume snapshot attaching of an SSH key with this method does not work, make sure that your installation of an operating system includes some method of accessing it.
No. 5 OpenStack CLI client
To use OpenStack CLI client, you need to have it installed. One of the following three articles should cover your situation:
Once you have installed this piece of software, you need to authenticate to start using it: How to activate OpenStack CLI access to Creodias cloud using one- or two-factor authentication
To use OpenStack CLI client to control Creodias cloud, you need to prove your identity: /accountmanagement/How-to-activate-OpenStack-CLI-access-to-Creodias-cloud
What We Are Going To Cover
Example scenario in which this article applies
You created a virtual machine with Ubuntu 22.04 by following How to create a VM using the OpenStack CLI client on Creodias cloud with slight modifications.
For this example let’s assume that we chose:
default image named Ubuntu 22.04 LTS as the source image
eo1.small as the flavor of the VM
ssh-key as the SSH key which is to be injected to the virtual machine during its creation
networks: cloud_00734_1 and eodata_00734_1
security groups: default and allow_ping_ssh_icmp_rdp
name of the virtual machine: ubuntu-vm
In your case, some of these options will be different.
You also added another option to your openstack server create command: --boot-from-volume
This option creates a volume which will serve as the boot drive of the virtual machine. After this option you specify that size in GB. In our case, we chose volume which has 16 GB.
We named our virtual machine ubuntu-vm
In this case, the final command was:
openstack server create --image "Ubuntu 22.04 LTS" --flavor eo1.small --key-name ssh-key --network cloud_00734_1 --network eodata_00734_1 --security-group default --security-group allow_ping_ssh_icmp_rdp --boot-from-volume 16 ubuntu-vm
After some time, you shut down your virtual machine and deleted it. The volume which was used as boot volume of that VM is still available. You created a snapshot of that volume: How to create or delete volume snapshot on Creodias.
Creating a VM from volume snapshot using the OpenStack CLI client
Step 1: Build a command and execute it
We are modifying the procedure from reference article How to create a VM using the OpenStack CLI client on Creodias cloud.
This procedure involves:
gathering data required for the command used to build the virtual machine
entering that command
executing that command
Changes to step Choose an image
Do not follow section Choose an image in the reference article. For CLI, that means not attaching parameter --image to the final command which you will use to create the virtual machine.
Instead, add to the final command the parameter --snapshot, proceeded by the ID of the volume snapshot. Check article /cloud/Bootable-versus-non-bootable-volumes-on-Creodias mentioned in Prerequisite No. 3 to learn how to obtain that ID.
For example, if the ID is cd101818-d690-4905-8b4c-465d868cc07f, this is what you should add:
--snapshot cd101818-d690-4905-8b4c-465d868cc07f
Changes to step Key Pair
If your particular installation of an operating system supports “injecting” of an SSH key this way, you can perform this step just like it was done in the reference article.
If, however, it does not support this process, omit parameter --key-name in your final command.
Example of creating a VM from volume snapshot using the OpenStack CLI client
Let’s assume that we want to create a virtual machine based on the following parameters:
Source: volume snapshot which has the following ID: cd101818-d690-4905-8b4c-465d868cc07f
Flavor: eo1.small
Networks: cloud_00495_1 and eodata
Security groups: default and allow_ping_ssh_icmp_rdp
Name: test-virtual-machine-from-snapshot
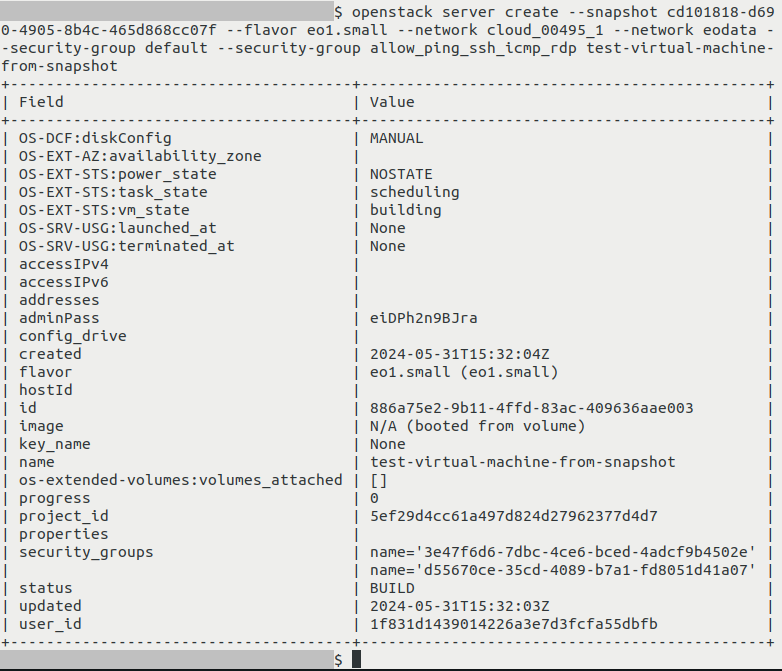
In this case, this is how the command used to create your virtual machine would look like:
openstack server create \
--snapshot cd101818-d690-4905-8b4c-465d868cc07f \
--flavor eo1.small \
--network cloud_00495_1 \
--network eodata_00495_1 \
--security-group default \
--security-group allow_ping_ssh_icmp_rdp \
test-virtual-machine-from-snapshot
The output:
Step 2: Other operations
You should be able to attach a floating IP to a virtual machine created in this way just like to any other virtual machine.
See appropriate section of the reference article.
The floating IP will almost certainly be different from the value given in that article so adjust where needed.
Virtual machines are controlled using different methods, for example SSH or web console. Whatever methods are available on the operating system stored on the volume snapshot should be available on your new virtual machine, since this is the assumption of this article. However, the commands used might be different, for example if the floating IP changed, the SSH command used to access the virtual machine might also change.
What To Do Next
Now that you have created a virtual machine from your volume snapshot, the need may arise in the future to delete that volume snapshot. To that end, see How to create or delete volume snapshot on Creodias
If you want to create a virtual machine from a volume snapshot using the Horizon dashboard instead of the OpenStack CLI client, see: How to create a VM from volume snapshot using Horizon dashboard on Creodias