Using curl and wget to download EODATA products from Creodias
In this article, you will learn how to download
an entire EODATA product packed as a ZIP archive, as well as
a single file of an EODATA product.
What We Are Going To Cover
Obtaining Keycloak token
Outputting Keycloak token and refresh token to the terminal
Assigning Keycloak token to a variable
Assigning Keycloak token to one variable and the refresh token to another variable
Generating Keycloak token using refresh token
Using Keycloak token to download products
Downloading full product
Downloading single file
Downloading file from link obtained by using option $expand=Locations
Prerequisites
No. 1 Account
You need an active Creodias account.
Creodias offers many different services, but here we will focus only on simple downloading of EODATA using Keycloak token.
Two-factor authentication is enabled on Creodias and you will need it to download products. To that end, you should have already installed an application to generate the required TOTP code (a six-digit number which changes every 30 seconds and serves as an additional proof of authentication). See article How to activate OpenStack CLI access to Creodias cloud using one- or two-factor authentication.
No. 2 Linux environment
This article was written for bash, curl, wget and jq running on Ubuntu 22.04. It will also run unchanged on WSL under Windows 10. Other operating systems and pieces of software might also work, but they may require tweaking of commands as they are not covered by this article.
bash is the shell in which the commands will be executed.
To obtain a necessary authentication token, you will use curl.
To download files, you can use either curl or wget.
jq will be used to parse JSON output.
On Ubuntu 22.04, bash should already be included with your operating system. Install curl, wget and jq with the following command:
sudo apt install -y curl wget jq
No. 3 Knowing the ID of the product you want to download
To follow the procedure described in this article, you need to know the ID of the product you want to download.
In article EOData Catalogue API Manual on Creodias, use section Query by name to find the ID of the product. That ID can be found as value of key Id in the JSON output of the query.
Let’s say that you are interested in product named
S1A_IW_GRDH_1SDV_20141031T161924_20141031T161949_003076_003856_634E.SAFE
To search for it by its exact name, access the following URL in a browser (for example, using Mozilla Firefox):
https://datahub.creodias.eu/odata/v1/Products?$filter=Name eq 'S1A_IW_GRDH_1SDV_20141031T161924_20141031T161949_003076_003856_634E.SAFE'
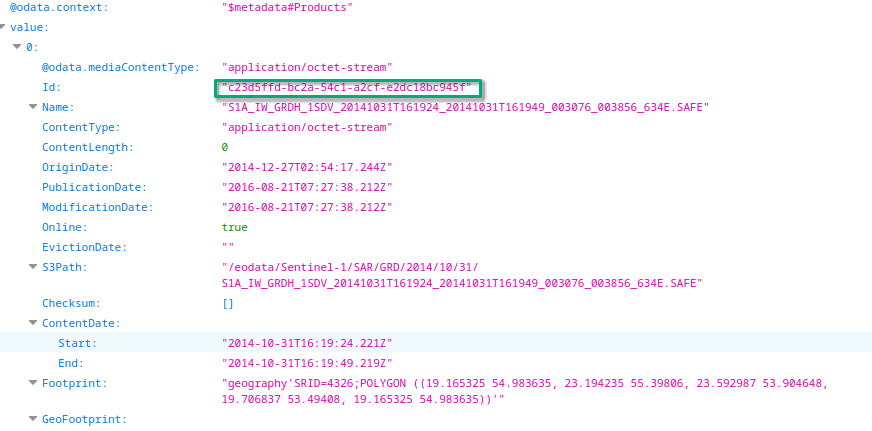
From the browser output, we see that the required ID is c23d5ffd-bc2a-54c1-a2cf-e2dc18bc945f.
Obtaining Keycloak token
For downloading products you need an authorization token (Keycloak token) as only authorized users are allowed to download Earth observation data products.
While obtaining a Keycloak token, you also get a refresh token. That refresh token can be used to generate another Keycloak token without having to provide login details again. Both Keycloak token and refresh token expire after some time.
Danger
Enter login details in Terminal window only!
In the next sections of this article, you will be entering your user name and password for the site. Always execute such commands in Terminal window and do NOT copy and paste such data into the browser!
Method 1: Outputting Keycloak token and refresh token to the terminal
To obtain a Keycloak token, execute the following command after replacing appropriate phrases as explained below.
curl --location --request POST 'https://identity.cloudferro.com/auth/realms/Creodias-new/protocol/openid-connect/token' \
--header 'Content-Type: application/x-www-form-urlencoded' \
--data-urlencode 'grant_type=password' \
--data-urlencode 'username=<USERNAME>' \
--data-urlencode 'password=<PASSWORD>' \
--data-urlencode 'client_id=CLOUDFERRO_PUBLIC' \
-d 'totp=<TOTP>' | jq '.'
In this command, replace:
<USERNAME> with your account’s e-mail address
<PASSWORD> with the password you use to login to your account
<TOTP> with the up-to-date 6-digit TOTP code (see Prerequisite No. 1 for more information)
Make sure that these credentials are passed to the shell correctly - be mindful of any characters like single quotes (’) and others.
Executing this command should give the progress report from curl and a JSON data structure:
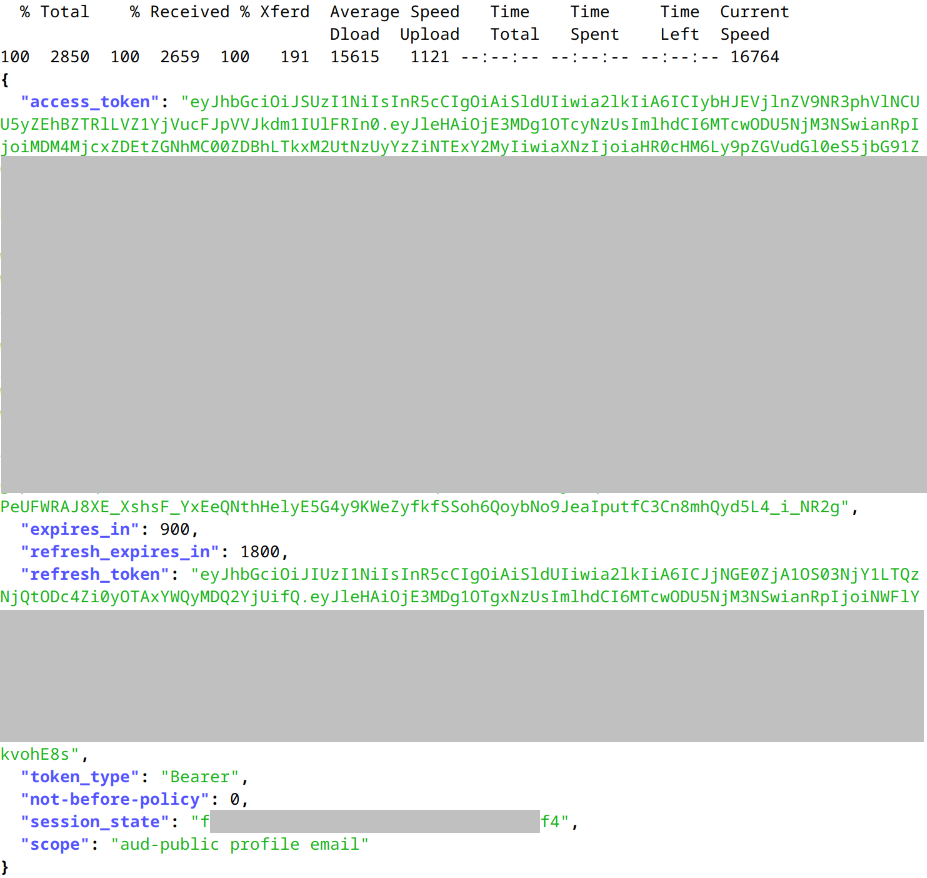
In that JSON data structure:
The value of key access_token contains your Keycloak token, which can be used to download EODATA products.
The value of key refresh_token contains your refresh token, which can be used to regenerate your Keycloak token.
The output contains values for keys expires_in and refresh_expires_in, which define after how many seconds will the Keycloak token and refresh token expire. The default values are 900 and 1800 seconds since their creation, respectively.
To learn how to use refresh token to generate a new Keycloak token, see Method 4 below.
Method 2: Assigning Keycloak token to a variable
If you don’t want to copy your Keycloak token manually, you can assign it to a shell variable and later on use it to download EODATA products. In this example, we will save it to a variable named ACCESS_TOKEN.
Execute this command after replacing values as explained below:
ACCESS_TOKEN=$(curl --location --request POST 'https://identity.cloudferro.com/auth/realms/Creodias-new/protocol/openid-connect/token' \
--header 'Content-Type: application/x-www-form-urlencoded' \
--data-urlencode 'grant_type=password' \
--data-urlencode 'username=<USERNAME>' \
--data-urlencode 'password=<PASSWORD>' \
--data-urlencode 'client_id=CLOUDFERRO_PUBLIC' -d 'totp=<TOTP>' | jq -r '.access_token')
In this command, replace:
<USERNAME> with your account’s e-mail address
<PASSWORD> with the password you use to login to your account
<TOTP> with the up-to-date 6-digit TOTP code (see Prerequisite No. 1 for more information)
To test whether the script was successful, view the contents of variable ACCESS_TOKEN
echo $ACCESS_TOKEN
Your Keycloak token should be displayed. It should contain lots of random characters.
Method 3: Assigning Keycloak token to one variable and the refresh token to another variable
This section describes a sequence of Bash commands which can be used to save Keycloak token to variable ACCESS_TOKEN and refresh token to variable REFRESH_TOKEN. Variable data will be used to keep the JSON structure for further processing.
Copy this command and paste it to your terminal - do not execute it yet.
data=$(curl --location --request POST 'https://identity.cloudferro.com/auth/realms/Creodias-new/protocol/openid-connect/token' \
--header 'Content-Type: application/x-www-form-urlencoded'
--data-urlencode 'grant_type=password'
--data-urlencode 'username=<USERNAME>'
--data-urlencode 'password=<PASSWORD>'
--data-urlencode 'client_id=CLOUDFERRO_PUBLIC' -d 'totp=<TOTP>')
In the pasted command, replace values:
<USERNAME> with your account’s e-mail address
<PASSWORD> with your account’s password
<TOTP> with the up-to-date 6-digit TOTP code
After replacing values, execute the command.
To assign your access token to variable ACCESS_TOKEN, execute this command:
ACCESS_TOKEN=$(echo $data | jq -r '.access_token')
To assign your refresh token to variable REFRESH_TOKEN, execute this command:
REFRESH_TOKEN=$(echo $data | jq -r '.refresh_token')
To check if the process was successful, check value of variable ACCESS_TOKEN:
echo $ACCESS_TOKEN
as well as value of variable REFRESH_TOKEN:
echo $REFRESH_TOKEN
Both of them should contain lots of random characters.
Method 4: Generating Keycloak token using refresh token
While following Method 1 or Method 3, you got a refresh token apart from Keycloak token. To use that refresh token to generate a new Keycloak token, execute the command below (replace <REFRESH_TOKEN> with your refresh token):
curl --location --request POST 'https://identity.cloudferro.com/auth/realms/Creodias-new/protocol/openid-connect/token' \
--header 'Content-Type: application/x-www-form-urlencoded' \
--data-urlencode 'grant_type=refresh_token' \
--data-urlencode 'refresh_token=<REFRESH_TOKEN>' \
--data-urlencode 'client_id=CLOUDFERRO_PUBLIC' | jq '.'
The output should be the same as in Method 1.
Using Keycloak token to download products
Now that you have generated your Keycloak token, you can use it to download EODATA products.
To download a product, you need to know its ID. Follow Prerequisite No. 3 to learn how to do that if you haven’t already.
Downloading full product
This section presents two example commands, each of which can be used to download full EODATA product as a ZIP archive.
To get them to work, first assign your Keycloak token to shell variable ACCESS_TOKEN as explained in section Obtaining Keycloak token above.
After that, assign the ID of the product to shell variable PRODUCT_ID. For example, if the ID of the product you want to download is c23d5ffd-bc2a-54c1-a2cf-e2dc18bc945f, execute the following command:
PRODUCT_ID=c23d5ffd-bc2a-54c1-a2cf-e2dc18bc945f
Here are the commands to download the product. As far as only the fetching of the EODATA product is concerned, they both are equivalent. They both assume that you want to save your product as product.zip in /tmp directory. If you want to choose a different destination, tweak them accordingly.
curl -H "Authorization: Bearer $ACCESS_TOKEN" \
"https://datahub.creodias.eu/odata/v1/Products($PRODUCT_ID)/\$value" \
--location-trusted \
--output /tmp/product.zip
wget  --header "Authorization: Bearer $ACCESS_TOKEN" \
"https://datahub.creodias.eu/odata/v1/Products($PRODUCT_ID)/\$value" \
-O /tmp/product.zip
The screenshot below contains the example workflow for curl. First, the ID of the product was assigned to variable PRODUCT_ID. After that, curl command was executed to download the product. Finally, the presence of downloaded file was verified using ls -la command.

Downloading single file
You can also download a single file in its original form (not compressed to a ZIP archive) from a product, without downloading the whole product.
First, find the link to the node for the file you wish to download.
To do that, first access the following URL (for example using Mozilla Firefox):
https://datahub.creodias.eu/odata/v1/Products(<PRODUCT_ID>)/Nodes
where <PRODUCT_UUID> is the ID of the product obtained by search query. To learn how to obtain it, see Prerequisite No.3.
If you want to use the Linux command line (tools like, say, curl) to see the contents of these links, make sure that they are passed to the shell correctly - be mindful of special characters like brackets. You should also be able to access many of OData URLs (excluding the ones that require things like authentication) via Internet browser like Firefox.
The output of link above should give, among others, the key uri and its value. You can use the link stored in that value to enter the root directory of your product.
After accessing that link you should see a list (as values of uri keys) of files and folders found in the root directory of the product.
You can access these further links to go further down the directory structure of the product.
Basically, you will be “walking” through the following URL patterns:
https://datahub.creodias.eu/odata/v1/Products(<PRODUCT_UUID>)/Nodes
https://datahub.creodias.eu/odata/v1/Products(<PRODUCT_UUID>)/Nodes(<NODE_NAME>)/Nodes
https://datahub.creodias.eu/odata/v1/Products(<PRODUCT_UUID>)/Nodes(<NODE_NAME>)/Nodes(<NODE_NAME>)/Nodes
where
- <PRODUCT_UUID>
is ID of the product and
- <NODE_NAME>
is name of element (regular file or directory) inside product, as returned from previous listing response.
While exploring the product, only elements (nodes) that represent folders can have their contents listed. If a folder is empty, you will receive this output:
{"result":[]}
Attempting to list a Node for a regular file also returns this result.
However, if such a link to a Node for a regular file is appropriately modified, that file can be downloaded to your computer in its original form (not packaged in, say, a ZIP archive).
To download such a file, replace the last word of the link - Nodes - with the phrase $value (but only that word). Then, assuming that:
the variable ACCESS_TOKEN contains your Keycloak token and
you want to save your file in your current working directory as quick-look.png,
you can use the following curl or wget commands to download the file (replace <link> with the download link you just created):
curl  -H "Authorization: Bearer $ACCESS_TOKEN" '<link>' \
--location-trusted \
--output quick-look.png
wget  --header "Authorization: Bearer $ACCESS_TOKEN" '<link>' \
--output-document quick-look.png
Example
Let's assume that we want to download the file called quick-look.png which is located in directory preview of product S1A_IW_GRDH_1SDV_20141031T161924_20141031T161949_003076_003856_634E.SAFE.First, we need to obtain the ID of the product. As demonstrated in Prerequisite No. 3, the link to enter into the browser would be:
https://datahub.creodias.eu/odata/v1/Products?$filter=Name eq 'S1A_IW_GRDH_1SDV_20141031T161924_20141031T161949_003076_003856_634E.SAFE'
The output is a JSON data structure. The ID of the product you are looking for is the value of key Id. The screenshot below contains this URL opened in Mozilla Firefox, with product ID marked with a rectangle:

As you can see in the output, the ID of the product is c23d5ffd-bc2a-54c1-a2cf-e2dc18bc945f (value of JSON key Id).
Since the ID of the product we are working on is c23d5ffd-bc2a-54c1-a2cf-e2dc18bc945f, the link used for exploring that product will be:
https://datahub.creodias.eu/odata/v1/Products(c23d5ffd-bc2a-54c1-a2cf-e2dc18bc945f)/Nodes
Accessing that URL should give this output:
{
  "result": [
    {
      "Id":"S1A_IW_GRDH_1SDV_20141031T161924_20141031T161949_003076_003856_634E.SAFE",
      "Name":"S1A_IW_GRDH_1SDV_20141031T161924_20141031T161949_003076_003856_634E.SAFE","ContentLength": 0,
      "ChildrenNumber": 6,
      "Nodes": {
        "uri": "https://download.dataspace.copernicus.eu/odata/v1/Products(c23d5ffd-bc2a-54c1-a2cf-e2dc18bc945f)/Nodes(S1A_IW_GRDH_1SDV_20141031T161924_20141031T161949_003076_003856_634E.SAFE)/Nodes"
      }
    }
  ]
}
Access the only uri address visible in output above, which is:
https://download.dataspace.copernicus.eu/odata/v1/Products(c23d5ffd-bc2a-54c1-a2cf-e2dc18bc945f)/Nodes(S1A_IW_GRDH_1SDV_20141031T161924_20141031T161949_003076_003856_634E.SAFE)/Nodes
You should now see the list of items from the root directory of the product.
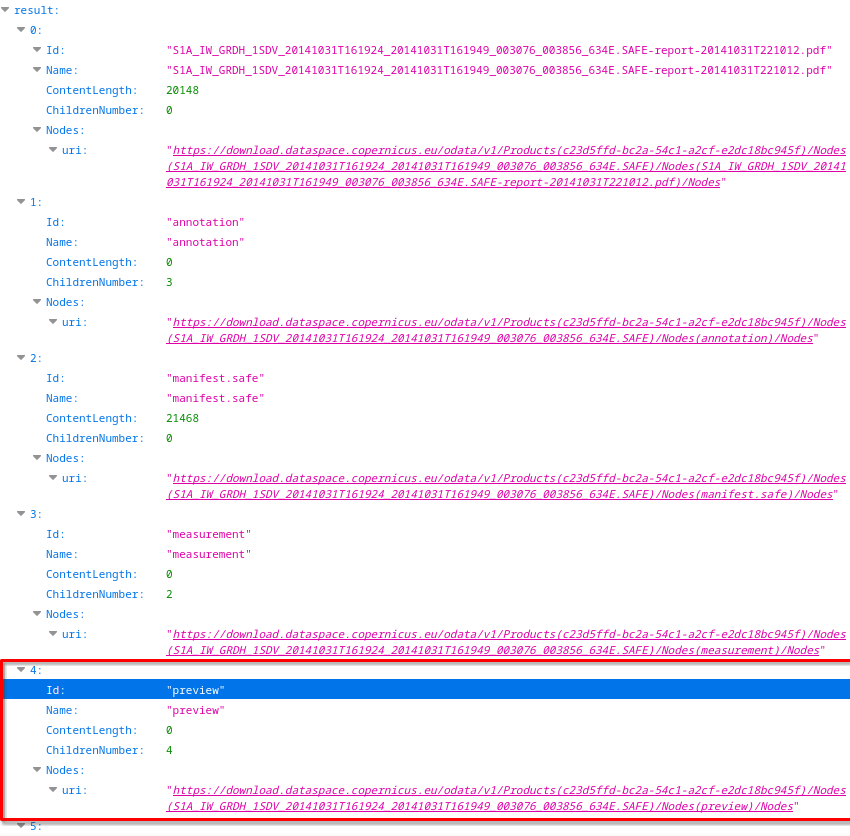
We shall concentrate only on the one marked with a red rectangle:
"preview"
Name     "preview"
ContentLength    0
ChildrenNumber   4
Nodes
uri      "https://download.dataspace.copernicus.eu/odata/v1/Products(c23d5ffd-bc2a-54c1-a2cf-e2dc18bc945f)/Nodes(S1A_IW_GRDH_1SDV_20141031T161924_20141031T161949_003076_003856_634E.SAFE)/Nodes(preview)/Nodes"
To list the contents of directory, access the following link visible in the output above:
https://download.dataspace.copernicus.eu/odata/v1/Products(c23d5ffd-bc2a-54c1-a2cf-e2dc18bc945f)/Nodes(S1A_IW_GRDH_1SDV_20141031T161924_20141031T161949_003076_003856_634E.SAFE)/Nodes(preview)/Nodes
Here is what that output looks like:
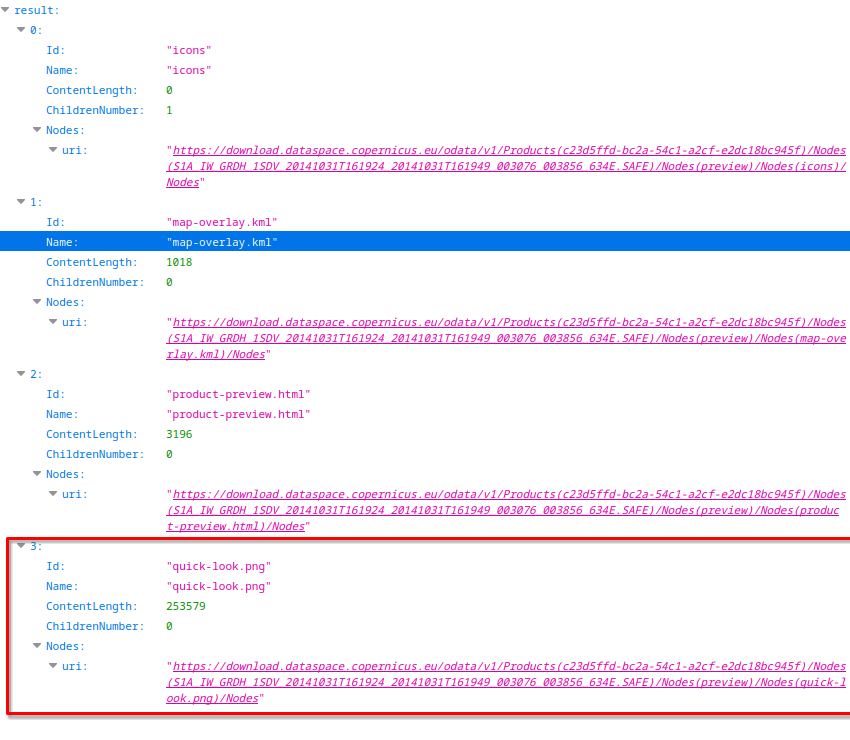
Click on the link in the red rectangle and that result is zero:

The link is
https://download.dataspace.copernicus.eu/odata/v1/Products(c23d5ffd-bc2a-54c1-a2cf-e2dc18bc945f)/Nodes(S1A_IW_GRDH_1SDV_20141031T161924_20141031T161949_003076_003856_634E.SAFE)/Nodes(preview)/Nodes(quick-look.png)/Nodes
That is the direct link to the image that we want to download. Note that it contains word Nodes in the end; to create the link for download, replace this final word with the phrase $value (but only that word):
https://download.dataspace.copernicus.eu/odata/v1/Products(c23d5ffd-bc2a-54c1-a2cf-e2dc18bc945f)/Nodes(S1A_IW_GRDH_1SDV_20141031T161924_20141031T161949_003076_003856_634E.SAFE)/Nodes(preview)/Nodes(quick-look.png)/$value
Now you can use this link to download that file. Note that you have been using browser to discover the links but in order to use curl and wget for downloading, enter the Terminal window again.
Assuming that:
the variable ACCESS_TOKEN contains your Keycloak token and
you want to save the downloaded file in your current working directory as quick-look.png
put the link you created above to curl or wget, as shown below, and execute the command to download the file.
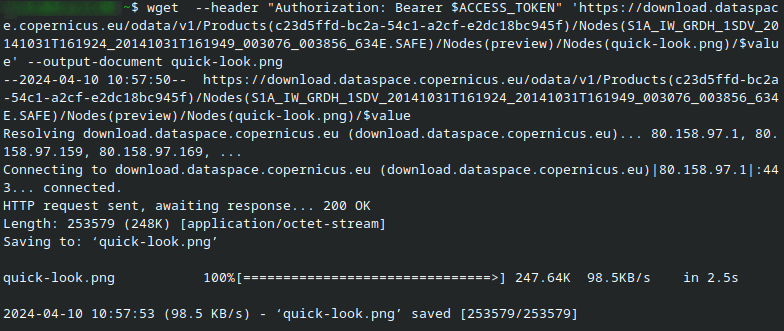
curl -H "Authorization: Bearer $ACCESS_TOKEN" 'https://download.dataspace.copernicus.eu/odata/v1/Products(c23d5ffd-bc2a-54c1-a2cf-e2dc18bc945f)/Nodes(S1A_IW_GRDH_1SDV_20141031T161924_20141031T161949_003076_003856_634E.SAFE)/Nodes(preview)/Nodes(quick-look.png)/$value' --location-trusted --output quick-look.png
wget --header "Authorization: Bearer $ACCESS_TOKEN" 'https://download.dataspace.copernicus.eu/odata/v1/Products(c23d5ffd-bc2a-54c1-a2cf-e2dc18bc945f)/Nodes(S1A_IW_GRDH_1SDV_20141031T161924_20141031T161949_003076_003856_634E.SAFE)/Nodes(preview)/Nodes(quick-look.png)/$value' --output-document quick-look.png
After executing one of these commands, the file should be downloaded.
Here is what it looks like in terminal window (for curl):

wget is a bit wordier:
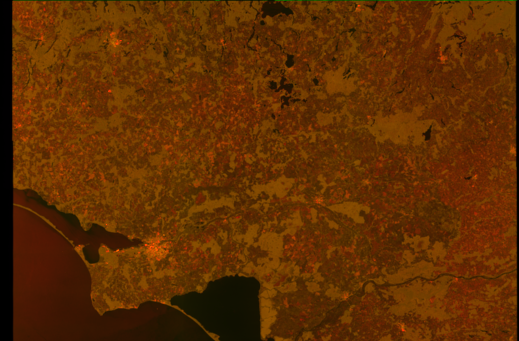
This is the image that was downloaded:
Downloading file from link obtained by using option $expand=Locations
The OData catalogue API is used for searching products in the Creodias EODATA catalogue.
One of attributes available within this API is called Locations. It contains locations, which are not, say, places in which the products were taken. Locations are URLs which can be used to download different forms of products - Compressed and/or Extracted.
You can learn more from article mentioned in Prerequisite No. 3 entitled EOData Catalogue API Manual.
If you simply entered one of these URLs to your Internet browser, you would get Forbidden error and you would not be able to download products.
To download a product using this link, you need to prove your identity using a Keycloak token, like you did in previous examples.
This section covers an example workflow which involves downloading a sample product using this type of link.
Let’s assume that we want to search for products which:
are from Sentinel-1 collection
have a name that contains phrase RAW
are ordered by starting sensing date
and to display locations for each of them. This is how the query will look like:
The locations described above are available for each product here as value of key Locations. For the first product returned by this query they are, as of writing of this article, as follows:
"Locations": [
 {
   "FormatType": "Compressed",
   "DownloadLink": "https://datahub.creodias.eu/odata/v1/Products(51adf66f-b315-4a27-a105-5f3139f7168a)/$zip",
   "ContentLength": 1380749909,
   "Checksum": [
     {
       "Value": "7dc947fbe839466d546a7f42c6766768",
       "Algorithm": "MD5",
       "ChecksumDate": "2024-08-02T12:49:05.382000Z"
     }
   ],
   "EvictionDate": "2024-09-01T12:54:46.050Z"
 },
 {
   "FormatType": "Extracted",
   "DownloadLink": "https://datahub.creodias.eu/odata/v1/Products(51adf66f-b315-4a27-a105-5f3139f7168a)/$value",
   "ContentLength": 1380749157,
   "Checksum": [
     {
       "Value": "e5bfa4e120de189ed8628807b6f7e223",
       "Algorithm": "MD5",
       "ChecksumDate": "2024-08-02T12:55:44.417031Z"
     },
     {
       "Value": "0063e9e26519fadf959f942e13b16eef50b9cfb77265eaaa68f6ee6befdc2791",
       "Algorithm": "BLAKE3",
       "ChecksumDate": "2024-08-02T12:55:47.560142Z"
     }
   ],
   "S3Path": "/eodata/Sentinel-1/SAR/IW_RAW__0S/2024/08/02/S1A_IW_RAW__0SDV_20240802T121950_20240802T122019_055034_06B474_F143.SAFE"
 }
]
Let’s suppose that we want to download the compressed form. The URL (value of key DownloadLink) is as follows:
https://datahub.creodias.eu/odata/v1/Products(51adf66f-b315-4a27-a105-5f3139f7168a)/$zip
Generate a Keycloak token if you don’t have one or your previous one expired. Put it into $ACCESS_TOKEN variable of your shell. See section Assigning Keycloak token to a variable near the beginning of this article.
Execute the following command to download this product in its compressed form:
curl -H "Authorization: Bearer $ACCESS_TOKEN" 'https://datahub.creodias.eu/odata/v1/Products(51adf66f-b315-4a27-a105-5f3139f7168a)/$zip' --location-trusted --output S1A_IW_RAW__0SDV_20240802T121950_20240802T122019_055034_06B474_F143.SAFE.zip
As value of parameter –output, enter the name you want to give to the downloaded file. In this case, we chose the name of the product we are downloading with .zip file extension.
wget --header "Authorization: Bearer $ACCESS_TOKEN" 'https://datahub.creodias.eu/odata/v1/Products(51adf66f-b315-4a27-a105-5f3139f7168a)/$zip' --output-document S1A_IW_RAW__0SDV_20240802T121950_20240802T122019_055034_06B474_F143.SAFE.zip
As value of parameter –output-document, enter the name you want to give to the downloaded file. In this case, we chose the name of the product we are downloading with .zip file extension.
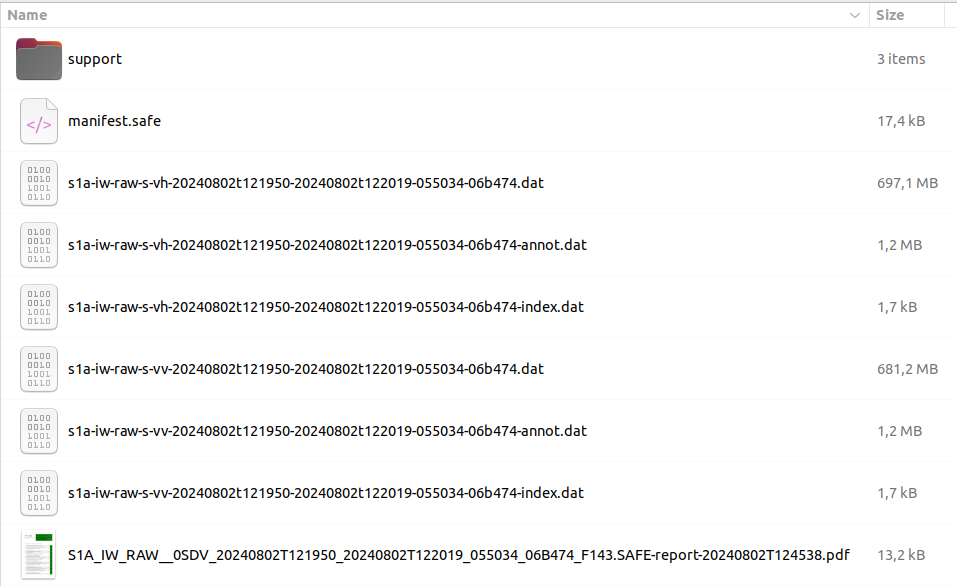
A .zip archive should be downloaded. This is how it looks like when open in the Nautilus file manager for Linux:

This archive should contain one folder:

This folder should have the following content:
Troubleshooting
If the Keycloak token expired, the download will fail.

In that case, generate the token again and use the new token before it expires.
What To Do Next
To obtain a Keycloak token and use it to download a product without having to enter the 6-digit TOTP code manually, you can use Bash or Python: