Accessing OpenStack Resources from Creodias Managed Kubernetes Using Shared Networks
Creodias relies on OpenStack to manage cloud infrastructure, meaning:
you can create and control OpenStack resources, e.g., Virtual Machines using its
two main interfaces: Horizon GUI and the OpenStack CLI.
In Creodias Managed Kubernetes, the node pools are managed separately and provisioned outside the scope of your OpenStack project. Still, these node pools can access your OpenStack project resources via a private network connection — without routing the traffic over the public Internet. This enhances security, reduces latency, and avoids unnecessary bandwidth costs.
This article explains how such a connection can be set up from Creodias Managed Kubernetes node pools utilizing the Shared Networks feature.
Note
To use the Shared Networks feature, both the Creodias Managed Kubernetes cluster and your OpenStack project with the accessed resource must be in the same region (currently only WAW4-1).
What We Are Going To Cover
Prerequisites
No. 1 Hosting account on Creodias
To use Creodias Managed Kubernetes, you need your
general Creodias account as well as the link to
https://managed-kubernetes.creodias.eu to access the dashboard.
No. 2 – Created a managed Kubernetes cluster
Follow the guide How to create a Kubernetes cluster using the Creodias Managed Kubernetes launcher GUI to create a cluster.
By the end of that guide, you should have a working Kubernetes cluster called networktest, and both the openstack and kubectl commands should be available. We also assume you know how to create node pools for a given managed Kubernetes cluster.
No. 3 – Launch a new VM
You will need a VM in your OpenStack project. This VM will be used to test the incoming connection from a pod on your Creodias Managed Kubernetes cluster’s node pool. Use the guide How to create a VM using the OpenStack CLI client on Creodias cloud.
No. 4 – OpenStack networks
This article builds upon basic OpenStack networking concepts. For a primer, see:
How to create a network with router in Horizon Dashboard on Creodias
For brevity, in this article we will use OpenStack CLI commands to create the network.
Step 1: Create network
Create the network:
openstack network create networktest_shared_network
Create its subnet:
openstack subnet create \
  --network networktest_shared_network \
  --subnet-range 192.168.168.0/24 \
  --gateway 192.168.168.1 \
  --dns-nameserver 8.8.8.8 \
  networktest_shared_subnet_168
Get the network ID:
openstack network show networktest_shared_network -f value -c id
Example output (your value will differ):
7ed0f1e1-29b8-4917-b96f-abe7b3024869
Store this value in an environment variable for use in later steps:
export NETWORK_ID=7ed0f1e1-29b8-4917-b96f-abe7b3024869
Warning
The NETWORK_ID and SOURCE_ID shown in this guide are example values. You must retrieve and use your own IDs throughout the steps.
Create a Security Group for Testing
We need to ensure that the VM allows incoming traffic such as ping, SSH, and optionally RDP for remote desktop testing. We need a security group that will allow at least ping.
Check whether there already is a security group allowing ping traffic, and if there is, just use it in the rest of the article.
Otherwise, create a new security group called allow_ping_ssh_icmp_rdp. Execute the following commands to create it:
openstack security group create allow_ping_ssh_icmp_rdp \
  --description "Allow ping, SSH, ICMP, and RDP"

openstack security group rule create --protocol tcp --dst-port 22 allow_ping_ssh_icmp_rdp

openstack security group rule create --protocol tcp --dst-port 3389 allow_ping_ssh_icmp_rdp

openstack security group rule create --protocol icmp allow_ping_ssh_icmp_rdp
Note
You need to create a new security group such as allow_ping_ssh_icmp_rdp only once.
This security group is now ready to be used with any VM to allow basic testing and remote access capabilities. We will use it in the next step when creating the test VM.
Step 2: Create a VM, associating that network
Create the VM using the saved network. It is important that this VM accepts incoming ICMP traffic so it can respond to ping requests:
openstack server create \
  --image "Ubuntu 22.04 LTS" \
  --flavor eo1a.small \
  --key-name sshkey \
  --network $NETWORK_ID \
  --security-group default \
  --security-group allow_ping_ssh_icmp_rdp \
  test-shared-vm
To retrieve the internal IP address of the VM (which will be used for testing later), run:
openstack server show test-shared-vm -c addresses -f value
This will output the IP address assigned to your VM on the shared network, for example:
networktest_shared_network=192.168.168.126
Take note of this IP address — you will need it in Step 5 to test connectivity from the pod.
Step 3: Create node pool
Get the source ID of your Creodias Managed Kubernetes cluster:
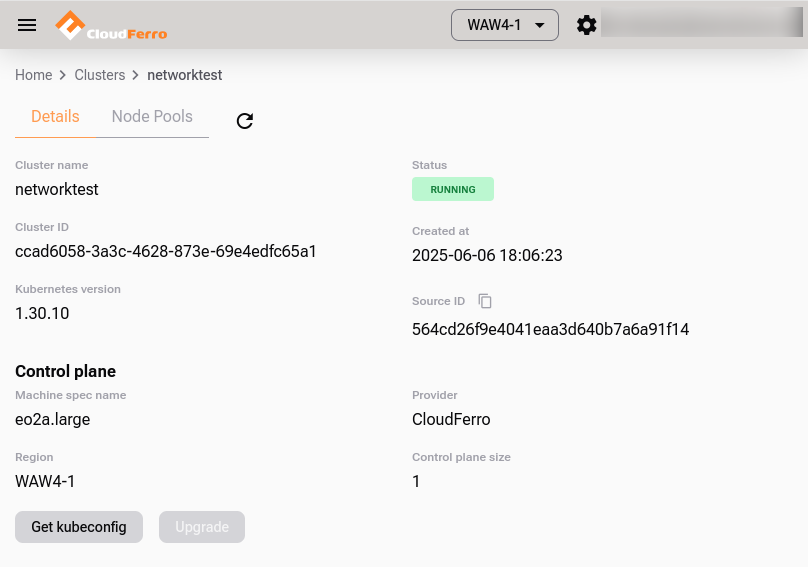
Source ID visible in the Managed Kubernetes GUI: 564cd26f9e4041eaa3d640b7a6a91f14
Save the source ID to an environment variable:
export SOURCE_ID=564cd26f9e4041eaa3d640b7a6a91f14
We will use both NETWORK_ID and SOURCE_ID to create an RBAC connection between the nodes and the stand-alone VM from above.
Create the node pool:
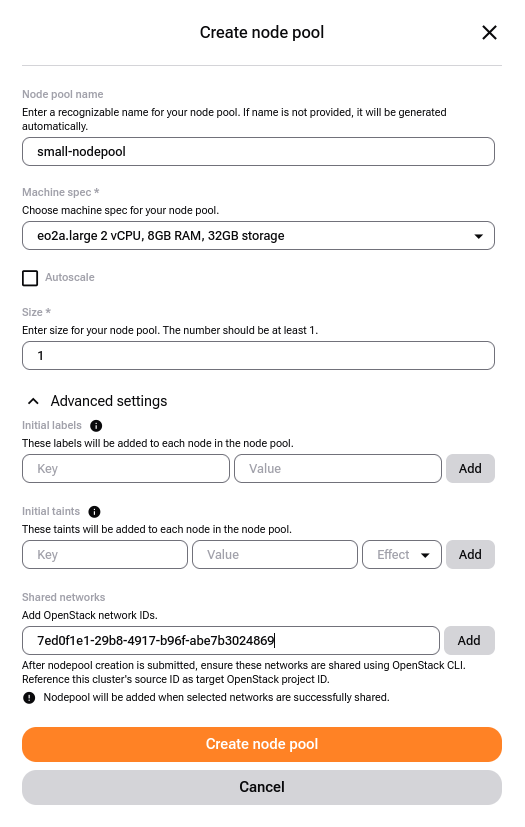
Ensure the Shared Network option is selected, and enter the exact network ID (7ed0f1e1-29b8-4917-b96f-abe7b3024869). Click Add.
You can enter multiple networks at once, one per line.
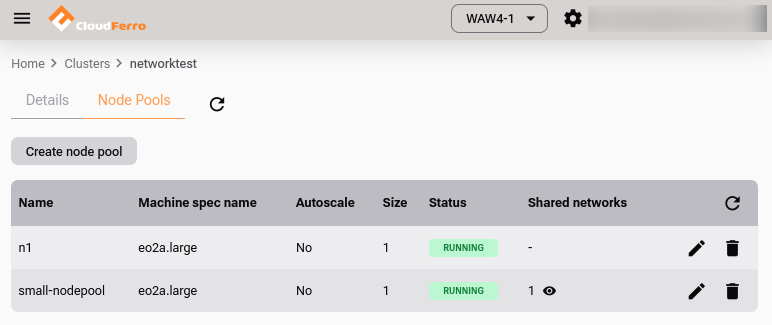
Click Create node pool. The node pool will enter the “Awaiting Network” state which means it awaits for the RBAC to be created.
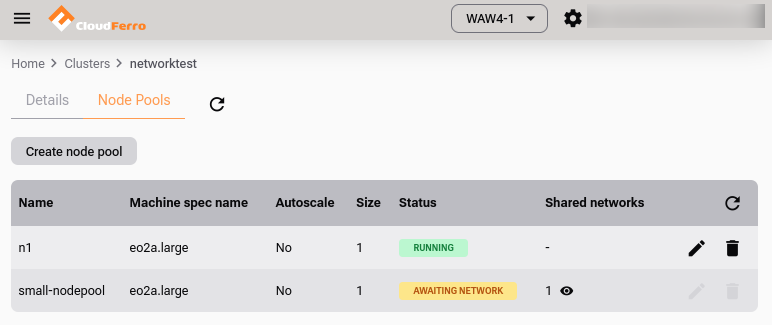
Node pool awaiting network.
Step 4: Share network via RBAC
RBAC (Role-Based Access Control) in OpenStack allows you to grant fine-grained access to specific resources, such as networks, between different projects. In our case, the node pool associated with your Creodias Managed Kubernetes cluster is deployed under a separate OpenStack project. To allow the node pool to access a private network created under your main project, we must explicitly grant it access. This is achieved by sharing the network via an RBAC policy targeted at the node pool’s project ID (SOURCE_ID).
Use the OpenStack CLI to share the network:
openstack --os-region WAW4-1 network rbac create \
  --type network \
  --action access_as_shared \
  --target-project $SOURCE_ID \
  $NETWORK_ID
Example output:
+-------------------+--------------------------------------+
| Field             | Value                                |
+-------------------+--------------------------------------+
| action            | access_as_shared                     |
| id                | 4a9f9c38-8c0c-4620-bfe6-733328c427a4 |
| object_id         | 7ed0f1e1-29b8-4917-b96f-abe7b3024869 |
| object_type       | network                              |
| project_id        | 673cfda60d7147688057d6de74e85ef4     |
| target_project_id | 564cd26f9e4041eaa3d640b7a6a91f14     |
+-------------------+--------------------------------------+
You may get a 409 Conflict if it was already shared. This is safe to ignore.
The status changes to 
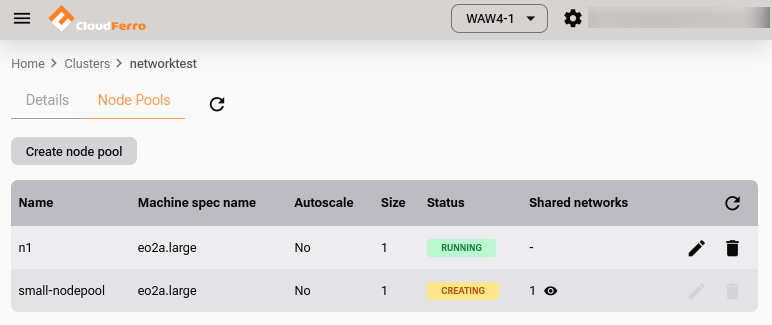
Node pool network.
Wait for status to change from to  :
:
Step 5: Test the connection
Now we will verify that your pod can reach the VM over the shared private network.
The command below creates a simple pod named alpine-sleeper using the lightweight Alpine Linux image. It instructs the pod to sleep indefinitely so that we can interact with it afterward.
kubectl run alpine-sleeper --image=alpine --restart=Never -- sleep infinity
Attach to the running pod using an interactive shell:
kubectl exec -it alpine-sleeper -- /bin/sh
From inside the pod, ping the internal IP address of your VM retrieved earlier in Step 2:
PING 192.168.168.126 (192.168.168.126): 56 data bytes
5 packets transmitted, 5 received, 0% packet loss
Clean Up the Test Pod
Once you’ve confirmed that the pod can reach the VM, you should remove the temporary pod used for testing.
Leaving unused pods running consumes resources on the node pool and can interfere with future tests. It’s a good practice to keep your cluster clean and free of artifacts after diagnostic checks.
Run the following command to delete the pod:
kubectl delete pod alpine-sleeper
What To Do Next
Use shared connectivity to:
Connect pods to VM-hosted databases or APIs
Monitor infrastructure from Kubernetes (e.g., Prometheus)
Deploy hybrid apps across VM and K8s