How to activate OpenStack CLI access to Creodias cloud using one- or two-factor authentication
Warning
Two Factor Authentication is required for all Creodias users. The only exception are accounts which log in using Keystone credentials.
One-factor and two-factor authentication for activating command line access to the cloud
To log into a site, you usually provide user name and email address during the creation of the account and then you use those same data to enter the site. You provide that data once and that is why it is called “one-factor” authentication. Two-factor authentication requires the same but considers it to be only the first step; on Creodias cloud, the second step is
to generate six-digit code using the appropriate software and then to
send it to the cloud as a means of additional certification.
Cloud parameters for authentication and, later, OpenStack CLI access, are found in a so-called RC file. This article will help you download and use it to first authenticate and then access the cloud using OpenStack CLI commands.
What We Are Going To Cover
How to download the RC file
Adjusting the name of the downloaded RC file
The contents of the downloaded RC file
How to activate the downloaded RC file
One factor authentication
Two factor authentication
Testing the connection
Resolving errors
Prerequisites
No. 1 Account
You need a Creodias hosting account with access to the Horizon interface: https://horizon.cloudferro.com/auth/login/?next=/.
No. 2 2FA
If your account has 2FA enabled (which you will recognize from the respective prompt when authenticating), you need to install and configure a piece of software which generates six-digit codes used for 2FA. To set that up, follow one of these articles, depending on the type of device you are using:
Mobile device (Android, iOS): Two-Factor Authentication to Creodias site using mobile application
Computer Two-Factor Authentication to Creodias site using KeePassXC on desktop
No. 3 OpenStackClient installed and available
Installing OpenStackClient on various platforms will also install the ability to run the .sh files. Since OpenStack is written in Python, it is recommended to use a dedicated virtual environment for the rest of this article.
- Install GitBash on Windows
Run .sh files and install OpenStackClient from a GitBash window under Windows. How to install OpenStackClient GitBash for Windows on Creodias.
- Install and run WSL (Linux under Windows)
Run .sh files and install OpenStackClient from a Ubuntu window under Windows. How to install OpenStackClient on Windows using Windows Subsystem for Linux on Creodias OpenStack Hosting.
- Install OpenStackClient on Linux
How to download the RC file
Location of the link to RC file
Click on account name
Top right corner of the Horizon screen contains the account name. Depending on the cloud you are using, you will see a menu like this:
Click on API Access
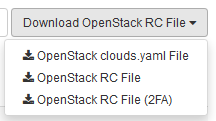
Navigate to API Access -> Download OpenStack RC File. Depending on the cloud you are using, you will see a menu like this:
WAW3-1, WAW3-2, FRA1-1 |
|
Option OpenStack clouds.yaml File is out of scope of this article.
Which OpenStack RC file to download
Choose the appropriate option, depending on the type of account:
- 2FA not active on the account
For clouds WAW3-1, WAW3-2, FRA1-1, select option OpenStack RC File.
- 2FA active on the account
Download file OpenStack RC File (2FA).
You only need one copy of the RC file at any time. If you downloaded more than one copy of the file to the same folder without moving or renaming them, your operating system may differentiate amongst the downloaded files by adding additional characters at the end of the file name.
By way of example, let the downloaded RC file name be cloud_00734_1-openrc-2fa.sh. For your convenience, you may want to
rename it and
move to the folder in which you are going to activate it.
The contents of the downloaded RC file
RC file sets up environment variables which are used by the OpenStack CLI client to authenticate to the cloud. By convention, these variables are in upper case and start with OS_: OS_TENANT_ID, OS_PROJECT_NAME etc. For example, in case of one-factor authentication, the RC file will ask for password and store it into a variable called OS_PASSWORD.
Below is an example content of an RC file which does not use 2FA:
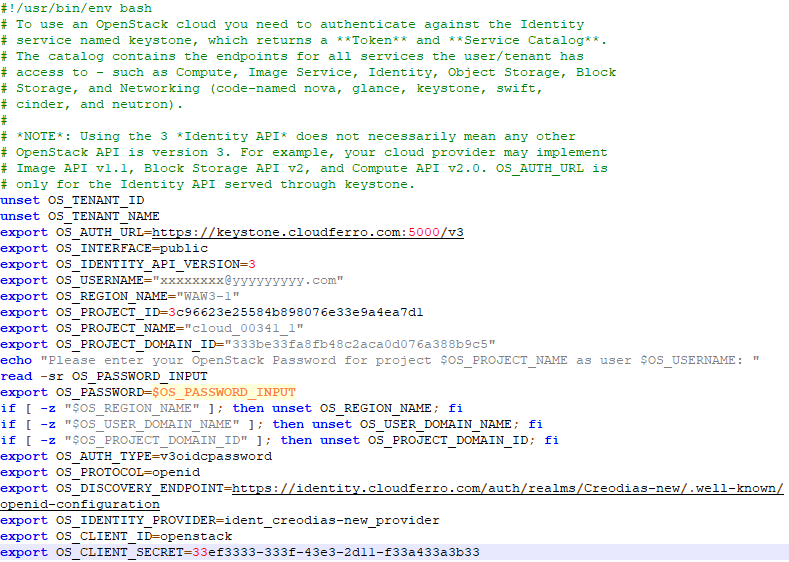
File which supports 2FA will have additional pieces of code for providing the second factor of authentication.
How to activate the downloaded RC file
The activation procedure will depend on the operating system you are working with:
- Ubuntu
Assuming you are in the same folder in which the RC file is present, use the source command:
source ./cloud_00734_1-openrc-2fa.sh
- macOS
The same source command should work on macOS. In some versions of macOS though, an alternative command zsh could serve as well:
zsh ./cloud_00734_1-openrc-2fa.sh
Note that in both cases ./ means “use the file in this very folder you already are in”.
- Windows
On Windows, to execute file with .sh extension, you must have an installed application that can run Bash files.
See Prerequisite No. 3, which describes in more detail how to run .sh files using various scenarios on Windows.
Running with one-factor authentication
The activated .sh file will run in a Terminal window (user name is grayed out for privacy reasons):

Enter the password, either by typing it in or by pasting it in the way your terminal supports it, and press Enter on the keyboard. The password will not be visible on the screen.
If your account has only one-factor authentication, this is all you need to do to start running commands from command line.
Two-factor authentication
If your file supports two-factor authentication, the terminal will first require the password, exactly the same as in case of one-factor authentication. Then you will get a prompt for the second factor, which usually comes in shape of a six-digit one-time password:

To get the six digit code, run the app that you are using for authentication. As recommended in Prerequisite No. 2, it may be
FreeOTP on mobile,
KeePassXC on desktop, or you may run
other software of your choice, or you can even write
your own Python or Bash code to generate the six digit code.
Let’s say that, for example, you are using FreeOTP on mobile device and that this is the icon you assigned to your account:
Tap on it and the six-digit number will appear:
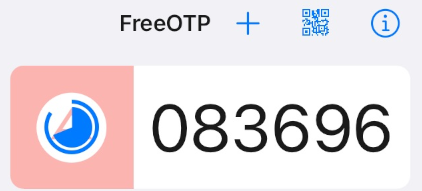
This six-digit number will be regenerated every thirty seconds. Enter the latest number into the Terminal window and press Enter on the keyboard. If everything worked correctly, after a few seconds you should return to your normal command prompt with no additional output:

Duration of life for environment variables set by sourcing the RC file
When you source the file, environment variables are set for your current shell. To prove it, open two terminal windows, source the RC file in one of them but not in the other and you won’t be able to authenticate from that second terminal window.
That is why you will need to activate your RC file each time you start a new terminal session. Once authenticated and while that terminal window is open, you can use it to issue OpenStack CLI commands at will.
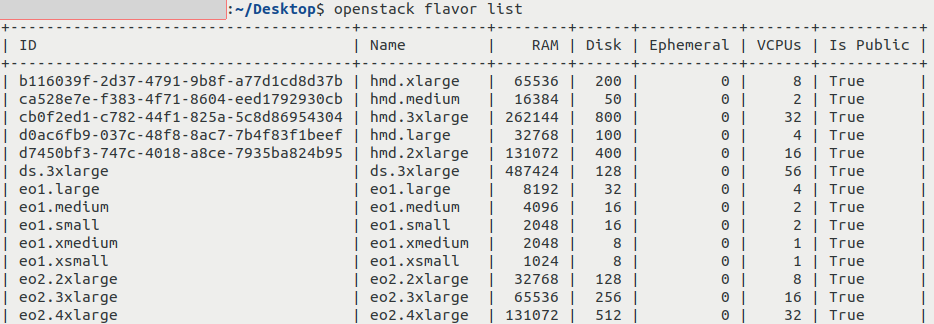
Testing the connection
If not already, install OpenStack client using one of the links in Prerequisite No 3. To verify access, execute the following command which lists flavors available in Creodias cloud:
openstack flavor list
You should get output similar to this:
Resolving errors
jq not installed
jq is an app to parse JSON input. In this context, it serves to process the output from the server. It will be installed on most Linux distros. If you do not have it installed on your computer, you may get a message like this:

To resolve, download from the official support page and follow the directions to install on your operating system.
If you are using Git Bash on Windows and running into this error, Step 6 of article on GitBash from Prerequisite 3, has proper instructions for installing jq.
2FA accounts: entering a wrong password and/or six-digit code
If you enter a wrong six-digit code, you will get the following error:
Call to Keycloak failed with code 401 and message
 {
  "error": "invalid_grant",
  "error_description": "Invalid user credentials"
}
If that is the case, simply activate the RC file again as previously and type the correct credentials.
2FA accounts: lost Internet connection
Activating a 2FA RC file requires access to Creodias account service because it involves not only setting variables, but also obtaining an appropriate token.
If you do not have an Internet connection, you will receive the following output after having entered a six-digit code:
Call to Keycloak failed with code 000 and message
It will be followed by an empty line and you will be returned to your command prompt.
To resolve this issue, please connect to the Internet and try to activate the RC file again. If you are certain that you have Internet connection, it could mean that Creodias account service is down. If no downtime was announced for it, please contact Creodias customer support: Helpdesk and Support
Non-2FA accounts: entering a wrong password
If your account does not have two-factor authentication and you entered a wrong password, you will not get an error. However, if you try to execute a command like openstack flavor list, you will get the error similar to this:
The request you have made requires authentication. (HTTP 401) (Request-ID: xxxxxxxxxxxxxxxxxxxxxxxxxxxxxxxxxxxxxxxx)
Instead of x characters, you will see a string of characters.
To resolve, activate your file again and enter the correct password.
Using the wrong file
If you have a 2FA authentication enabled for your account but have tried to activate the non-2FA version of the RC file, executing, say, command openstack flavor list, will give you the following error:
Unrecognized schema in response body. (HTTP 401)
If that is the case, download the correct file if needed and use it.
What To Do Next
With the appropriate version of RC file activated, you should be able to create and use
instances,
volumes,
networks,
Kubernetes clusters
and, in general, use all OpenStack CLI commands.
For example, if you want to create a new virtual machine, you can follow this article:
How to create a VM using the OpenStack CLI client on Creodias cloud
If you want your new virtual machine to be based on an image which is not available on Creodias cloud, you will need to upload it. The following article contains instructions how to do it:
How to upload your custom image using OpenStack CLI on Creodias