Generating and authorizing Terraform using Keycloak user on Creodias
Clicking in Horizon and entering CLI commands are two main ways of using an OpenStack system. They are well suited to interactively executing one command at a time but do not scale up easily. A tool such as Terraform, by HashiCorp corporation, provides an alternative to manual ways of introducing cascading changes. Here is how you could, say, create several instances at once:
Define parameters for the creation of one instance,
save them in a Terraform configuration file and
let Terraform automatically repeat it the prescribed number of times.
The plan is to install Terraform, get OpenStack token, enter it into the configuration file and execute. You will then be able to effectively use Terraform within the Creodias cloud. For instance, with Terraform you can
automate creation of a multitude of virtual machines, each with their own floating IPs, DNS and network functions or
automate creation of Kubernetes clusters
and so on.
What We Are Going To Do
Install Terraform as a root user
Reconnect to the cloud
Download OpenStack token
Set up the configuration file and initialize Terraform
Create Terraform code
Explain the meaning of the variables used
Execute the Terraform script
Prerequisites
No. 1 Account
You need a Creodias hosting account with access to the Horizon interface: https://horizon.cloudferro.com/auth/login/?next=/. In particular, you will need the password for the account so have it ready in advance.
No. 2 Installed version of Linux
You can use your current Linux installation, however, in this article we shall start with a clean slate. Create a new VM with Ubuntu as defined in this article:
How to create a Linux VM and access it from Linux command line on Creodias.
No. 3 Installed OpenStackClient for Linux
To get token from the cloud, you will first need to enable access from the Ubuntu VM you just created:
How to install OpenStackClient for Linux on Creodias
It will show you how to install Python, create and activate a virtual environment, and then connect to the cloud by downloading and activating the proper RC file from the Creodias cloud.
No. 4 Connect to the cloud via an RC file
Another article, How to activate OpenStack CLI access to Creodias cloud using one- or two-factor authentication, deals with connecting to the cloud and is covering either of the one- or two-factor authentication procedures that are enabled on your account. It also covers all the main platforms: Linux, MacOS and Windows.
You will use both the Python virtual environment and the downloaded RC file after Terraform has been installed.
Step 1 Install Terraform as a root user
Install the required dependencies using the following command:
sudo apt-get install wget curl unzip software-properties-common gnupg2 -y
Download and add the HashiCorp signed gpg keys to your system. To perform this action, first enter root mode:
sudo su # Enter root mode
curl -fsSL https://apt.releases.hashicorp.com/gpg | apt-key add -
Add the HashiCorp repository to the APT:
sudo apt-add-repository "deb [arch=$(dpkg --print-architecture)] https://apt.releases.hashicorp.com $(lsb_release -cs) main"

The following commands will update Ubuntu, install Terraform and check its version:
apt-get update -y            #update Ubuntu
apt-get install terraform -y # install Terraform
terraform -v                 # check the version
Now exit root mode and become the standard eouser again.
su eouser # Exit root mode
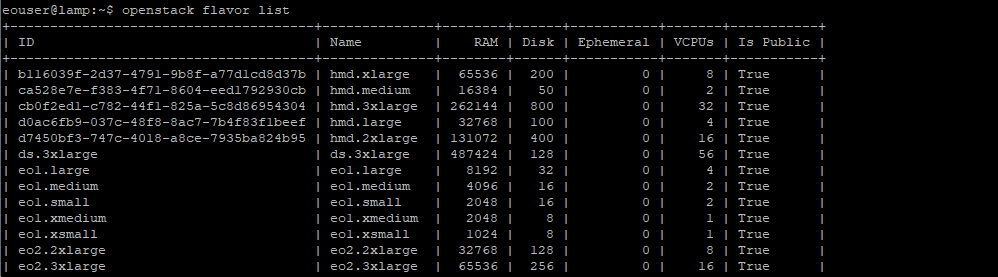
Step 2 Reconnect to the cloud
Working through Prerequisites Nos. 2 and 3, you ended up being connected up to the cloud. That connection is now lost because you have switched to root user and back again, to the normal eouser for the Creodias cloud. Refer to Prerequisite No. 4 Activate the RC file to reconnect to the cloud again. The following command will act as a test:
openstack flavor list
and should present a start of a list of flavors available in the system:
You are now ready to receive token from the cloud you are working with. The “token” is actually a very long string of characters which serves as kind of password for your code.
Step 3 Download OpenStack token
Get token with the following command:
openstack token issue -f shell -c id
This is the result:
id="gAAAAABj1VTWP_CFhfKv4zWVH7avFUnHYf5J4TvuKG_Md1EdSpBIBZqTVErqVNWCnO-kYq9D7fi33aRCABadsp23-e-lrDFwyZGkfv-d83UkOTsoIuWogupmwx-3gr4wPcsikBvkAMMBD0-XMIkUONAPst6C35QnztSzZmVSeuXOJ33DaGr6yWbY-tNAOpNsk0C9c13U6ROI"
Value of variable id is the token you need. Copy and save it so that you can enter it into the configuration file for Terraform.
Step 4 Set up the configuration file and initialize Terraform
Create new directory where your Terraform files will be stored and switch to it:
mkdir terraform-dir # Name it as you want
cd terraform-dir
Create configuration file, yourconffile.tf, and open it in text editor. Here we use nano:
sudo nano yourconffile.tf # Name it as you want
Paste the following into the file:
# Configure the OpenStack Provider
     terraform {
       required_providers {
             openstack = {
               source = "terraform-provider-openstack/openstack"
             }
       }
     }
Save the file (for Nano, use Ctrl-X and Y).
These commands inform Terraform it will work with OpenStack.
Use the following command to initialize Terraform:
terraform init
Terraform will read yourconffile.tf file from the current folder. The actual name does not matter as long as it is the only .tf file in the folder.
You can, of course, use many other .tf files such as
main.tf for the main Terraform program,
variable.tf to define variables
and so on.
The screen after initialization would look like this:
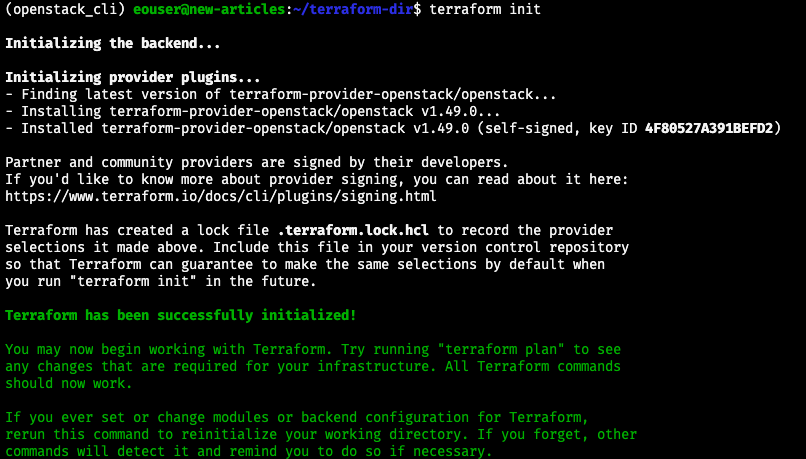
Terraform has been initialized and is working properly with your OpenStack cloud. Now add code to perform some useful tasks.
Note
In examples that follow, we use two networks, one with name starting with cloud_ and the name of the other starting with eodata_. The former network should always be present in the account, but the latter may or may not present. If you do not have network which name starts with eodata_, you may create it or use any other network that you already have and want to use.
Step 5 Create Terraform code
Append code to the contents of the yourconffile.tf. It will generate four virtual machines as specified in the value of variable count. The entire file yourconffile.tf should now look like this:
# Configure the OpenStack Provider
terraform {
  required_providers {
        openstack = {
          source = "terraform-provider-openstack/openstack"
        }
  }
}

provider "openstack" {
          user_name = "absdefr@xxyyzz23.com"
          tenant_name = "cloud_00aaa_1"
          auth_url = "https://keystone.cloudferro.com:5000/v3"
          domain_name = "cloud_00aaa_1"
          token = "gAAAAABj1VTWP_CFhfKv4zWVH7avFUnHYf5J4TvuKG_Md1EdSpBIBZqTVErqVNWCnO-kYq9D7fi33aRCABadsp23-e-lrDFwyZGkfv-d83UkOTsoIuWogupmwx-3gr4wPcsikBvkAMMBD0-XMIkUONAPst6C35QnztSzZmVSeuXOJ33DaGr6yWbY-tNAOpNsk0C9c13U6ROI"
          }

resource "openstack_compute_instance_v2" "test-terra" {
count = 4
name = "test-instance-${count.index}"
image_id = "d7ba6aa0-d5d8-41ed-b29b-3f5336d87340"
flavor_id = "eo2.medium"
security_groups  = [
"default", "allow_ping_ssh_icmp_rdp" ]
network {
name = "eodata_00aaa_3"
}
network {
name = "cloud_00aaa_3"
}
}
Always use the latest value of image id
From time to time, the default images of operating systems in the Creodias cloud are upgraded to the new versions. As a consequence, their image id will change. Let’s say that the image id for Ubuntu 20.04 LTS was 574fe1db-8099-4db4-a543-9e89526d20ae at the time of writing of this article. While working through the article, you would normally take the current value of image id, and would use it to replace 574fe1db-8099-4db4-a543-9e89526d20ae throughout the text.
Now, suppose you wanted to automate processes under OpenStack, perhaps using Heat, Terraform, Ansible or any other tool for OpenStack automation; if you use the value of 574fe1db-8099-4db4-a543-9e89526d20ae for image id, it would remain hardcoded and once this value gets changed during the upgrade, the automated process may stop to execute.
Warning
Make sure that your automation code is using the current value of an OS image id, not the hardcoded one.
The meaning of the variables used
The meaning of the variables used is as follows:
- user_name
User name with which you log in into the Creodias account. You can use email address here as well.
- tenant_name
Starts with cloud_00. You can see it in the upper left corner of the Horizon window.
- domain_name
If you have only one project in the domain, this will be identical to the tenant_name from above.
- token
The id value you got from command openstack token issue.
- count
How many times to repeat the operation (in this case, four new virtual machines to create)
- name
The name of each VM; here it is differentiated by adding an ordinal number at the end of the name, for example, test-instance-1, test-instance-0, test-instance-2, test-instance-3.
- image_id
The name or ID code for an operating systems image you get with command Compute -> Images. For example, if you choose Ubuntu 20.04 LTS image, its ID is d7ba6aa0-d5d8-41ed-b29b-3f5336d87340.
- flavor_id
Name of the flavor that each VM will have. You get these names from command openstack flavor list.
- security_groups
Here, it is an array of two security groups – default and allow_ping_ssh_icmp_rdp. These are the basic security groups that should be used as a start for all VMs.
- network
Name of the network to use. In this case, we include network eodata_00aaa_3 for eodata and cloud_00aaa_3 for general communication within the cloud.
Step 6 Execute the Terraform script
Here is how Terraform will create four instances of Ubuntu 20.04 LTS. Command apply will execute the script; when asked for confirmation to proceed, type yes to start the operation:
terraform apply
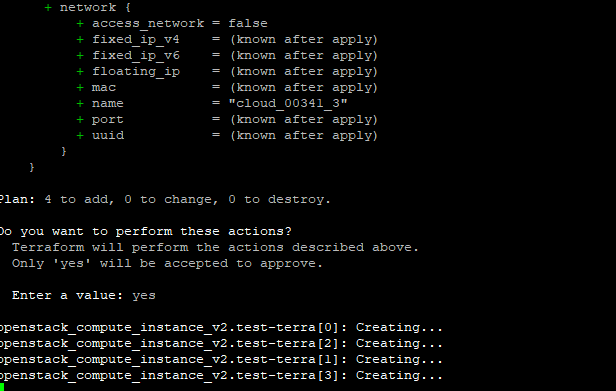
Type
yes
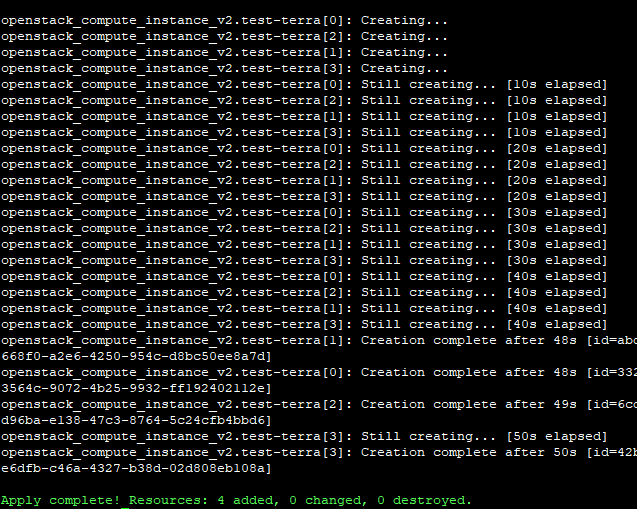
It will create four VMs as defined by variable count.
You should see output similar to this:
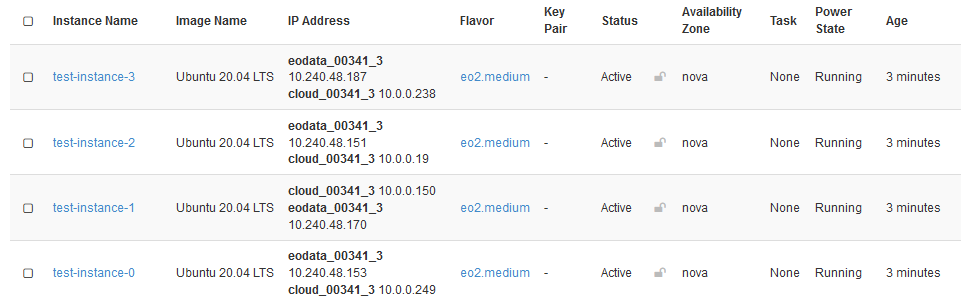
This is how you would see those virtual machines in Horizon:
If you wanted to revert the actions, that is, delete the VMs you have just created, the command would be:
terraform destroy
Again, type yes to start the operations.
What To Do Next
Of particular interest would be the following CLI commands for Terraform:
- plan
Shows what changes Terraform is going to apply for you to approve.
- validate
Check whether the configuration is valid.
- show
Show the current state or a saved plan.
Use command
terraform -help
to learn other commands Terraform can offer.
What To Do Next
Article How to create a set of VMs using OpenStack Heat Orchestration on Creodias uses orchestration capabilities of OpenStack to automate creation of virtual machines. It is a different approach compared to Terraform but both can lead to automation under OpenStack.